4.4. Display One Record at a Time
Note: The GridView control comes with the companion DetailsView control, which displays one record at a time.
Besides the GridView control, there is another new control that is similar to it but presents a slightly different view. Instead of displaying multiple records on one page, the DetailsView control displays one record at a time. The DetailsView control is located in the Toolbox on the Data tab (see Figure 4-33). Figure 4-33. The DetailsView control 
4.4.1. How do I do that? To see how the DetailsView control differs from the GridView control, you will replace the GridView control created in the previous lab with a DetailsView control. You will also see how the DetailsView control allows new records to be inserted into the database, which is not allowed in the GridView control. Using the project created in the previous lab, replace the GridView control with the DetailsView control in the default form. Apply the Mocha theme to the DetailsView control (via the Auto Format... link in the DetailsView Tasks menu). In the DetailsView Tasks menu, select SqlDataSource2 as its data source and select the following checkboxes (see Figure 4-34): Enable Paging Enable Inserting Enable Editing Enable Deleting
The checkboxes available are dependent on how the data source is configured. For example, Enable Editing and Enable Deleting are available only if the data source that is being used supports them. If you have configured your data source to support Inserting as well, there is also an Enable Inserting checkbox. Figure 4-34. Enabling the DetailsView control for paging, inserting, editing, and deleting 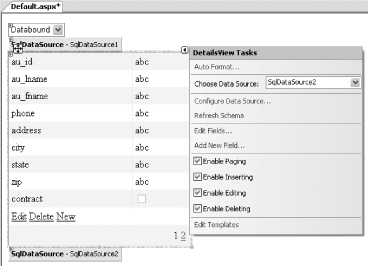
Press F5 to test the application. Figure 4-35 shows the DetailsView in action. You can also edit and insert new records. Figure 4-35. Using the DetailsView control 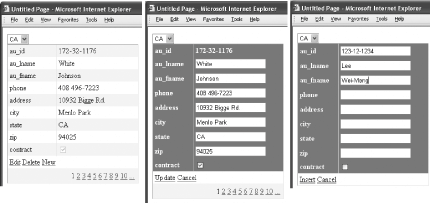
Tip: By default the GridView and DetailsView controls use the field name of the table as header text. For example, you see au_id and au_fname used as the header for both the GridView and DetailsView controls in this and previous labs.To customize the header text of a DetailsView control, click on the Edit Fields... link in the DetailsView Tasks menu and then configure it in the Fields dialog (see Figure 4-36) via the HeaderText property.To customize the header text of a GridView control, click on the Edit Columns... link in the GridView Tasks menu and then configure it in the Fields dialog via the HeaderText property.
Figure 4-36. Customizing the header text of a DetailsView control 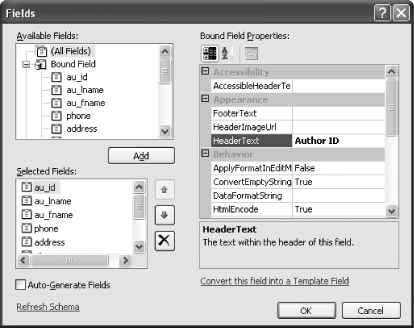
4.4.2. What about... ...creating a Master/Detail view of records in a table? The GridView and DetailsView controls together make a good pair of controls for displaying a Master/Detail view of records. For example, the GridView control could display all the employee IDs, and clicking on a particular employee ID could trigger the DetailsView control to display the details of the selected employee. To create a Master/Detail view, follow these steps: Add a new Web Form to the project and name it Default2.aspx. Add a 2 1 table to the Web Form (Layout Insert Table), and add a GridView control to the left cell of the table and a DetailsView control to the right cell of the table (see Figure 4-37). Insert Table), and add a GridView control to the left cell of the table and a DetailsView control to the right cell of the table (see Figure 4-37). Figure 4-37. Adding GridView (left) and DetailsView (right) controls to the form 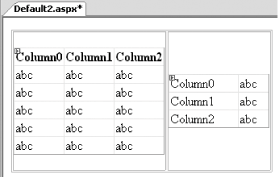
Configure the GridView control to bind to a new SqlDataSource control and retrieve the au_id field from the authors table in the pubs database (see the lab Section 4.1 for detailed instruction on how to do this). The Source View of the GridView control and the newly created SqlDataSource control now looks like Example 4-2.
Tip: For this example, I strongly suggest you download the sample code from http://www.oreilly.com/catalog/aspnetadn/.
Example 4-2. Source View of the GridView and SqlDataSource controls <asp:GridView runat="server" Width="158px" DataSource AutoGenerateColumns="False" DataKeyNames="au_id" AllowPaging="True" PageSize="4" AllowSorting="True"> <Columns> <asp:CommandField ShowSelectButton="True"> </asp:CommandField> <asp:BoundField ReadOnly="True" HeaderText="au_id" DataField="au_id" SortExpression="au_id"> </asp:BoundField> </Columns> </asp:GridView> <asp:SqlDataSource runat="server" SelectCommand="SELECT [au_id] FROM [authors]" ConnectionString="<%$ ConnectionStrings: pubsConnectionString %>"> </asp:SqlDataSource>
Configure the DetailsView control to bind to a new SqlDataSource control and retrieve all the fields from the authors table in the pubs database. In particular, the au_id field is dependent on the record selected in the GridView control (see Figure 4-38). Figure 4-38. Selecting a record in the GridView control 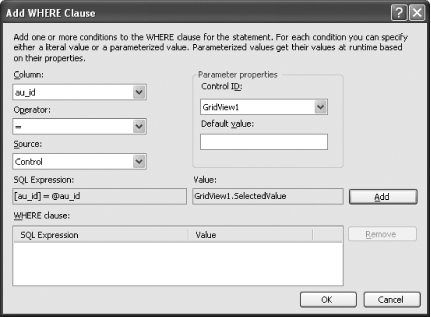
The Source View of the DetailsView control and the newly created SqlDataSource control should now look like the source shown in Example 4-3. Example 4-3. Source view of the DetailsView and SqlDataSource controls <asp:DetailsView runat="server" Height="50px" Width="286px" DataSource AutoGenerateRows="False" DataKeyNames="au_id"> <Fields> <asp:BoundField ReadOnly="True" HeaderText="au_id" DataField="au_id" SortExpression="au_id"> </asp:BoundField> <asp:BoundField HeaderText="au_lname" DataField="au_lname" SortExpression="au_lname"> </asp:BoundField> <asp:BoundField HeaderText="au_fname" DataField="au_fname" SortExpression="au_fname"> </asp:BoundField> <asp:BoundField HeaderText="phone" DataField="phone" SortExpression="phone"> </asp:BoundField> <asp:BoundField HeaderText="address" DataField="address" SortExpression="address"> </asp:BoundField> <asp:BoundField HeaderText="city" DataField="city" SortExpression="city"> </asp:BoundField> <asp:BoundField HeaderText="state" DataField="state" SortExpression="state"> </asp:BoundField> <asp:BoundField HeaderText="zip" DataField="zip" SortExpression="zip"> </asp:BoundField> <asp:CheckBoxField HeaderText="contract" SortExpression="contract" DataField="contract"> </asp:CheckBoxField> </Fields> </asp:DetailsView> <asp:SqlDataSource runat="server" SelectCommand="SELECT * FROM [authors] WHERE ([au_id] = @au_id)" ConnectionString="<%$ ConnectionStrings: pubsConnectionString %>"> <SelectParameters> <asp:ControlParameter Name="au_id" Control PropertyName="SelectedValue" Type="String" /> </SelectParameters> </asp:SqlDataSource>
Apply the Sand & Sky theme to both the GridView and DetailsView controls. Press F5 to test the application. You should now be able to select a record in the GridView control and see the details of the selected record in the DetailsView control (see Figure 4-39).
Figure 4-39. Details of the selected record 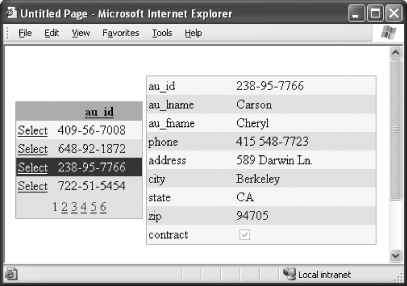
4.4.3. Where can I learn more? One particular operation with the GridView and DetailsView control that you should take note of is deletion. You wouldn't want the user to delete a record mistakenly without giving him a second chance. The GridView and DetailsView will gladly delete the record without any warning (if you have enabled deleting). Before a record is deleted, it is your duty to ensure that the user is asked to confirm his action. You can do so via a client-side script. To learn more about writing this kind of script, check out the following sites: http://msdn.microsoft.com/library/default.asp?url=/library/en-us/dndive/html/data01102002.asp http://www.dotnetbips.com/displayarticle.aspx?id=108 http://www.dotnetjunkies.com/Article/17F2328F-ECB8-478F-A393-3D0E0F024EC0.dcik
To learn more about the DetailsView control, check out the MSDN Help topic "DetailsView class." |