Section 4.3. Edit and Delete Records
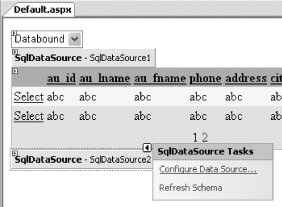
4.3. Edit and Delete RecordsNote: Let users edit and delete records in the GridView control. Apart from simply displaying records in the GridView control, you can also allow users to edit or delete records directly while they're being viewed. Unlike the old DataGrid, the new GridView control makes editing and deleting records very simple. And with the wizards to help you configure the GridView control, your life as a developer could not be simpler. 4.3.1. How do I do that?In the previous lab, you saw how GridView binds to the SqlDataSource control. You have also seen how rows can be sorted automatically without requiring you to write code to do it and how records can be displayed in multiple pages. In this lab, you'll go one step further. You will see how you can configure the GridView control for editing and deleting records.
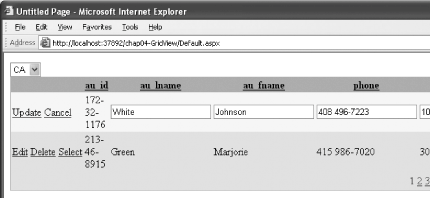
Figure 4-32. Editing and deleting records 4.3.2. What about......resolving concurrency conflicts? Recall that in Figure 4-30 you checked the "Use optimistic concurrency" checkbox. By selecting this checkbox, the SqlDataSource control will detect any changes to the table before an update is performed. Consider a case in which two users are both trying to update the same record. If one user has updated the record, the other user will detect that the original values have been changed when he tries to update the same record, and the update will not be successful. If you switch to Source View, you will notice that the SqlDataSource control has acquired a number of new elements and attributes. In particular, the DeleteCommand, InsertCommand, and UpdateCommand attributes take care of the tasks of deleting, inserting, and editing records in the database. Their syntax is shown in Example 4-1. Example 4-1. DeleteCommand, InsertCommand, and UpdateCommandDeleteCommand="DELETE FROM [authors] WHERE [au_id] = @original_au_id AND [au_lname] = @original_au_lname AND [au_fname] = @original_au_fname AND [phone] = @original_phone AND [address] = @original_address AND [city] = @original_city AND [state] = @original_state AND [zip] = @original_zip AND [contract] = @original_contract" InsertCommand="INSERT INTO [authors] ([au_id], [au_lname], [au_fname], [phone], [address], [city], [state], [zip], [contract]) VALUES (@au_id, @au_lname, @au_fname, @phone, @address, @city, @state, @zip, @contract)" UpdateCommand="UPDATE [authors] SET [au_lname] = @au_lname, [au_fname] = @au_fname, [phone] = @phone, [address] = @address, [city] = @city, [state] = @state, [zip] = @zip, [contract] = @contract WHERE [au_id] = @original_au_id AND [au_lname] = @original_au_lname AND [au_fname] = @original_au_fname AND [phone] = @original_phone AND [address] = @original_address AND [city] = @original_city AND [state] = @original_state AND [zip] = @original_zip AND [contract] = @original_contract" ConflictDetection="CompareAllValues" The SQL statements are structured so that they can detect concurrency issues. As an example, consider the UpdateCommand statement. An update can be performed successfully only when the values for the original fields are the same (checked using the @original_fieldname parameter). To implement the "First-One Wins" strategy, you need to set the ConflictDetection attribute to CompareAllValues. Note: The update conflict resolution strategy in which the first user to update a record wins is called "First-One Wins." The <updateParameters> element keeps track of the old values of each field: <UpdateParameters> <asp:Parameter Type="String" Name="au_lname" /> <asp:Parameter Type="String" Name="au_fname" /> <asp:Parameter Type="String" Name="phone" /> <asp:Parameter Type="String" Name="address" /> <asp:Parameter Type="String" Name="city" /> <asp:Parameter Type="String" Name="state" /> <asp:Parameter Type="String" Name="zip" /> <asp:Parameter Type="Boolean" Name="contract" /> <asp:Parameter Type="String" Name="original_au_id" /> <asp:Parameter Type="String" Name="original_au_lname" /> <asp:Parameter Type="String" Name="original_au_fname" /> <asp:Parameter Type="String" Name="original_phone" /> <asp:Parameter Type="String" Name="original_address" /> <asp:Parameter Type="String" Name="original_city" /> <asp:Parameter Type="String" Name="original_state" /> <asp:Parameter Type="String" Name="original_zip" /> <asp:Parameter Type="Boolean" Name="original_contract" /> </UpdateParameters> Note that the old value of each parameter is prefixed with the string "original_". You can change this value by setting the OldValuesParameterFormatString property of the SqlDataSource control. ...handling errors in updating? If you try to update a record in the GridView control and an error occurs, you can trap this error via the RowUpdated event, like this: Protected Sub GridView1_RowUpdated(_ ByVal sender As Object, _ ByVal e As System.Web.UI.WebControls. _ GridViewUpdatedEventArgs) _ Handles GridView1.RowUpdated If e.Exception IsNot Nothing Then Response.Write("Error in updating record.") e.ExceptionHandled = True End If End Sub4.3.3. Where can I learn more?To learn how to handle concurrency issues in .NET, check out the article at http://www.15seconds.com/issue/030604.htm. To learn how to service the event fired by the GridView control before a record is deleted, check out the MSDN Help topic "GridView.RowDeleting Event." |
- Distributed Data Warehouse for Geo-spatial Services
- Data Mining for Business Process Reengineering
- Intrinsic and Contextual Data Quality: The Effect of Media and Personal Involvement
- Healthcare Information: From Administrative to Practice Databases
- Relevance and Micro-Relevance for the Professional as Determinants of IT-Diffusion and IT-Use in Healthcare


