Automating the Deployment Process
| Chapter 1, "Introduction to Software Build and Release Management," discussed how Software Release Management typically demands more control and rigor by identifying exactly the inputs and outputs of the build and release process. Often the amount of control that is required is seen as overhead, especially if it is a manual process. If you are using IBM Rational ClearCase and ClearQuest, you have the opportunity to automate the association of checkouts against change requests or defects. This goes some of the way toward minimizing the overhead and ensures that the reasons for change on your project are tracked and implemented, ultimately leaving the developers to concentrate on their coding. However, the information that is recorded via this process is simply a collection of change requests. There is no notion of how these change requests contribute toward a release, whether the release has been deployed, and, if relevant, to what environment. This section describes a capability of Rational ClearCase and ClearQuest called Build and Deployment Tracking, which you can use and customize to achieve just this. Note Build and Deployment Tracking is a new feature in IBM Rational ClearCase and ClearQuest version 7, so some of the information in this section might have changed slightly before the final release. Introduction to Build and Deployment TrackingThe Build and Deployment Tracking capability allows you to track the deployment of builds from development through the test and production environments. It is composed of a number of additional ClearQuest packages that you can apply to any schema, as well as a ClearCase Deployment Unit template and generator tool called du_tool. At a high level, the Build and Deployment Tracking capability manages the following entities:
The relationship between these different entities is illustrated in Figure 11.2. Figure 11.2. Rational Build and Deployment tracking entities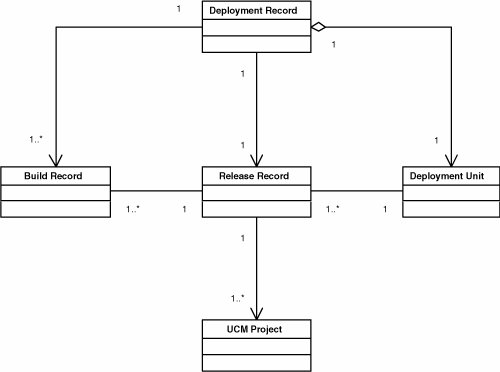 Note that although a UCM project is shown, the Build and Deployment Tracking capability does not presume this relationship and can work equally well with Base ClearCase. Also note that the actual deployment work flow can be customized to work in the environment in which you are operating. I will discuss how to achieve this later. Install Build and Deployment TrackingTo install the Rational Build and Deployment Tracking packages, use the Package Wizard in the ClearQuest Schema Designer. First make sure that the schema you want to apply the packages to is checked in, and then select Package, Package Wizard. Select the Deployment Tracking package, as shown in Figure 11.3. This installs the Build Tracking package at the same time. Note that you may need to click the More Packages button first to find the Deployment Tracking package. Figure 11.3. ClearQuest Package Installation Wizard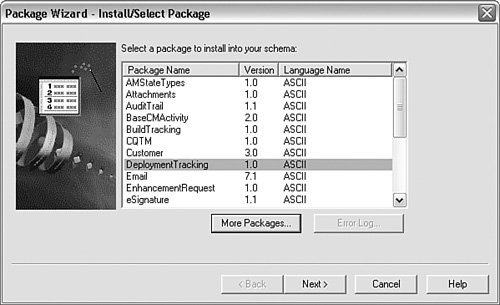 Click the Next button, and then select the schema you want to apply the packages to. After this process has completed, you should see a number of additional record types, such as BTBuild and DTRelease, in your schema. You should obviously test this new schema before upgrading your live user database. Integrate CruiseControl with Build TrackingSince CruiseControl has been used to automate the execution of our builds in this book, it makes sense to automate the creation of the Build Record from CruiseControl. This allows you to associate any of the builds created by CruiseControl with the Deployment Record, ensuring that you have full traceability, from what was deployed to how, when, and where it was built. To create the Build Record, the ClearQuest API can be used. Chapter 8, "Baseline and Change Request Reports," described how to use the ClearQuest API to create reports by querying existing records. To submit new records, the approach is similar. However, rather than executing queries, you set the values of any record fields and then commit a new record: my $buildObj = $sessionObj->BuildEntity("BTBuild"); $buildObj->SetFieldValue("Build_System_ID", $buildID); $buildObj->Validate(); $buildObj->Commit();This example creates a new Build Record (BTBuild), setting the Build_System_ID field to an appropriate value, and then validates and commits the new record. The Build Record has a number of fields that can be directly mapped from CruiseControl properties:
In addition, the state of the Build Record (which is either Complete or Failure) can be mapped from the CruiseControl property ${thisbuildsuccessful}, which has either a true or false value, depending on whether the build was successful. Listing 11.2 is a complete example of a ClearQuest API script to create a Build Record. Listing 11.2. Perl Script to Create a Build Recordcreate_build_record.pl
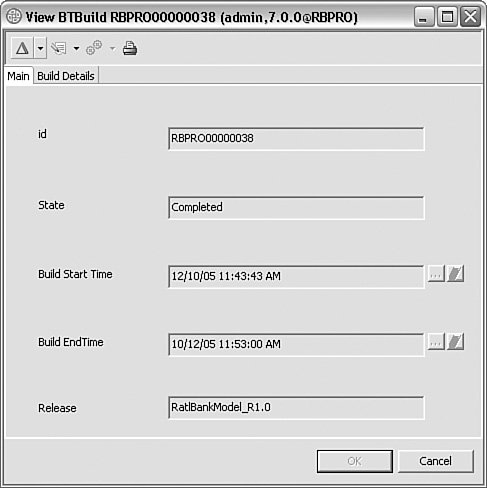
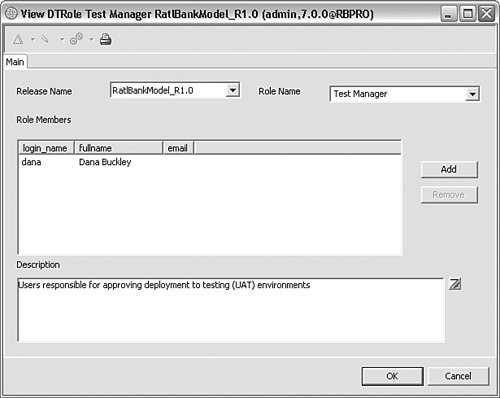
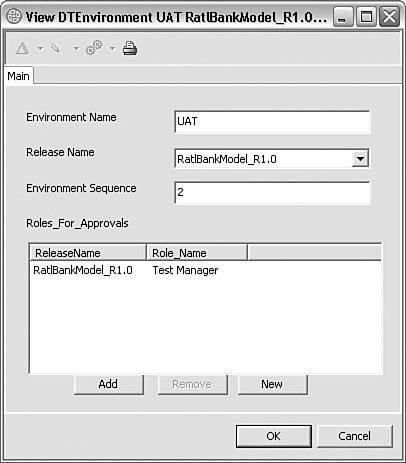
This example takes a number of parameters as input. These are passed from CruiseControl when the script is executed. Given appropriate parameters, the script creates and validates a new Build Record. Depending on the value of the $successful parameter, the state of the record is changed to either Complete or Failure. To create the Build Record, this script can be invoked using Ant. This can be achieved by creating a new target called create-build-record in your build.xml file: <target name="create-build-record"> <exec executable="ratlperl.exe" error="error.txt"> <arg value="etc/create_build_record.pl"/> <arg value='"${label}"'/> <arg value='"${thisbuildsuccessful}"'/> <arg value='"${name.release.id}"'/> <arg value='"${name.build.url}${logfile}"'/> <arg value='"${builddate}"'/> <arg value='"${logdir}/${logfile}"'/> </exec> </target>The properties included in this example are either those passed directly from CruiseControl, such as ${label}, or those stored in an Ant default.properties file, such as ${name.release.id}. Finally, the create-build-record target can be invoked automatically for each build by adding an <antpublisher> task to your CruiseControl config.xml: <publishers> <antpublisher antWorkingDir="${dir.ratlbankmod}" buildfile="${dir.ratlbankmod}/build.xml" target="create-build-record"/> ... </publishers>Figure 11.4 shows a CruiseControl automatically created Build Record. Figure 11.4. ClearQuest Build record Note that since ClearQuest supports the inclusion of hyperlinks, using this record you could navigate directly to the CruiseControl Build Results web via the Build Web URL field. Whether you use this mechanism to create a Build Record for every Integration Build or just for Release Builds depends on your personal preferences. If Integration Builds never get deployed, there is no particular reason to create a Build Record each time. However, one reason why you might do so is to take advantage of the ClearQuest metrics and charting capabilities. For example, this would allow you to report on the number of successful builds versus failed builds, the average build length, and so on. Customize the Deployment EnvironmentTo support different types of deployment environments, the Build and Deployment Tracking capability gives you a degree of customization over the roles and environment it supports. Typically, you will have different names for the roles that are involved in the deployment process, such as Deployment Manager or Operations Manager, as well as names for the different deployment environments, such as System Test, User Acceptance Test, and Production. To customize Build and Deployment Tracking for your own environment, you would typically do the following:
Once you have defined the deployment environment in which you will be working, you are ready to execute a deployment. First, however, you need to specify exactly what you will deploy. This is achieved by creating a Deployment Unit file, as discussed next. Create the Deployment Unit FileThe Deployment Unit file is an XML file that lists the exact set of files that are to be deployed. Each file is a ClearCase object and is uniquely identified and referenced as to how it can be retrieved from ClearCase. Since all the files are referenced to ClearCase, you are required to first stage any files you want to deploy. To achieve this, you create your Release Packages and stage them using the process described in the previous section. Furthermore, since the Deployment Unit file should also be version-controlled, it makes sense to use the assembly project approach from Chapter 10, and store them in the additional deployment directory or component. To create a Deployment Unit file, you must first create a Deployment Unit template file. This file stores information in XML format about the files in your VOB that you want to deploy. The Deployment Unit template file includes the following data:
You could construct this file manually against the Deployment Unit schema that is supplied with the product and then verify that it is a valid Deployment Unit template file using the du_tool --verify command. Alternatively, you can automatically generate the file via the du_tool --generate command, additionally specifying a set of directories to be traversed to find the files to be deployed. To do this, you would execute commands similar to the following:
This example first navigates to a deployment directory in a Staging VOB, which you have permission to write to. It then finds all the staged objects in the model, web, and db component directories. It writes the list of staged objects to the file RatlBankWeb_R1.0_template.xml. Here's an example of such a template file: <?xml version="1.0" encoding="UTF-8"?> <tracking:deploymentUnit xmlns:xsi=http://www.w3.org/2001/XMLSchema-instance xmlns:tracking="http://www.ibm.com/deployment/schema/ deploymentTracking.xsd" name="RatlBankModel" version="1.0"> <file path="\RatlBankReleases\model\RatlBankModel.jar" origPath="RatlBankModel.jar" /> <history changeOperation="Generate" changeNote="" user="pat" hostname="gorilla" datetime="2006-01-10T13:30:45-05:00" /> </tracking:deploymentUnit> Once you have a Deployment Unit template filecreated either manually or automaticallyyou can create the actual Deployment Unit file. This is achieved by "decorating" the contents of the template file with object references (OREFs) that link each file listed in the Deployment Unit template with a specific version of that file in the VOB. To do this, you execute commands similar to the following:
This example creates a Deployment Unit file called RatlBankModel_R1.0_20_ decorated.xml by decorating the template file created previously. It also associates this file with a particular baselinein this case, a UCM composite baseline. The Deployment Unit file is also added to version control. Here's an example of a decorated file: <?xml version="1.0" encoding="UTF-8"?> <tracking:deploymentUnit xmlns:xsi="http://www.w3.org/2001/XMLSchema-instance" instance version="1.0" name="RatlBankModel" xmlns:tracking="http://www.ibm.com/deployment/schema/ deploymentTracking.xsd"> <file path="\RatlBankReleases\model\RatlBankModel.jar" versionURI="ccase:/RatlBankReleases/model/ RatlBankModel.jar? OREF=oid%3A647ea4ab.90fc46b6.8ddf.d6%3A82%3A8c%3Aab %3A8c%3Ad5%40vobuuid%3A961a67f4.a4554a26.ab21.a0%3A 77%3A7e%3A60%3A9b%3Aa9&registry_server=GORILLA &region=Windows" csrule="RATLBANKMODEL_REL_28_INT -nocheckout" origPath="RatlBankModel.jar" /> <CCOrigin> <baseline baselineName="RATLBANKMODEL_20_BL_INT" originAuthority="UserProvided" /> <configSpec> ... </configSpec> </CCOrigin> <history changeOperation="Decorate" changeNote="" user="pat" hostname="gorilla" datetime="2006-01-10T13:32:28-05:00"/> <history changeOperation="Generate" changeNote="" user="pat" hostname="gorilla" datetime="2006-01-10T13:30:45-05:00"/> </tracking:deploymentUnit> Once the Deployment Unit file has been created, its contents can be deployed; this is achieved by creating a Deployment record, as discussed next. Execute the DeploymentTo execute a deployment, you create a new Deployment Record. You do this in the ClearQuest client by selecting Actions, New, DTRecord, which displays a new DTRecord form similar to that shown in Figure 11.7. Figure 11.7. ClearQuest Deployment record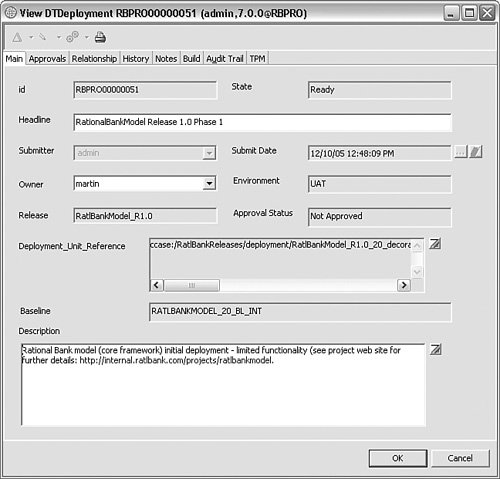 Enter a name for the deployment, as well as an owner and which release the deployment is associated with. To indicate which objects should be deployed, the Deployment Record should also be directly associated with the Deployment Unit file created in the preceding step. You can browse to this file's location by clicking the Browse button. Note that the Deployment Record checks whether this file has been added to version control. Once you have created the Deployment Record, you move it through its life cycle. The life cycle that is executed is based on the deployment environments that you will have created for the release, as discussed earlier. It also prompts you for approvals before you enter each environment, depending on the roles you have set up. For each approval that is required, a DTApproval record is created. It needs to be approved by an appropriate team member before the next environment can be deployed to. You can also enforce electronic signatures so that the approvals are signed for, and implement e-mail rules to notify users when approvals are required. For more information on the deployment work flow and how to implement electronic signatures and e-mail notification, see the Build and Deployment Tracking user guide.
In summary, the Build and Deployment Tracking capability is a relatively straightforward yet powerful mechanism for ensuring traceability and repeatability of your deployment process. You can also develop around this capability, implementing as much automation as you want. In this case, I demonstrated how to automate the creation of the Build Record. However, note that the Build and Deployment Tracking capability does not actually physically deploy your files for you. Instead, this process depends on what form your Release Packages take. Therefore, next I will look at how you can execute different types of physical deployment based on the information that has been made available via the Deployment Unit. |
EAN: 2147483647
Pages: 115