Constructing a Release Build Using UCM
| Chapter 3 discussed the concepts of a Release-Prep Line. This section illustrates how to create this environment using UCM, as well as how to implement a Staging VOB. Create the Release Build EnvironmentIf you are using UCM, you can simply create a Release-Prep Line (or stream in UCM) as a child stream of the project's integration stream. You can do this using the ClearCase Project Explorer GUI by right-clicking the integration stream and selecting Create Child Stream. Alternatively, you can execute the following from the command line:
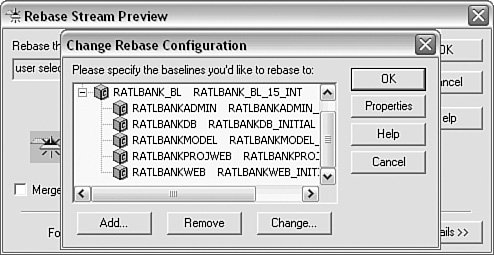
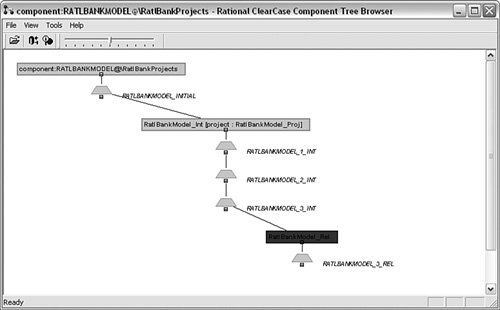
This creates a new stream called RatlBankModel_Rel in the UCM project RatlBankModel_Proj, as shown in Figure 10.7. It also creates a dynamic view called RatlBankModel_Rel to access it. Figure 10.7. UCM Release-Prep stream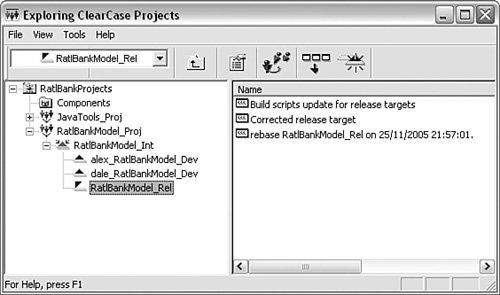 With this stream in place, whenever you want to create a Release Build, you can bring the stream up to date by rebasing against a suitable baseline from the integration stream. You can achieve this using the ClearCase Project Explorer GUI by right-clicking the Release-Prep stream and selecting Rebase. The Rebase Stream Preview window appears, as shown in Figure 10.8. You can then select an appropriate candidate baseline from the integration steam. Figure 10.8. UCM rebase stream Alternatively, you can execute the following from the command line:
This example rebases the Release-Prep stream to the baseline RATLBANKMODEL_02_INT. Implement Critical Changes and FixesThe reasons for implementing any critical changes or fixes are the same whether Base ClearCase or UCM is used. With UCM, however, if you find that at Release Build time you are asked to actively take out some functionality, you can use the Release-Prep stream and create a UCM activity to remove the functionality. Although this might sound like a difficult scenario, it is preferable to the alternative approach of delaying each Integration Build until you decide what changes you want. UCM has no out-of-the-box solution to achieve this; however, the process and a supporting script (called cset.pl) are described in detail in Bellagio and Milligan [Bellagio05]. Execute the Release BuildAs for the Base ClearCase example, your Release Build should be executed via a single Ant target, such as release. The decision of whether to create a new baseline or promote the status of the input Integration Baseline is the same as with Base ClearCase. The difference with UCM is that if you decide you want to create a new baseline but you have not made any changes on the Release-Prep stream, by default UCM does not allow you to create a new baseline. Although you can drop to the command line to force the creation of such a baseline, in practice this is not necessarily recommended, because creating an identical baseline can have implications for subsequent delivery and rebasing. The decision therefore is as follows:
Note that in Figure 10.9 I have chosen to name the Release Build baseline based on the number of the Integration Build baseline that seeded it (RATLBANKMODEL_3_INT and RATLBANKMODEL_3_REL). This is a simple mechanism you can use to help with traceability. With this in mind, the Ant target for a Release Build would look similar to Listing 10.4. Listing 10.4. UCM Release Target
To create your Release Build, you could then execute the following from the command line: >ant release This example uses the macro cc-apply-bl and the automated baseline numbering capability from Chapter 5 to generate and apply a unique ClearCase baseline. Note that this target does not currently carry out any staging of the built objects. I will discuss how to implement an environment in UCM to achieve this next. Stage the Release Build OutputsWith UCM you can create UCM components specifically for staging and then use the component read/write capability to enforce which project is allowed to write to which staging component. To do this, you first need to create a staging component for each project. For example, to create a staging component for the RatlBankModel project, you could execute the following from the command line:
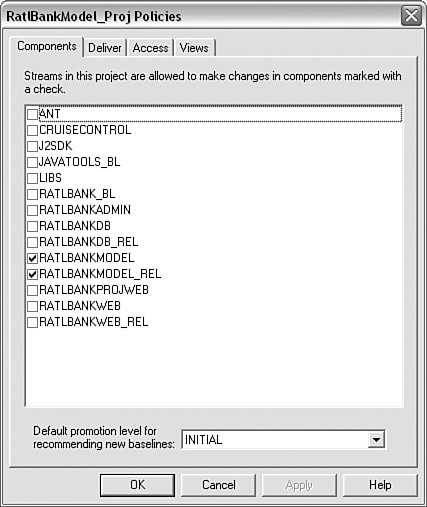
This example creates a staging component called RATLBANKMODEL_REL in the ClearCase VOB RatlBankReleases. This is a specific VOB that has been created for staging. The physical directory that it creates inside this VOB for the staging component is called model. Alternatively, you could start the ClearCase Project Explorer GUI, right-click the Components folder, and select New, Component in a VOB. You see the dialog box shown in Figure 10.10, in which you can enter the details about the component to be created. Figure 10.10. Creating a staging component in the UCM Project Explorer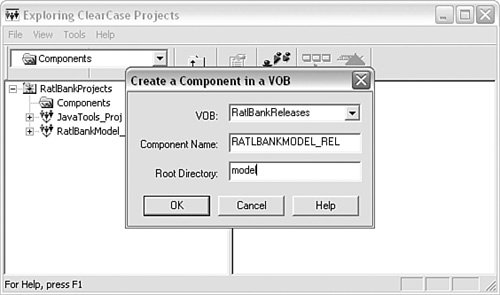 Once the staging components have been created, you need to add them to an existing UCM project to make them part of the project's configuration. To do this in the ClearCase Project Explorer, right-click the project's integration stream (RatlBankModel_Int) and select Properties. On the Configuration tab, click Add and browse to select the INITIAL baseline for the staging component, as shown in Figure 10.11. Figure 10.11. Adding a staging component to an existing project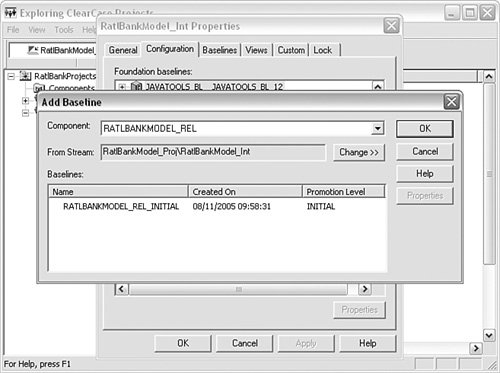 Note that in this example, the staging component is marked as nonmodifiable. This is fine for staging components that the project consumes (and does not need to write to), but in this case the project requires write access to the component. To achieve this in the ClearCase Project Explorer, right-click the project (RatlBankModel_Proj) and select Policies. This brings up a window similar to Figure 10.12. On the Components tab, you can select which staging components are to be made writeable for the project. Figure 10.12. Making a staging component writeable for a project You can achieve the same result from the command line by executing the following commands:
In both cases you need to synchronize all child streams and views to this new configuration. Once you have created this environment, you can regularly place baselines to indicate which staged objects should be consumed by different projects. This can be carried out automatically as part of the build process, as shown in Listing 10.5. Listing 10.5. Ant Release Build Target and Staging
In this example the <ccstage> task automatically stages the build's derived objects. Then the cc-apply-bl macro is called twicefirst to baseline all the input (source) files used during the build, and then to baseline all the staged objects. This is an example of how to achieve a complete build, stage, and label; you might want to implement more or less automation, depending on your requirements. Reusing Staged ObjectsOnce you have created and started baselining objects into the staging components, it is relatively simple to reuse the objects in any project. Rather than adding new baselines for new components, as in Figure 10.11, you would click Change and browse to the new baseline you want the project to consume. If you have a large number of staging components, you might also want to take advantage of composite baselines, either to group source and staging components or to group the complete set of staging components. I explained how to create a composite baseline for the JavaTools VOB in Chapter 3; here the process is exactly the same. Note that the exact implementation of when and how you create staging components, when you stage objects into them, and when you baseline depends on the environment in which you are developing. However, this chapter should give you enough information on what is possible and where to start.
|
EAN: 2147483647
Pages: 115