Constructing a Release Build
| To be able to package or deploy a release, you first need to have created a Release Build. This build essentially uses the same set of input files and build scripts as your Integration Build; the difference is that it should be executed in a more controlled manner. That is, the Release Build should be constructed in an isolated environment and against a specific baseline. Typically, a number of steps are involved in constructing a Release Build:
Chapter 3, "Configuring Your SCM Environment," discussed the concept of creating a Release-Prep Line as a way of creating an isolated and controlled environment for executing a Release Build. The following sections show you how to construct such an environment using both Base ClearCase and UCM. Most of the other concepts should be familiar from our discussions of how Integration Builds are constructed. However, there's one main difference between an Integration Build and a Release Build. The outputs of an Integration Build are typically transient and overwritten by the next Integration Build, whereas the outputs of a Release Build are potentially persisted and used as an input to further parts of a build or deployment process. This is the concept of staging, which I will discuss first. The Staging ProcessAs discussed at the beginning of this chapter, a Deployment Unit essentially refers to a set of artifacts (either a Release Package or previously built objects). For traceability purposes, you need some way to guarantee this reference over time. Since a Release Build will have been executed within a specific ClearCase release view, in practice, this view should contain all the artifacts that need to be packaged. These can be referred to as active objects, because they are the derived objects from the build that are active at this point in time. However, what if you need to refer to these individual objects in the future or ascertain which of these objects is in any of the test or live environments? Looking in the current ClearCase release view will show you only the current active objectsand there might have been several Release Builds since the original active objects were deployed. Of course, because you will have a build baseline or label to refer to, you will always be able to regenerate these objects, but often this is not flexible or timely. An alternate approach is to create staged objects, which are essentially derived objects that are versioned and baselined in ClearCase. Staged objects are usually checked into a Staging (or Release) VOB created specifically for this purpose. There are normally two reasons why you might want to stage derived objects:
Either way, given that staged objects are potentially reused across projects and are deployed to test and live environments, there should always be some control over who is allowed to stage them. Typically, this is achieved by giving each project its own directory or component within the Staging VOB, as illustrated in Figure 10.5. Figure 10.5. RationalBank staging environment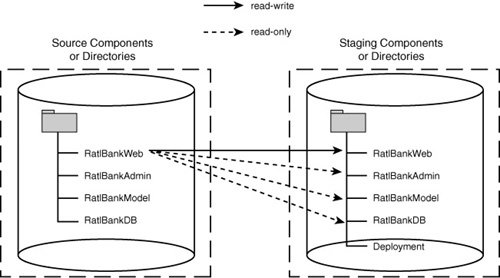 In Figure 10.5, the RatlBankWeb project is allowed to write its derived objects into its own staging component but can only consume the set of staged objects from all the other components. The actual mechanism to achieve this depends on whether you are using Base ClearCase or UCM. I will discuss how to achieve this in the next section.
Automating StagingOne of the advantages of checking in an object to the Staging VOB is that you can also check in the object's configuration record (configuration records were described in Chapter 9, "Build Reporting and Auditing"). This can be achieved using the -from argument to the cleartool checkin command:
This command checks in the derived object RatlBankModel.jar in the dist directory to the model directory in the Staging VOB called RatlBankReleases.
To automate this staging process, you could create a script to execute a set of cleartool checkin commands, as just shown. However, if you already are executing the build using Ant, a better way is to use the <ccstage> task from the clearantlib library, as shown in Listing 10.1 Listing 10.1. Ant Release Build Target and Staging
This example stages all the derived objects in the ${dir.dist} directory to the directory model in the Staging VOB RatlBankReleases. Once staged, these objects can be baselined and made available for subsequent deployment or reuse. Now that I have discussed staging and given you some background on how to implement it, the next two sections use this information to illustrate how a Release Build can be constructed for both Base ClearCase and UCM. Note that I give sample command lines for Windows. To map them to Linux/UNIX, you typically would replace the format used for VOB tags. For example, change the Windows VOB tag \RatlBankSources to the equivalent UNIX VOB tag /vobs/RatlBankSources. |
EAN: 2147483647
Pages: 115
- Chapter I e-Search: A Conceptual Framework of Online Consumer Behavior
- Chapter III Two Models of Online Patronage: Why Do Consumers Shop on the Internet?
- Chapter IX Extrinsic Plus Intrinsic Human Factors Influencing the Web Usage
- Chapter XII Web Design and E-Commerce
- Chapter XVI Turning Web Surfers into Loyal Customers: Cognitive Lock-In Through Interface Design and Web Site Usability