First Steps with Ant
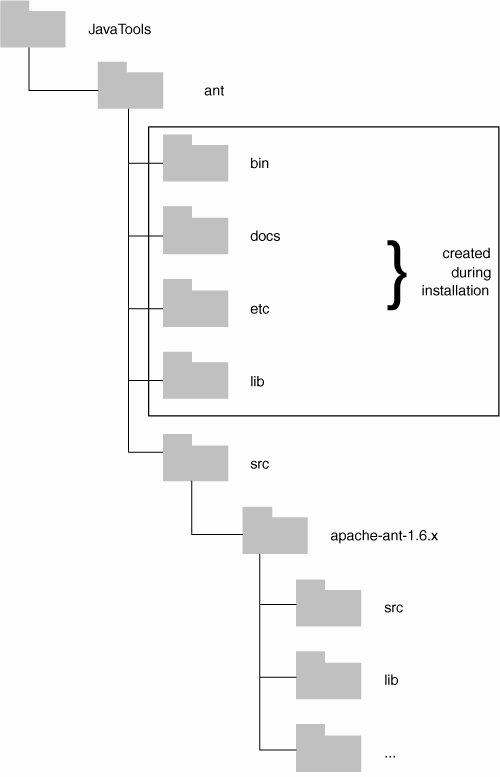
| Chances are you already have a copy of Ant. It comes bundled with a number of popular IDEs, such as Eclipse and Rational Application Developer, and also with other build tools, such as CruiseControl. However, to guarantee that the same version of Ant is being used across the project, it is worth downloading and installing a specific version into the JavaTools directory structure that was created in Chapter 3, "Configuring Your SCM Environment." Two types of downloads are available for Ant: binary and source versions. Here I describe how to download the source version, compile it, and install it into the JavaTools directory structure. Download and Install AntFirst, download and extract the Ant source distribution from the Ant Web site: http://ant.apache.org/. There should be a link for downloading the source distribution; in this case, download the zip file apache-ant-1.6.5-src.zip (or the latest version of Ant that is available). Extract this file to a directory; I recommend putting it in your JavaTools ant/src directory. You can add this directory to source control too if you make any changes to the distribution. You should then have a structure similar to that shown in Figure 4.1. Figure 4.1. Ant source directory structure Once this is complete, you can build and install the Ant distribution in the standard manner. To do this, go to the command line and execute the following commands on Windows: >cd C:\Views\javatools_int\JavaTools\ant\src\apache-ant-1.6.x >set ANT_HOME=C:\Views\javatools_int\JavaTools\ant >set CLASSPATH=%CLASSPATH%;.\lib >build.bat install or execute the following on Linux/UNIX: >cd /Snapshot_views/javatools_int/JavaTools/ant/src/apache-ant-1.6.x >export ANT_HOME=/Snapshot_views/javatools_int/JavaTools/ant >export CLASSPATH=$CLASSPATH:./lib >build.sh install The second line is used to set the environment variable ANT_HOMEthe root directory for an installed copy of Ant. The Ant build script looks for this environment variable and installs its binaries there as part of the installation process (the resulting directory structure is shown in Figure 4.1). Note that these steps assume that the javatools_int view created in Chapter 3 is still available. Note also that the exact Linux/UNIX assignment of this variable depends on the shell being used (the preceding example is for the Korn shell).
If you do not envisage changing the contents of the source distribution, you can download the binary distribution of Ant instead. In this case, simply download the distribution file and extract it in the JavaTools ant directory to create the bin, lib, docs, and etc directories. At this point, I recommend adding to source control the files that have been installed in these directories. You can then apply a new label or make a new baseline across the JavaTools ant component (as illustrated in Chapter 3) and then make it available for the rest of the organization to use. Now that Ant is installed, let's start using it. Configure Eclipse to Use Your JavaTools AntMost IDEs come with a preintegrated version of Ant. However, to ensure identification and consistency across the build process, I strongly recommend that you use the version of Ant you installed into your JavaTools directory. To change the version of Ant used in Eclipse, select the Window, Preferences menu option. In the Preferences window, select Ant, Runtime, as shown in Figure 4.2. Figure 4.2. Ant Preferences window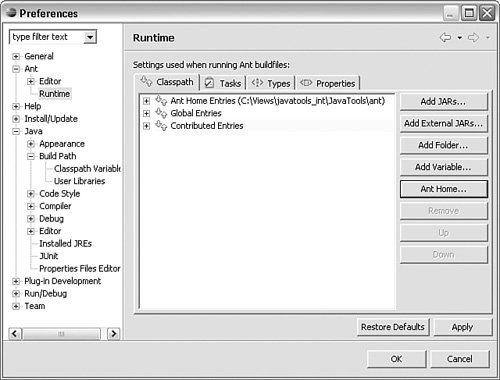 Click the Ant Home button, and then browse to and select the root of your JavaTools ant directory structure, such as the following: C:\Views\javatools_int\JavaTools\ant Eclipse should now be configured to use your installed version of Ant. The Build FileAll Ant builds are driven by an XML formatted build file (the equivalent of a makefile for the make tool). By default this is typically called build.xml and is located in the project root directory. However, there is no reason why a project can't contain a number of build files of any given name. Ant allows you to call or chain these files together, if, for example, you want to build recursively down a directory structure containing multiple projects. Build File Editing with EclipseWhenever you create a build.xml file inside Eclipse, it is recognized as an Ant build file and has a corresponding Ant icon (a file overlaid with an image of an ant). When Eclipse recognizes this file, it allows Ant-specific operations to be executed on it. Note that Eclipse considers any XML file a candidate Ant build file. For example, you could create a file called standard-targets.xml, and it will be used successfully in Eclipse. However, you will not get the Ant icon. Whenever you edit the build.xml file, Eclipse performs syntax highlighting as well as content and code assist specifically for the Ant domain. For example, if you entered <ta in the editor and pressed Ctrl-Space, you would see a list of code completion options. You would then select the appropriate Ant target or task. I will discuss targets and tasks later, but let's suppose that in this instance you are creating a brand-new <target>. Eclipse completes the rest of the code for you. In this case, it would write the following: <!-- ================================= target: name ================================= --> <target name="name" depends="depends" description="--> description"> </target> If any errors are associated with the build file, Eclipse recognizes and annotates them accordingly, making it easier to find and fix problems in the build file before you execute it. Next, I describe the makeup of a typical project build.xml file. Define the ProjectThe build file always references a single project; in our scenario the project is called RatlBankModel. Here are the first two lines of our RatlBankModel build.xml file: <?xml version="1.0"?> <project name="RatlBankModel" default="compile" basedir="."> The first line is basically an XML definition, saying that the contents of this file are in standard XML format. The second line is a bit more interesting, because it defines the name of the project, RatlBankModel, and also a default target, compile. Targets are distinct parts of the build script. In this case this line is saying that if no parameters are specified when Ant is invoked on this project, by default the compile task is carried out. You can probably imagine what this task does! The basedir attribute defines the base directory from which any relative references to directories are made. For example, if reference is made to the build directory, in this file it refers to the directory called build in the current directory (the directory the build.xml file is in). Speaking of the build directory, next I describe how to refer to values such as these in the Ant build file. Initialize PropertiesYou define variables within an Ant script by using properties, which basically are name/value pairs. Properties are also immutable. In other words, after they have been defined, their values can't be changed. Think of them as constant variables. For the RatlBankModel project, I will define these five properties: <property name="dir.src" value="src"/> <property name="dir.build" value="build"/> <property name="dir.dist" value="dist"/> <property name="dir.vendor.libs" value="../../JavaTools/libs"/> <property environment="env"/> The first four properties define where to find certain directories that make up the project's directory structure. The dir.src property refers to the directory where the source code is held. The dir.build property refers to the directory the source code is compiled into (where the Java .class files will be built). The dir.dist property refers to the directory where the releasable distribution file will be built, such as a .jar file. Finally, the dir.vendor.libs property refers to the directory where any of the third-party libraries that you need to build against are held. The final property that is defined is slightly different; this is the environment property. What is actually being defined is a name that can be used to refer to operating system environment variables directly within a build scriptin this case, env. I describe how to refer to properties next. Define the CLASSPATHWhenever you compile Java source code, you need to provide a CLASSPATH. This is the set of Java libraries or classes that your program requires but does not directly consist of as part of its code. This can include third-party libraries, the Sun JDK libraries, or just classes that you have built as part of a related project. The following is a definition of our CLASSPATH for the RatlBankModel project: <path > <pathelement location="${dir.build}"/> <!-- include third party vendor libraries --> <fileset dir="${dir.vendor.libs}"> <include name="*.jar"/> </fileset> <!-- include java libraries --> <fileset dir="${env.JAVA_HOME}/lib"> <include name="tools.jar"/> </fileset> </path>Here I define a <path> element with the unique identifier of classpath so that it can be referred to later. When a <path> element is created, it can be made up of any number of <pathelement> and <fileset> elements.
In the example I include a reference to our own build directory as a <pathelement>: <pathelement location="${dir.build}"/>Then I include a reference to two <fileset> elementsone to include all the third-party .jar files: <fileset dir="${dir.vendor.libs}"> <include name="*.jar"/> </fileset>and one to include the standard Sun JDK tools library: <fileset dir="${env.JAVA_HOME}/lib"> <include name="tools.jar"/> </fileset>Notice how I refer to the properties I defined earlier, such as by using ${dir.build} to refer to the dir.build property and ${env.JAVA_HOME} to refer to the JAVA_HOME environment variable (where the Sun JDK has been installed). The build file has enough context to start defining targets.
Create a Clean EnvironmentAs I have mentioned, targets are distinct sections of the build script intended to carry out a set of actions. Each target can contain one or more tasks. A task is basically an interface to a Java object written to carry out a predefined operation, such as compiling a set of source files or creating a directory structure. Attributes are specified for the task, defining its exact invocation. The first two targets I will define are for housekeeping. First, the project needs a target called init, which creates the template directory structure that is used for building: <target name="init" description="initialise directory structure"> <mkdir dir="${dir.build}"/> <mkdir dir="${dir.dist}"/> </target>This target refers to the mkdir task to create two directoriesone where the Java classes will be compiled, and another where the Java distribution archive will be created. The attribute that is specified for both of these tasks, dir=, is the directory on the file system that is to be created. Next, a target called clean is defined. It will be used to remove any files that have been generated as part of the build: <target name="clean" description="remove generated files"> <delete dir="${dir.build}"/> <delete dir="${dir.dist}"/> </target>This type of target is often used before compilation so that it can be guaranteed that everything is in a known state. Here, rather than a task to create directories, I use the delete task to delete the directories created during the init target and that the project will have built into. Compile the FilesThe next target that needs to be defined is the one to actually do some workcompiling the source code. This target is defined as follows: <target name="compile" depends="init" description="compile source code"> <javac destdir="${dir.build}" > <src path="${dir.src}"/> <classpath ref/> </javac> </target>Sometimes a target has a dependency on another target. For example, before you compile the source files, you should create the directory structure. These dependencies are easily specified via a depends attribute in the target. This can be seen in the preceding compile target, which executes the init target first. Ant automatically executes any dependencies. The task I use here is <javac>, Ant's interface to your Java compiler. This task compiles all the Java source code in the src directory and places the compiled classes in the build directory. I also refer to the CLASSPATH I defined earlier so that the compiler can resolve any dependent libraries or classes.
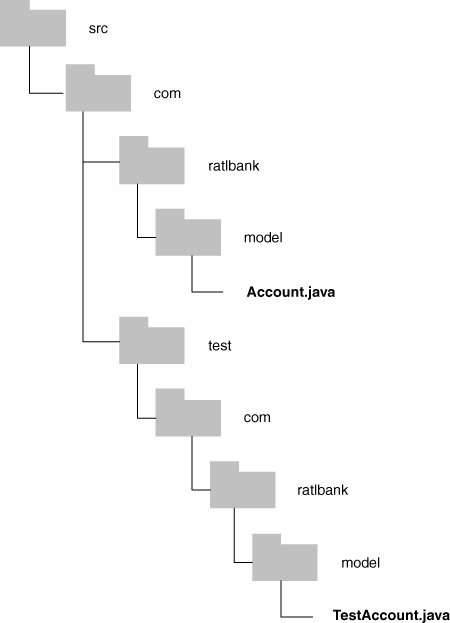
Test the Compiled CodeOne of the most important aspects of ensuring a repeatable and useable process is carrying out some basic tests on the functionality that is contained within the build. This normally is done by running a suite of unit tests right after the build is compiled. In this section I assume that you already have a set of JUnit test classes for all the Java source code that is going into the build. If you don't, I encourage you to start investigating the advantages of this approach. See Fowler [FowlerCI] or Hunt and Thomas [Hunt03] for further information. If you are following the approach of creating a JUnit test class for every Java class, I recommend that you use a convention for naming or storing these JUnit test classes. One simple convention is to create a test directory structure alongside your src directory and include the word Test in the name of the test class and file. For example, the JUnit test class for Account.java would be TestAccount.java. This structure is illustrated in Figure 4.3. Figure 4.3. JUnit and source directory structures The reason that this particular structure is recommended is that, because the test classes are in the src directory, they are automatically compiled via the compile target. To execute all the JUnit test classes as a batch job, you can then create a test target as follows: <target name="test" depends="compile" description="run unit tests"> <junit printsummary="on" fork="no" haltonfailure="false" failureproperty="tests.failed" showoutput="true"> <classpath ref/> <formatter type="xml"/> <batchtest todir="${dir.build}"> <fileset dir="${dir.src}"> <include name="**/Test*.java"/> </fileset> </batchtest> </junit> <junitreport todir="${dir.build}"> <fileset dir="${dir.build}"> <include name="TEST-*.xml"/> </fileset> <report format="noframes" todir="${dir.build}"/> </junitreport> <fail if="tests.failed"> One or more tests failed. Check the output... </fail> </target>This target essentially has three parts. The first calls the Ant <junit> task and uses a <batchtest> nested element to batch the set of tests to be executed. In this case, this means all the files in the src directory that meet the expression "**/Test*.java", which matches the files and directory structure shown in Figure 4.3. In this example the <junit> task creates a set of XML files as the result. The second part of the target takes these XML files and transforms them to HTML using the <junitreport> task. An example of the result is shown in Figure 4.4. Figure 4.4. JUnit HTML output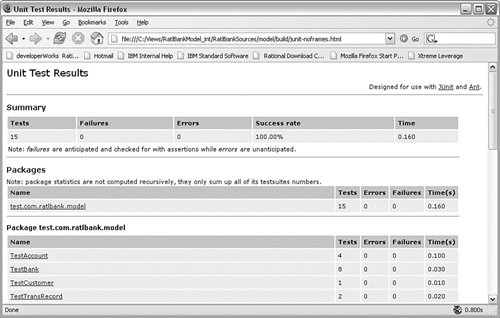 Finally, the third part of this target uses the results of the property tests.failed, which is set by the <junit> task and indicates whether the test run passed or failed. If the test run fails and this property is set, it is then used by the Ant <fail> task to halt the build. The Completed Build FileThe Ant build file is now complete, allowing you to create a basic build directory structure and then execute a compilation across a set of Java classes. The completed build file for the RatlBankModel project is shown in Listing 4.1. Listing 4.1. RatlBankModel build.xml File
With this file in place, I will now describe how to start executing the build. Execute the Build FileChapter 6, "Running Your Build Scripts," discusses how to automate build execution. This chapter briefly discusses how to manually invoke the build. You can do this to check that the script created in Listing 4.1 works. To execute the build file, navigate to the directory where the build.xml file is held, and then run Ant with the target from the build file that you want to execute as a parameter. I normally clean the build environment first and then compile. You can do this using the following two commands: >ant clean >ant You should see the following output: >ant clean Buildfile: build.xml clean: [echo] removing generated files BUILD SUCCESSFUL Total time: 0 seconds >ant Buildfile: build.xml init: [echo] creating directory structure [mkdir] Created dir:C:\Views\RatlBankModel_bld\RatlBankSources\model\build [mkdir] Created dir: C:\Views\RatlBankModel_bld\RatlBankSources\model\dist compile: [javac] Compiling 17 source files to C:\Views\RatlBankModel_bld\RatlBankSources\ model\build [javac] Since fork is true, ignoring compiler setting. BUILD SUCCESSFUL Total time: 4 seconds
Notice that since a default target already exists (compile), the second invocation actually calls both the init and compile targets (because compile depends on the init target). What happens if you try to compile again? Try running the following command a second time: >ant You should see the following output: >ant compile Buildfile: build.xml init: [echo] creating directory structure compile: BUILD SUCCESSFUL Total time: 1 secondYou will notice that Ant has not rebuilt anything. If you deleted one of the .class files in the dir.build directory, Ant would recompile only that file. Ant works out what to compile based on date and time out-of-date rules. Only Java files that have no corresponding .class file or where the class file is older than the .java file are compiled. However, this process is not infallible. If you want to guarantee that you are building the right things, I encourage you to carry out a clean first. An alternative is to use the <depend> task for dependency checking. To execute the JUnit test run, you can use this command: >ant test This should produce the file junit-noframes.html in the build directory; the content of this file was shown in Figure 4.4. Build File Execution with EclipseTo execute an Ant script in Eclipse, right-click the build.xml file in the Package Explorer and select Run As, Ant Build from the pop-up menu. You see the Modify attributes and launch window, as shown in Figure 4.5. Figure 4.5. Ant launcher window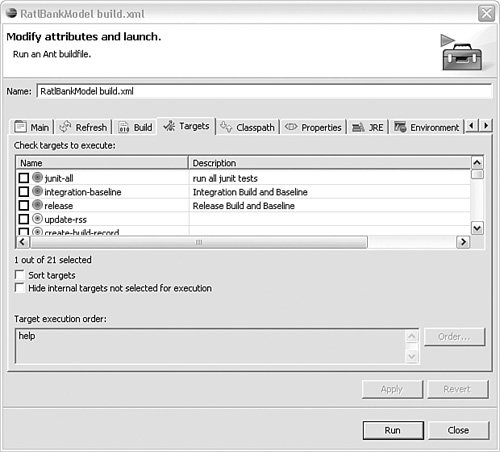 This launcher contains a number of tabs:
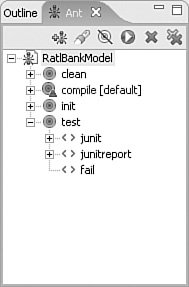
Once you have invoked Ant in this way, a shortcut is available from the run configuration icon (a play button with a briefcase under it). Clicking this icon invokes the build without having to go through the launcher window again. Eclipse also provides a specific Ant view (see Figure 4.6) that lists in outline format each Ant target that exists within a set of build files. You can add as many build files as you want to the Ant view by clicking the Add Buildfiles icon (an ant with a plus sign next to it) or by dragging a build file onto the window. The Ant view gives you a nice overview of the layout of the build file. You can also execute any of the targets simply by double-clicking them. Figure 4.6. Ant view window Whatever mechanism you use to invoke Ant, its output is placed in the Eclipse console view, as shown in Figure 4.7. Figure 4.7. Eclipse console window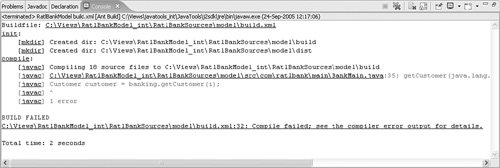 You can click any of the build file errors in the console to go to the appropriate place in the build file. This completes our brief tour through the basics of Ant. You can find more information about the different tasks you can use in your build file by looking at the documentation that comes with Ant, online at http://ant.apache.org/manual/ or in Williamson [Williamson03]. Debug Your Build FilesHopefully, by creating your build scripts early in the development process, and because all members of the team are executing the same set of scripts (but with different parameters), you should be able to identify and solve most problems with the build process. Despite this, sometimes the build might fail, seemingly with problems in the build scripts themselves. By default Ant might hide the reasons for this failurefor example, the Java "stack trace," which is symptomatic of the problem. To display this additional information, you can tell Ant to produce both verbose output and debug information using the -v and -d options: >ant -v -d build.xml compile A word of warning is in order, though: turning on this level of output can generate a significant amount of information. It might therefore be desirable to first redirect this output to a file. Another useful option in Ant is the -diagnostics option, which you can use as follows: >ant -diagnostics build.xml compile This displays detailed information on the version of Ant and the environment it is running in. |
EAN: 2147483647
Pages: 115