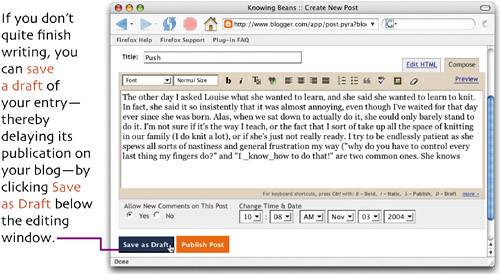
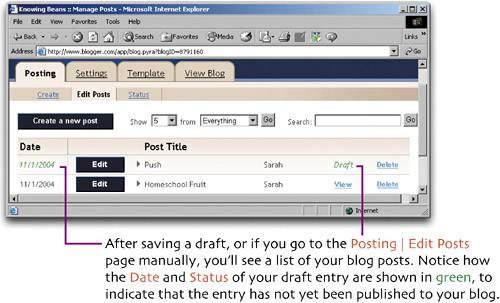
Flylib.com

Books Software


save a draft


save a draft


publish a draft


add formatting


add a picture


delete a post


extra bits

add a new post p. 12

  • If you see the generic Blogger home page instead of the Dashboard, you probably have not signed in yet (page 9).


link to another blog p. 16

  • If you use a browser that doesn't offer an add link button, you can write the HTML code manually. Type <a href="url"> before the linked text and then </a> after it. It should look something like this when you're done:

    <a href="http://www.site.com/target.html">linked text</a>

    Make sure to use straight quotes, and don't forget the http:// .

  • Each time you publish a post, Blogger does three things: it adds the new post to your main blog page, it updates the archive page if necessary, and it creates a separate, independent post page whose sole job is to display that new blog post (and any comments it may receive). Because the main page of a blog is subject to frequent updating, using the blog's main URL for linking to the current post will only work until a new entry is posted. Instead, if you want to link to a specific blog entry, you should link to the post page, whose URL will not change. Such a link is called a permalink .

  • Currently, Blogger creates a permalink out of the timestamp in the byline at the end of each post. If you allow comments, the link to the comments in the byline is also a permalink. In older versions of Blogger, the link was labeled Permalink , as in the example. In some blogging software, permalinks are identified with a hash sign ( # ).

  • The URL of a post page will change (and thus the permalink will be less than permanent), if you change a post's title, month, or year.

  • If you disable post pages on the Settings Archiving page , your blog's permalinks will change since the post pages will no longer exist. When you disable post pages, Blogger keeps all your current posts on the main page and creates a separate page for each set of archived posts. In this case, if you change the archiving frequency (see page 53), the permalinks will change.


publish a draft p. 19

  • You can also edit an already published post and then save it as a draft to remove it temporarily from your blog.


extra bits

add formatting p. 20

  • Although the Compose bar is designed to save you from writing HTML, it is perfectly fine to type HTML tags right in there; you don't have to switch to the Edit HTML mode. If you do switch to Edit HTML mode, you'll notice the HTML code stays intact. But when you switch back to Compose, the HTML code will be displayed as if it were in a browser.

  • One reason you might want to write your own HTML (apart from being a control freak) is that the Compose bar only offers a limited set of formatting options. But you can type any HTML you want manually. My bestselling HTML for the World Wide Web, Fifth Edition, with XHTML and CSS: Visual QuickStart Guide is a good resource, if I do say so myself . :)


add a picture p. 22

  • You can also resize a picture right in the Compose bar. To get the photo to appear, click the Preview button and then click Hide Preview to get back to the Compose bar. You should now see the photo. Click it. Drag the handles on its corners to resize. That said, if you need to resize the photo significantly, doing it with a graphics program saves bandwidthwhich means it will load faster.

  • Almost all Internet Service Providers (ISPs) include some amount of Web hosting with your account. This means you probably already have a certain amount of space on your ISP's servers where you can store your photos and then link to them from your blog. Consult your ISP's online help files for more details.

  • While you can link to photos that are on other servers besides your own, you'll need to get permission to insert photos from sites that do not belong to you.

  • Photo archive services like hello and flickr can store your photos and then automate the process of resizing, uploading, and writing the code for them on your blog. They can be a good option if you don't have sufficient Web space of your own or if you don't feel comfortable uploading pictures to that Web space. But they have their own setup processes which can be as complicated as simply doing it yourself. In addition, they require that you add a link on your blog back to their site.

  • Blogger has an upload image/file icon on the Compose bar. However, it only works if you are hosting your blog on your own server, as described in Chapter 7. In that case, it facilitates uploading the picture and writing the code.