Report History
The report history feature of the Report Manager allows you to keep copies of a report’s past execution. This allows you to save the state of your data without having to save copies of the data itself. You can keep documentation of inventory levels, production schedules, or financial records. You can look back in time, using the report history to do trend analysis or to verify past information.
Enabling Report History
In order to demonstrate the report history feature of Reporting Services, we need a report whose results change often. It just so happens we have such a report in our Chapter08 solution. The TransportMonitor report provides different values every time that the report is run. We will move that report to the Report Server and then enable the report history.
-
Open the Report Manager and navigate to the Chapter 08 folder.
-
Use the Upload File button to upload the TransportMonitor report from the Chapter 08 solution.
-
Select Show Details, if it is available in the report viewer toolbar. If it is not available, you are already in Show Details mode.
-
Click the icon in the Edit column for the TransportMonitor report. The Properties page will appear.
-
Click Parameters on the left side of the page. The Parameters page will appear.
-
Click the Has Default check box and type 1304 for Default Value.
-
Click Apply.
-
Click Data Sources on the left side of the page. The Data Sources page will appear.
-
Click Browse. The Data Source page will appear.
-
Use the tree view to find the 2004 Conference folder in the tree structure. The 2004 Conference folder is inside the Galactic Delivery Services folder.
-
Select the Galactic shared data source and click OK.
-
Click Apply.
-
Click History on the left side of the page. The History Properties page will appear, as shown in Figure 11-7.

Figure 11-7: The History Properties page -
Click the View tab at the top of the page. Remember, this report has autorefresh set. After a few seconds, the report will refresh and new data will be displayed.
-
Make sure the Allow History to Be Created Manually check box is checked. If it is not, check it and click Apply.
Manually Creating a Report History Snapshot
One way to create a report history is to do so manually. We will give this a try in the following example:
-
Select the History tab. (This is the History tab along the top, not the History link on the left side of the page.) The Create/View History page will appear.
-
Click the New Snapshot button in the report viewer toolbar. An entry for a report history snapshot will appear.
-
Click the New Snapshot button two more times to create two more report history snapshots, as shown in Figure 11-8.
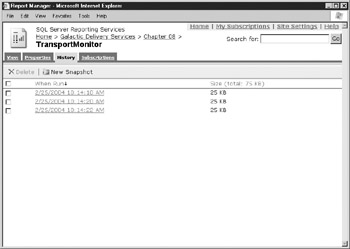
Figure 11-8: The Create/View History page -
Click the link in the When Run column to the first report history snapshot you created. This report should appear in a new browser window.
-
Open the other two report history snapshots and compare all three.
As with the cached report instances, the report history snapshots store the intermediate format of the report. Due to this fact, you can export this report to any of the rendering formats.
-
Select one of your browser windows containing a report history snapshot.
-
Export the snapshot to the Acrobat (PDF) file format and open it in Adobe Acrobat Reader.
-
Close Acrobat Reader and the browser windows containing your report history snapshots.
Report History Snapshots and Report Parameters
To make our TransportMonitor report work with report history snapshots, we had to provide a default value for the transport number parameter. These parameters cannot be changed when each snapshot is created. (They can be changed, however, if the report is run normally through the Report Manager.)
Essentially, we are saving report history snapshots for only one transport. In order to save report history snapshots for other transports, we need to create linked reports with parameters defaulted to the other transport numbers.
-
Select the Properties tab.
-
Click General on the left side of the page.
-
Click Create Linked Report.
-
Type Transport 1305 Monitor for Name and The Transport Monitor Report for Transport 1305 for Description.
-
Click OK. The linked report will execute.
-
Select the Properties tab.
-
Click Parameters on the left side of the page.
-
Change Default Value to 1305.
-
Click Apply.
-
Click the History tab.
-
Click New Snapshot.
-
Click the entry for the new snapshot to view it. You can see that this is a snapshot for transport number 1305.
-
Close the browser window containing your report history snapshot.
We can create as many linked reports as we need to collect report history snapshots for the different possible parameter values. Remember that linked reports all point back to a single report definition. If the TransportMonitor report is ever updated, it will only need to be deployed in one location, and all the linked reports will have the updated report definition.
Additional Methods for Creating Report History Snapshots
You can create report history snapshots in two other ways, in addition to the manual method just described. You can instruct the Report Server to create a report history snapshot each time it creates an execution snapshot. With this setting turned on, any time the Report Server creates an execution snapshot—either manually or on a scheduled basis—a copy of that execution snapshot is saved as a report history snapshot.
Additionally, you can set up a schedule to create your report history snapshots. Let’s give that a try:
-
Click the Chapter 08 link at the top of the page.
-
Click the icon in the Edit column for the TransportMonitor report. (The original report, not the linked copy.)
-
Select the Properties tab.
-
Click History on the left side of the page.
-
Check the Use the Following Schedule to Add Snapshots to Report History check box.
-
Report-Specific Schedule will be selected by default. Click Configure next to Report-Specific Schedule. The Schedule page will appear.
-
Select Hour.
-
Change the Hourly Schedule to run every 0 hours 1 minutes. Set Start Time to 5 minutes from now.
-
Select today’s date for Begin Running This Schedule On.
-
Check the Stop This Schedule On check box and set it to tomorrow’s date.
-
Click OK to return to the History Properties page. Note the description of the schedule you just created under Report-Specific Schedule.
-
Click Apply to save your changes to the history snapshot settings.
-
Select the History tab.
As each minute passes beyond the time you chose for the schedule to start, a new report history snapshot will be created. You will need to refresh you browser to see the new history snapshots in the list.
Report History Snapshots and Security
Not all users can change report history snapshot properties. In order to change the report history snapshot properties for a report, you must have rights to the Manage Report History task. Of the four predefined security roles, the Content Manager and My Reports roles have rights to this task.
Managing Report History Snapshots
You will not usually have a report that requires a new report history snapshot every minute of the day as we set up in our example. Even so, report history snapshots can start to pile up if you let them. It is important to make business decisions about the number of history snapshots to save for each report. It is then even more important to implement those business decisions and manage the number of history snapshots that are actually being saved on the Report Server.
Setting Limits on the Number of Report History Snapshots
Reporting Services provides a way to limit the number of history snapshots that are saved for any given report. Let’s take a look and put a limit on our TransportMonitor report snapshots at the same time.
-
Select the Properties tab.
-
In the Select the Number of Snapshots to Keep section of the page, select the Limit the Copies of Report History option.
-
Set the limit to 5.
-
Click Apply to save your changes to the history snapshot settings.
-
Click OK in response to the warning dialog box.
-
Select the History tab.
If you waited long enough to accumulate more than five report history snapshots, you will see that the list has been reduced to the five most recent history snapshots. The older history snapshots were automatically deleted. As each new history snapshot is created, the oldest history snapshot is deleted, so the total always remains at five. Again, remember that you need to refresh your browser to see these changes as each minute passes.
We chose to set a limit on the number of history snapshots saved for this report. In addition to this option, you have two others to choose from (see Figure 11-7). You can keep an unlimited number of history snapshots, or you can use the default setting for history snapshot retention. You will see how to change this default setting later in this chapter.
Manually Deleting Report History Snapshots
In addition to using the history snapshot limit on the History Properties page, you can also manually delete unwanted history snapshots.
-
Refresh your browser.
Caution If you have reached the limit of five history snapshots, the Report Server is automatically deleting old history snapshots as new ones are created. If your Create/View History page is not up to date, you could try to delete a history snapshot that has already been removed by the Report Server. This will result in an error.
-
Check the check box in the Delete column for three of the snapshot history entries.
-
Click Delete in the History tab toolbar.
-
Click OK to confirm the deletion.
The Report Server will again accumulate history snapshots for this report until it has reached our five snapshot limit. At that point, it will again delete the oldest history snapshot as each new one is created.
Disabling Report History Snapshot Creation
We will now disable the creation of report history snapshots for this report so w are not wasting valuable execution cycles.
-
Select the Properties tab.
-
Uncheck the Use the Following Schedule to Add Snapshots to Report History check box.
-
Click Apply.
-
Select the History tab.
New history snapshots will no longer be created for this report on a scheduled basis. Note, however, that the existing history snapshots were not deleted. These history snapshots are still available for viewing, even though the schedule that created them has been disabled.
Updating Report Definitions and Report History Snapshots
One of the best features of report history snapshots is that they are not lost if the definition of the underlying report is changed. Let’s see this in action.
-
Start Visual Studio and open the Chapter08 solution.
-
Open the TransportMonitor report layout.
-
Increase the height of the report body and move the table item down so there is room at the top of the layout area.
-
Place a text box across the top of the layout area.
-
Type the following expression in the text box:
="Transport: " & Parameters!TransportNumber.Value
-
Click Save All in the toolbar.
-
Right-click the Chapter08 project entry in the Solution Explorer. Select Properties from the context menu. The Chapter08 Property Pages dialog box will appear.
-
Fill in the appropriate values to deploy this report to the Galactic Delivery Services/Chapter 08 folder. (Refer back to Chapter 10 if you need help with this.)
-
Click OK to exit the Chapter08 Property Pages dialog box.
-
Right-click the TransportMonitor report in the Solution Explorer and select Deploy from the context menu.
-
After the deployment has succeeded, close Visual Studio.
-
Return to the Report Manager in your browser.
-
Select the View tab for the TransportMonitor report. Note that the report now includes our change, placing the transport number at the top of the report.
-
Select the History tab. We still have some report history snapshots based on the old report definition.
-
Click New Snapshot to manually create a report history snapshot based on the new report definition. Our five history snapshot limit is still in effect, so one of the old history snapshots may have to be deleted to make room for the new one.
-
Click the most recent history snapshot to view it. It has the transport number at the top because it is based on the new report definition.
-
Close this browser window.
-
Click the oldest history snapshot to view it. It does not have the transport number at the top because it is based on the old report definition.
-
Close this browser window.
Just like the cached report instance, the report history snapshot contains both the report definition and the dataset. Therefore, it is unaffected by subsequent changes to the report definition.
EAN: 2147483647
Pages: 109
- Challenging the Unpredictable: Changeable Order Management Systems
- The Second Wave ERP Market: An Australian Viewpoint
- Enterprise Application Integration: New Solutions for a Solved Problem or a Challenging Research Field?
- Intrinsic and Contextual Data Quality: The Effect of Media and Personal Involvement
- A Hybrid Clustering Technique to Improve Patient Data Quality
- Integration Strategies and Tactics for Information Technology Governance
- Linking the IT Balanced Scorecard to the Business Objectives at a Major Canadian Financial Group
- Measuring ROI in E-Commerce Applications: Analysis to Action
- Governing Information Technology Through COBIT
- The Evolution of IT Governance at NB Power