Subscriptions
Up to this point, we have discussed only one way for users to receive reports. They log on to the Report Manager site, find the report they want, and execute it. This is known as pull technology. The user pulls the information out of Reporting Services by initiating the execution of the report.
Reporting Services also supports push technology for delivering reports. In a push scenario, Reporting Services initiates the execution of the report and then sends the report to the user. This is done through the report subscription.
Standard Subscriptions
Reporting Services supports several types of subscriptions. The first is the standard subscription. A standard subscription is a request to push a particular report to a particular user or set of users. The standard subscription is usually a self-serve operation. A user logs on to the Report Manager site and finds the report they want. The user then creates the subscription by specifying the schedule for the push delivery and the delivery options.
There are two delivery options for standard subscriptions: e-mail and file share. The e-mail delivery option will, of course, send an e-mail to the specified e-mail addresses with the report either embedded as HTML or as an attached document. The file share option will create a file containing the report in a specified folder on
a file share. The file share option can be used to place the report into a document store that is managed and/or indexed by another application such as Microsoft’s SharePoint Portal Services.
Creating a Standard E-Mail Subscription with an Embedded Report
You have been hired as the traffic manager for Galactic Delivery Services and are responsible for routing transport traffic. As part of your job, it is important to know what the weather is like at all the hubs. Rather than taking the time to go look at the Weather report on the Report Manager website, you would like to have the report e-mailed to you hourly.
-
Open the Report Manager and navigate to the Chapter 08 folder.
-
Click Show Details.
-
Click the icon in the Edit column for the Weather report.
-
Select the Subscriptions tab. The Create/View Subscriptions page will appear.
-
Click New Subscription. The Subscription Properties page will appear, as shown in Figure 11-9 and Figure 11-10.
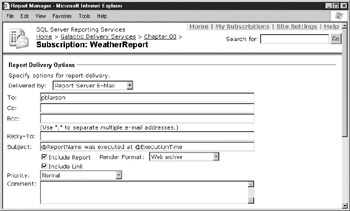
Figure 11-9: The Subscription Properties page, top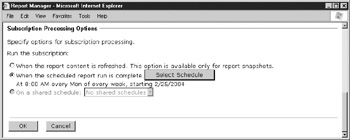
Figure 11-10: The Subscription Properties page, bottom -
The Delivered By drop-down list defaults to Report Server E-Mail. Leave this as the default setting.
-
Type your e-mail address for To. Note that you can enter multiple e-mail addresses, separated by a semicolon (;), and you can also enter e-mail addresses for Cc and Bcc.
-
Enter an e-mail address for Reply-To. This can be your own e-mail address, someone else’s, or a dummy e-mail address that does not even exist.
-
By default, the subject of the e-mail will be the name of the report followed by the time the report was executed. Change Subject to @ReportName.
-
Leave the Include Report check box checked. This will include the report in the e-mail. Uncheck the Include Link check box.
-
The Render Format drop-down list will default to Web Archive. Leave this default value.
-
Select High from the Priority drop-down list.
-
For Comment, type This e-mail was sent from Reporting Services.
-
For Run the Subscription, select the option When the Scheduled Report Run Is Complete.
-
Click Select Schedule. The Schedule page will appear.
-
Select Hour.
-
Leave the schedule to run every 1 hour and 00 minutes. Set the start time to 5 minutes from now.
-
Select today’s date for Begin Running This Schedule On.
-
Check Stop This Schedule On and select tomorrow’s date.
-
Click OK to return to the Schedule Properties page.
-
Click OK to create this standard subscription and return to the View/Edit Subscriptions page.
-
After the time specified by your schedule has passed, refresh this page. You should see the time of the execution in the Last Run column and “Mail sent to” followed by your e-mail address in the Status column. You should also have a high-priority e-mail waiting for you in your mailbox.
-
Do not delete this subscription until you have had a chance to look at the My Subscriptions page later in this chapter.
Creating a Standard E-Mail Subscription with a Report Link
You have just been promoted to sales manager for the Axelburg office of Galactic Delivery Services. Congratulations. Being a good manager, you want to keep tabs on how your sales people are doing. In order to do this, you want to view the Invoice-Batch Number report each week to see how much you are invoicing your clients. As a memory aid, you would like to receive an e-mail each week with a link to this report.
-
Open the Report Manager and navigate to the Axelburg folder.
-
Click the Invoice-Batch Number report to execute it.
-
Click New Subscription in the toolbar for the View tab. The Subscription Properties page will appear.
-
Delivered By defaults to Report Server E-Mail. Leave this as the default setting.
-
Type your e-mail address for To.
-
Enter an e-mail address for Reply-To.
-
Change Subject to @ReportName.
-
Uncheck the Include Report check box. Leave the Include Link check box checked.
-
Render Format is not used because we are just embedding a link to the report.
-
Select High from the Priority drop-down list.
-
For Comment, type Remember to check the invoice amounts.
-
For Run the Subscription, select the option When the Scheduled Report Run Is Complete.
-
Click Select Schedule. The Schedule page will appear.
-
Select Week.
-
Leave Repeat After This Number of Weeks set to 1.
-
Check today for On day(s). For example, Check Mon if today is Monday. Uncheck all the other days.
-
Set the start time to 5 minutes from now.
-
Select today’s date for Begin Running This Schedule On.
-
Check Stop This Schedule On and select tomorrow’s date.
-
Click OK to return to the Schedule Properties page.
-
At the bottom of the Schedule Properties page, you will see a list of the parameters for the selected report. If necessary, you can specify a set of parameters to use when running this subscription. Leave the default values for the parameters.
-
Click OK to create this standard subscription and return to the Report Viewer page.
When the scheduled time has passed, you will receive an e-mail with a link to this report.
Standard Subscriptions and Execution Snapshots
In addition to creating your own schedule for your standard subscriptions, you can also synchronize your subscriptions with scheduled execution snapshots. For example, the Weather report is set to create an execution snapshot every hour. We want to receive an e-mail with the new version of the report after each new execution snapshot has been created.
One way to do this is to keep the schedule for the execution snapshot synchronized with the schedule for the subscription. The execution snapshot runs, then the subscription runs 1 minute later. This can cause problems if the execution snapshot occasionally takes more than 1 minute to create or if one of the schedules is edited.
A better solution is to let the creation of the execution snapshot drive the delivery of the subscription. The When the Report Content Is Refreshed option does just that (refer back to Figure 11-10). When this option is selected for a subscription, the subscription is sent out every time a new execution snapshot is created. Of course, this option is only available for reports that have execution snapshots enabled.
Multiple Subscriptions on One Report
There is nothing that prevents a user from creating more than one subscription on the same report. Perhaps you want a report delivered every Friday and on the last day of the month. You can’t do this with one subscription, but you can certainly do it with two—a weekly subscription for the Friday delivery and a monthly subscription for delivery on the last day of the month.
Another reason for multiple subscriptions is to receive a report run for multiple sets of parameters. You saw, when setting up the subscription for the Invoice-Batch Number report, that you can specify parameter values as part of the subscription properties. Using this feature, you could have one subscription send you a report with one set of parameters and another subscription send you the same report with a different set of parameters.
Embedded Report Versus Attached Report
When you choose to include the report along with the subscription e-mail, the report can either show up embedded in an HTML e-mail or as an attached document. If you select the Web archive format, the report will be embedded. If you select any of the other render formats, the report will be sent as an attached document.
Having the report embedded in the e-mail makes it very convenient for the user to view the report. It is simply part of the body of your e-mail. However, not all e-mail packages support HTML e-mail, so there may be some users who cannot view an embedded report. If a user is not sure of the capabilities of their e-mail package, they should choose the Acrobat (PDF) file format. This format will be sent as an attachment and can be viewed by just about anyone.
Standard Subscriptions and Security
Not all users can create standard subscriptions. In fact, it is possible to view a report but not be able to subscribe to it. In order to subscribe to a report or create a subscription for delivery to others, you must have rights to the Manage Individual Subscriptions task. Of the four predefined security roles, the Browser, Content Manager, and My Reports roles have rights to manage individual subscriptions.
Managing Your Subscriptions
An active user may subscribe to a number of reports scattered throughout a number of folders. Just remembering all the reports you have subscribed to can be a big challenge. Managing all those subscriptions can be even tougher. Fortunately, the Report Manager provides a way to view all your subscriptions in one place.
My Subscriptions
The My Subscriptions page consolidates all your standard subscriptions in one place.
-
Click the My Subscriptions link at the top of the page. The My Subscriptions page will appear, as shown in Figure 11-11.
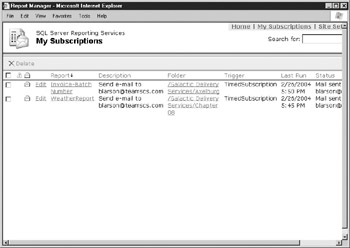
Figure 11-11: The My Subscriptions page -
You can click on any heading to sort your list of subscriptions.
-
Click the Edit link next to WeatherReport. The Subscription Properties page will appear.
-
You can make changes to this subscription, if you desire. Click Cancel to return to the My Subscriptions page.
-
Click the WeatherReport link in the Report column. You will jump to the Weather report.
-
Click your browser’s Back button.
-
Click the text in the Folder column for the Invoice-Batch Number report. You will jump to the Axelburg folder.
-
Click your browser’s Back button.
The My Subscriptions page lists all the standard subscriptions you have created on this Report Server. This makes the subscriptions much easier to manage. You can sort the list several different ways to help you find and manage the subscriptions. You can also use the My Subscriptions page to delete unwanted subscriptions.
Let’s delete these subscriptions so you do not waste computing power e-mailing reports.
-
Check the check box in the headings. This will automatically check the check box next to each subscription.
-
Click Delete in the toolbar.
-
Click OK to confirm the deletion.
-
Click the Home link at the top of the page. You will return to the Home folder.
Data-Driven Subscriptions
A better name for a data-driven subscription might be “mass mailing.” The data-driven subscription allows you to take a report and e-mail it to a number of people on a mailing list. The mailing list can be queried from any valid Reporting Services data source. The mailing list can contain fields, in addition to the recipient’s e-mail address, that are used to control the content of the e-mail sent to each recipient. As mentioned in Chapter 2, the Enterprise Edition of Reporting Services is required in order for you to use data-driven subscriptions.
Creating a Data-Driven Subscription
Transport 1305 has been acting up. GDS wants all of its mechanics to have a good background on the types of problems that this transport is having. To facilitate this, the results from the Transport 1305 Monitor report should be e-mailed to all mechanics every 4 hours. Employees holding the position of Mechanic I should receive the report as a high-priority e-mail. Employees holding the position of Mechanic II should receive the report as a normal-priority e-mail.
-
Open the Report Manager and navigate to the Chapter 08 folder.
-
Click Show Detail.
-
Click the icon in the Edit column for the Transport 1305 Monitor report.
-
Select the Subscriptions tab.
-
Click the New Data-Driven Subscription button. The first page of the Data-Driven Subscription process will appear, as shown in Figure 11-12.
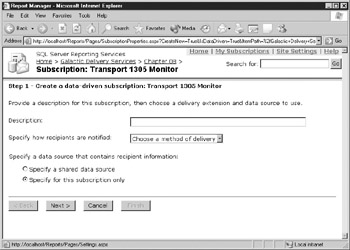
Figure 11-12: Data-Driven Subscription process, first page -
Type Maintenance Watch on Transport 1305 for Description.
-
Select Report Server E-Mail from the Specify How Recipients Are Notified drop-down list.
-
Select the Specify a Shared Data Source option.
-
Click the Next button. The Shared Data Source page will appear, as shown in Figure 11-13.
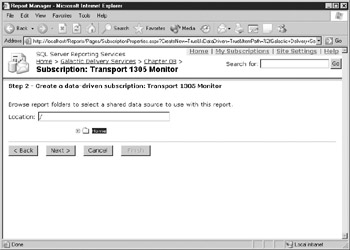
Figure 11-13: Data-Driven Subscription process, Shared Data Source page -
Use the tree view to find the 2004 Conference folder in the Galactic Delivery Services folder.
-
Select the Galactic shared data source in the 2004 Conference folder.
-
Click the Next button. The Query page will appear, as shown in Figure 11-14.
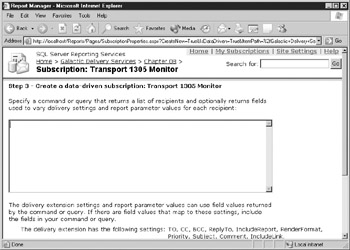
Figure 11-14: Data-Driven Subscription process, Query page -
Type the following for the query:
EXEC stp_MechanicMailingList
-
Click Validate to make sure there aren’t any typos or other problems.
-
If the query does not validate successfully, look for the error in the query you typed. Otherwise, click Next. The Data Association page will appear as shown in Figure 11-15. Here, you will associate columns in the result set with fields in the subscription e-mail.
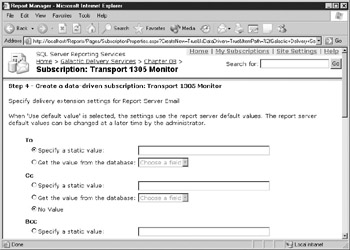
Figure 11-15: Data-Driven Subscription process, Data Association page -
Set the following properties on this page:
Property
Value
To
Specify a static value
Specify a static value (For To)
(Type your e-mail address here. Normally, you would select the e-mail address from a database field, but we want to have a valid e-mail address for our example. Because your system cannot send interplanetary e-mail, we will have to use your e-mail address.)
Reply-To
Specify a static value
Specify a static value (Reply-To)
Reports@Galactic.SRA
Render Format
Specify a static value
Specify a static value (Render Format)
Acrobat (PDF) file
Priority
Get the value from the database
Get the value from the database (Priority)
Priority
Subject
Get the value from the database
Get the value from the database (Subject)
Subject
Include Link
Specify a static value
Specify a static value (Include Link)
False
-
Click the Next button. The Parameter Values page will appear, as shown in Figure 11-16.
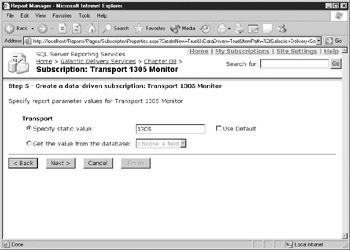
Figure 11-16: Data-Driven Subscription process, Parameter Values page -
Leave this page set to the defaults. Click the Next button. The Notify Recipients page will appear, as shown in Figure 11-17.
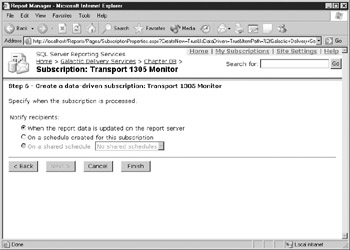
Figure 11-17: Data-Driven Subscription process, Notify Recipients page -
Select the On a Schedule Created for This Subscription option.
-
Click the Next button. The Schedule page will appear.
-
Select the Hour option.
-
Change the schedule to run every 4 hours 00 minutes.
-
Set the start time to 5 minutes from now.
-
Select today’s date for Begin Running This Schedule On.
-
Check Stop This Schedule On and select tomorrow’s date.
-
Click Finish.
-
Once the scheduled time for your subscription has passed, refresh this page. You should see the time of the execution in the Last Run column and “Done: 8 processed of 8 total; 0 errors.” in the Status column. You should also receive eight e-mails (there are eight mechanics in the database, and we sent an e-mail to each one) with the Transport 1305 Monitor report attached.
-
If you do not want to receive eight e-mails every 4 hours for the next day, you can delete this subscription.
Data-Driven Subscriptions and Security
Not all users can create data-driven subscriptions. In order to create a data-driven subscription for a report, you must have rights to the Manage All Subscriptions task. Of the four predefined security roles, only the Content Manager role has rights to this task.
EAN: 2147483647
Pages: 109