Linked Reports
In many cases, the security set up within Reporting Services will restrict the folders that a user can access. The sales department may be allowed to access one set of folders. The personnel department may be allowed to access another set of folders. The personnel department doesn’t want to see sales reports, and there will certainly be some personnel reports that should not be seen by everyone in the sales department.
This works very well—a place for everything and everything in its place—until you come to that report that needs to be used by both the sales department and the personnel department. You could put a copy of the report in both places, but this gets to be a nightmare as new versions of reports need to be deployed to multiple locations on the Report Server. You could put the report in a third folder accessed by both the Sales Department and the Personnel Department, but that can make navigation in the Report Manager difficult and confusing.
Fortunately, Reporting Services provides a third alternative: the linked report. With a linked report, your report is deployed to one folder. It is then pointed to by links that are placed elsewhere within the Report Catalog, as shown in Figure 10-24. To the user, the links look just like a report. Because of these links, it appears that the report is in many places. The sales department sees it in their folder. The personnel department sees it in their folder. The fact of the matter is that the report is only deployed to one location, so it is easy to administer and maintain.
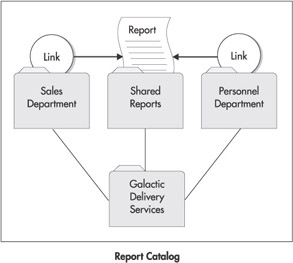
Figure 10-24: A linked report
Creating a Linked Report
In order to demonstrate a linked report, we are going to make use of the Invoice-BatchNumberMatrix report from Chapter 4. This report shows the invoice amounts for companies in various cities. Galactic Delivery Services has sales offices in each of these cities. Each sales office will have its own folder within the GDS Report Catalog. A sales office should be able to access the Invoice-BatchNumberMatrix report in their own folder and see the invoices for customers in their city.
Deploying the Report to a Common Folder
We will begin by deploying the report to a common folder. Here are the steps to follow:
-
Log in with a user name and password that has content manager rights in Reporting Services.
-
Start Visual Studio and open the Chapter04 project.
-
Modify the properties of the Chapter04 project as follows:
Property
Value
TargetFolder
Galactic Delivery Services/Shared Reports
TargetServerURL
http://ServerName/ReportServer
Replace “ServerName” with the appropriate server name or with “localhost.”
-
Deploy the Invoice-BatchNumberMatrix report.
-
Close Visual Studio.
Creating Linked Reports
Now that the report has been deployed to the Report Catalog, it is time to create our linked reports:
-
Open the Report Manager in your browser and navigate to the Galactic Delivery Services folder.
-
Create a new folder. Type Axelburg for Name and Axelburg Sales Office for Description.
-
Create another new folder. Type Utonal for Name and Utonal Sales Office for Description.
-
Navigate to the Shared Reports folder.
-
Click Show Details.
-
Click the icon in the Edit column next to the Invoice-BatchNumberMatrix report.
-
Click Create Linked Report. The create linked report page will appear.
-
Type Invoice-Batch Number for Name and Axelburg invoices in each batch for Description.
-
Click Change Location. The Folder Location page will appear.
-
Select the Axelburg folder and click OK to return to the create linked report page.
-
Click OK to create and execute this linked report in the Axelburg folder.
-
Type 01/01/2003 for Enter a Start Date and 12/31/2003 for Enter an End Date. Click View Report.
-
Click the link for the Axelburg folder at the top of the page.
-
Click Hide Details. You can see that the linked report we just created looks just like a report.
-
Navigate back to the Shared Reports folder.
-
Click Show Details.
-
Click the icon in the Edit column next to the Invoice-BatchNumberMatrix report.
-
Click Create Linked Report. The create linked report page will appear.
-
Type Invoice-Batch Number for Name and Utonal invoices in each batch for Description.
-
Click Change Location. The Folder Location page will appear.
-
Select the Utonal folder and click OK to return to the create linked report page.
-
Click OK to create and execute this linked report in the Utonal folder.
-
Select Utonal from the Select a City drop-down list. Type 01/01/2003 for Enter a Start Date and 12/31/2003 for Enter an End Date. Click View Report.
We have now successfully created and tested our two linked reports.
Managing Report Parameters in Report Manager
We have our linked reports, but we have not quite fulfilled all the business needs stated for these linked reports. The Axelburg sales office is supposed to be able to see only their own invoice data. The same is true for the Utonal sales office. We can meet these business needs by managing the report parameters right in the Report Manager. Here are the steps to follow:
-
Navigate to the Axelburg folder. Note the small chain links on the icon for the Invoice-BatchNumber report. This indicates that it is a linked report.
-
Click the icon in the Edit column next to the Invoice-BatchNumber report.
-
Click Parameters on the left side of the screen. The parameter management page will appear. Note that the City parameter has a default of Axelburg. Because this is the Axelburg folder, we will leave that default alone. What we will modify is the user’s ability to change this default value.
-
Uncheck the Prompt User check box in the City row. The user will no longer be prompted for a city. Instead, the report will always use the default value. As you may have guessed, you can have a default value, you can prompt the user for the value, or you can do both. You must do at least one of these.
-
Check the Has Default check box in the StartDate row. Type 01/01/2003 for the default value for this row.
-
Check the Has Default check box in the EndDate row. Type 12/31/2003 for the default value for this row.
-
Click Apply to save your changes.
-
Select the View tab.
-
Notice that you can no longer select a city. It is always Axelburg. Also, notice that we now have default values for the date. It is also worth noting that these default values are much easier to modify than the default values that are part of the report.
-
Navigate to the Utonal folder.
-
Click the icon in the Edit column next to the Invoice-BatchNumber report.
-
Click Parameters on the left side of the screen.
-
Change the City field’s default parameter to Utonal.
-
Uncheck the Prompt User check box in the City row.
-
Check the Has Default check box in the StartDate row. Type 01/01/2003 for the default value for this row.
-
Check the Has Default check box in the EndDate row. Type 12/31/2003 for the default value for this row.
-
Click Apply to save your changes.
-
Select the View tab.
Now we have the linked reports working just the way we need them. Not only did we simplify things by not deploying the report in multiple places, but we also were able to hardcode parameter values for each linked report.
EAN: 2147483647
Pages: 109