Section 7.2. VNC
7.2. VNCWhat SSH is to the command line, VNC is to the desktop: VNC allows you to see and control another machine's graphical desktop remotely. It's very useful for controlling a remote server, especially since you can control that machine the way you want, rather than being restricted to the command line. 7.2.1. Setting up a VNC ServerFedora Core comes with simple VNC support built-in, but this simple support should be used only for servers that are internal to your network. On its own, VNC is very insecure , but we can leverage SSH's security features to make it secure. We'll look at how this can be done a little later in the chapter. To start the simple VNC server, launch the Remote Desktop Preferences tool shown in Figure 7-9 by selecting Desktop > Preferences > Remote Desktop. Check Allow other users to view your desktop and Allow other users to control your desktop, and uncheck Ask you for confirmation. You can optionally provide a password that users must enter before they connect to the VNC servertick Require the user to enter this password, and enter a password but keep in mind that this only provides a very light level of security. It's important to note that this VNC server works only while a user is logged at the server; if the server is waiting at the login screen, VNC connections using this method are not possible using this tool. Clients will connect to your VNC server via TCP over ports 59005906, so you'll need to open these ports in your firewall: add 5900:tcp, 5901:tcp, … 5906:tcp to the Other Ports list in the Security Level Configuration tool. Once you've done so, the server will be accessible via VNC. Figure 7-9. The Remote Desktop Preferences tool. 7.2.2. VNC ViewersSetting up a VNC server isn't much use unless you have a client with which you can access it. Here, we'll take a brief look at three VNC viewers: TightVNC for Windows, Chicken of the VNC for Mac OS X, and Fedora Core's Terminal Server Client. 7.2.3.1. TightVNCFigure 7-10. The TightVNC Select Components screen.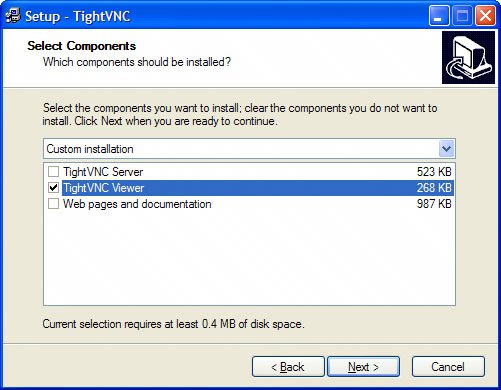 TightVNC is a popular open-source VNC server and viewer package for Linux and Windows, and is available for download from http://www.tightvnc.com/. Double-click on the installation program and proceed through the standard Windows installer wizard. When you get to the Select Components screen shown in Figure 7-10, select the TightVNC Viewer. Proceed through the rest of the wizard, and the TightVNC Viewer will be installed. When you launch the TightVNC viewer, you're presented with three items in the All Programs menu, as shown in Figure 7-11: Best Compression, Fast Compression and Listen Mode. Best and Fast Compression are both shortcuts to the same program, but with different parameters; Listen Mode puts an icon in the system tray so the viewer can be launched quickly. Choose Best or Fast Compression to launch the viewer. Figure 7-11. TightVNC in the All Programs menu.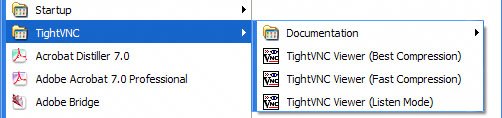 Connecting to the VNC server is a simple task: enter the name of the server and click OK. The remote server's desktop will appear in a window on your own desktop as shown in Figure 7-12. Simply move your mouse over the window to start interacting with it; you can control the remote server as if you were sitting at it. To close the VNC connection, simply click on the cross icon in the window title bar. Figure 7-12. Using TightVNC viewer.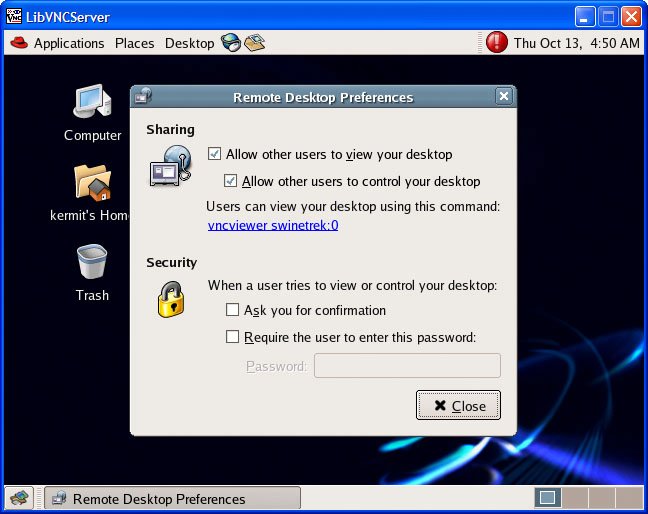 7.2.3.2. Chicken of the VNCChicken of the VNC is another open-source VNC viewer, but one developed for Mac OS X. You can download it from http://cotvnc.sourceforge.net/. It's distributed as a disk image, so installation is as simple as opening the disk image and copying the application into your Applications folder. Launch the application, enter the name of your VNC server, and click Connect. The remote desktop will appear on your own desktop; it will look similar to that shown in Figure 7-13. Figure 7-13. Using Chicken of the VNC.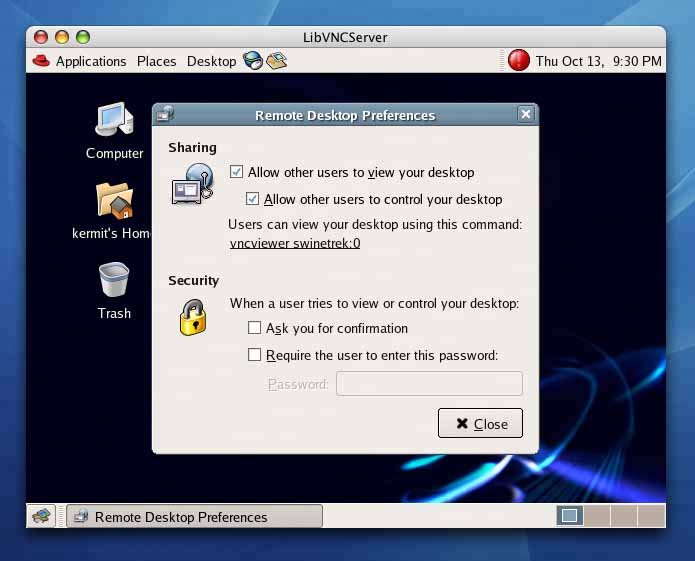 7.2.3.3. Fedora Core's Terminal Server ClientFigure 7-14. Connecting to a VNC server.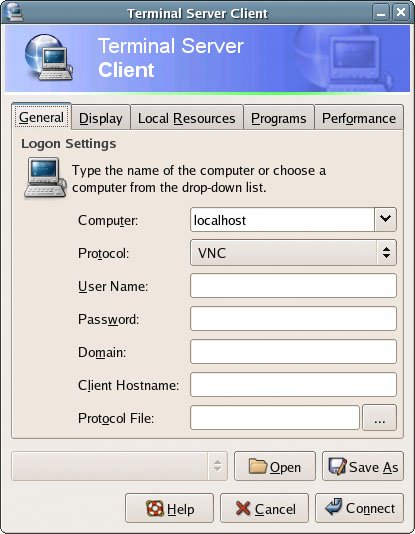 Fedora Core is supplied with a VNC client in the form of Terminal Server Client. This client can access both Windows Terminal Servers and servers running VNC. To install it, launch the Add/Remove Applications tool and, from the System Tools group, install the tsclient and vnc packages. Now, select Applications > Internet > Terminal Server Client to launch the program. This client can access both Windows Terminal Servers and servers running VNC. Simply enter the name of the VNC server to which you want to connect, and choose VNC as the Protocol, as shown in Figure 7-14, then click Connect. The remote server's desktop will appear in a window on your own desktop, as illustrated in Figure 7-15. You can control the remote server as if you were sitting at it, and simply close the VNC connection by clicking on the cross icon in the window's title bar when you're done. Figure 7-15. The Terminal Server client.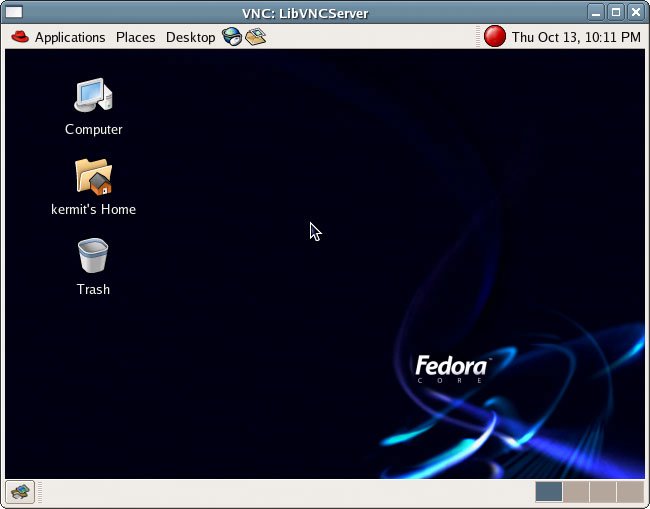 7.2.3. Securing VNC with SSH TunnellingSince the VNC protocol by itself is not secure, it's not a good idea to leave a machine that's running VNC connected to the Internet. Fortunately, SSH offers a very handy feature called SSH tunnelling or port forwarding to circumvent this problem. In essence, instead of connecting directly to the VNC server (as shown in Figure 7-16), SSH tunnelling allows you to make your VNC connection through an established SSH connection (depicted in Figure 7-17). Figure 7-16. An unsecured VNC connection.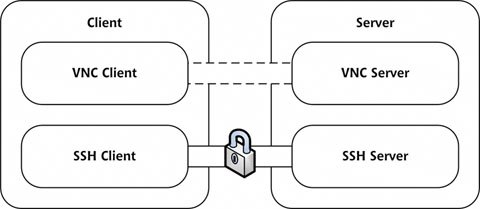 Figure 7-17. A secure VNC connection.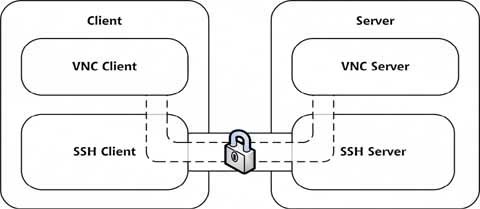 SSH tunnelling is actually quite simple to get up and running. The procedure for using VNC securely is:
7.2.4.4. Setting up the VNC Server DaemonBefore we begin, we need to install the VNC server daemon; we can do so with the yum install vnc-server command, or by selecting the vnc-server package from the Network Servers package group in the Package Management tool. 7.2.4.5. Setting up the SSH TunnelSSH tunnelling is a technique by which we redirect communications to and from a certain portin this case, port 5901to a port on the local machine, through SSH, thereby encrypting communications across that port. Both PuTTY and ssh support SSH tunnelling. 7.2.4.5.1. Tunnelling with PuTTYTo set up PuTTY for SSH tunnelling, select the Tunnels category in the PuTTY Configuration dialog, as shown in Figure 7-18. In Source Port, enter the local port number to forward (in this case, 5901), and in Destination, enter the server name and remote port number to forward in the format servername:portnumber. Click Add to add this forwarded port to the list. Once everything is set up, click Open, and your SSH session will start as normal. 7.2.4.5.2. Tunnelling with the ssh ClientWith the command-line ssh client, tunnelling is set up using the -L option, as follows: mymac:~ kfrog$ ssh -L 5901:swinetrek:5901 kermit@swinetrek kermit@swinetrek's password: Last login: Sun Oct 16 20:46:10 2005 from 192.168.69.36 [kermit@swinetrek ~]$ After the -L option, we list the local port we want to forward, the remote server name, and the port on the remote server that we want to forward to. Figure 7-18. Setting up PuTTY for SSH tunnelling.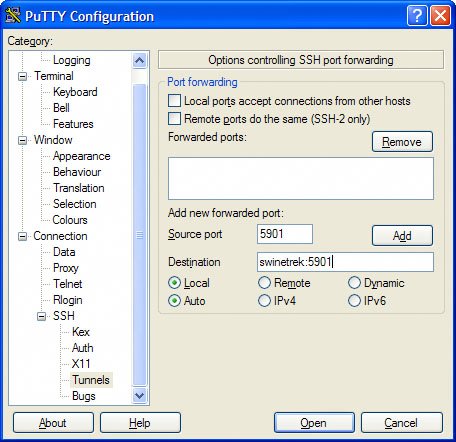 7.2.4.6. Starting the VNC Server DaemonNow that we've opened an SSH session, we start the VNC server daemon by entering vncserver at the command prompt: [kermit@swinetrek ~]$ vncserver You will require a password to access your desktops. Password: Verify: New 'swinetrek:1 (kermit)' desktop is swinetrek:1 Creating default startup script /home/kermit/.vnc/xstartup Starting applications specified in /home/kermit/.vnc/xstartup Log file is /home/kermit/.vnc/swinetrek:1.log [kermit@swinetrek ~]$ If this is the first time you've run vncserver, it will ask for the password that is to be used for this and all future VNC connections. You can change this password later, using the vncpasswd command. vncserver will also create configuration files for the currently logged-in user in the directory ~/.vnc. Before we make use of VNC for the first time, we need to modify one of these files to ensure that the GNOME desktop environment is started when we log in. Open the file ~/.vnc/xstartup in your text editor, locate the line that says, "Uncomment the following two lines for normal desktop," and uncomment the two lines that follow. Once you're done, the file should look like this: ~/.vnc/xstartup
7.2.4.7. Connecting to the VNC ServerThe next stepconnecting to the VNC serveris also simple. Using your VNC client, enter localhost:1 as the server name. This may seem a little counter-intuitive, but it's correct: by connecting to localhost:1 you actually connect to port 5901 on your machine; that connection then travels down the SSH tunnel to port 5901 on the remote machine, which is where the VNC server is waiting for a connection. You now have a VNC connection that is secure, because it travels through the SSH tunnel you've set up. Do not close the SSH session while VNC is running, or your VNC session will be abruptly cut off! Once you have finished working, disconnect from VNC by closing the window. You must then stop the VNC daemon on the server: in the SSH connection to the server, enter vncserver -kill :1 to stop the VNC server daemon. You can then log out of the SSH session, which closes the SSH tunnel. |
EAN: 2147483647
Pages: 92