| In a well-designed WordPress theme, fonts, colors, layout, and typography are all controlled by cascading style sheets (CSS). The primary place to modify these is in the file style.css. In the Default theme, a few styles related to images are also set in header.php. In the Default theme, style.css groups the style rules into categories: Typography & Colors controls the font, font size, font color, and background color of text on each page. Structure specifies the page layout. In the Default theme, that's a group of four "boxes"header, content, sidebar, and footerencompassed in a page box. This is all done with CSS, not HTML tables. Headers provides additional formatting for header content. Images provides alignment information for images. Lists provides formatting information for ordered and unordered lists. Form Elements includes formatting information for search, entry, and comment forms. Comments formats comment elements. Sidebar provides formatting information for the sidebar. Calendar provides formatting instructions for the calendar, which may be displayed in the sidebar. Various Tags & Classes includes formatting instructions for elements such as blockquotes, acronyms, and horizontal rules.
Tip
To modify a blog's styles 1. | Make a copy of your style.css file for safekeeping.
| 2. | Open Stylesheet with the Theme Editor or style.css with a text editor (Figure 28).
Figure 28. The style.css file for the Default theme, opened in the TextWrangler text editor. Note the two comments near the top of the window. 
| 3. | Modify the style rules to fit your design.
| 4. | Save or upload the modified file to replace the original.
| 5. | Visit your blog to check that it works as expected.
| 6. | If the blog does not appear as expected, repeat steps 2 through 5 to fix the problem or restore the style.css file with the backup copy you made in step 1you did follow step 1, didn't you?
|
Tips  | We explain how to edit theme files with the Theme Editor or a text editor earlier in this chapter. If you're not sure what a CSS style is used for, consult the theme template files to learn which PHP or HTML codes call it. Use Comments to keep notes about the stylesheet. For example, you might add a comment to explain how an instruction works (Figure 28). CSS comments take this form: /* comment goes here */. If you can't see the effects of your CSS modifications load style.css directly into your browser to check that the browser is accessing the latest version. It's a good idea to validate the CSS to make sure it conforms to W3C recommendations. We explain how near the end of this chapter.
|
To change the Default theme's header image 1. | Prepare an image at least 760 pixels wide and 200 pixels high (Figure 29).
Figure 29. Create a header image that's 760 pixels wide and 200 pixels high. 
| 2. | Save the image with the name personalheader.jpg.
| 3. | Use your FTP client software to put the image in /wp-content/themes/default/images (Figure 30).
Figure 30. Copy the personalheader.jpg file into the images folder for the Default theme. In this example, we're using Fetch on a Mac. 
| 4. | Open Header with the Theme Editor or header.php with a text editor.
| 5. | Locate the line that begins with #headerimg { background: (Figure 31) and remove the commenting code from the lines before and after it (Figure 32).
Figure 31. The header image style information is commented out to deactivate it. 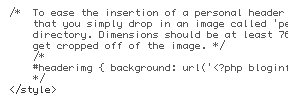
Figure 32. Remove the comment codes to activate the header image style information. 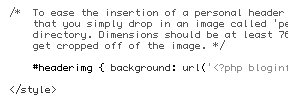
| 6. | Save or upload the modified file to replace the original.
| 7. | View your blog. Your image should appear in place of the default header image (Figure 33).
Figure 33. Your image appears as the header image. 
|
Tips | As you can see, the designer of the Default theme made it very easy to replace his image with yours. Although the code for his header image appears earlier in the header.php file, when you follow step 5, header image code is activated that supercedes the earlier code and replaces the image. This is a good example of how CSS information can appear in a file other than style.css.
|
To change the Default theme's header text appearance 1. | Open Stylesheet with the Theme Editor or style.css with a text editor.
| 2. | Scroll down to the h1 and #headerimg .description selectors in the Typography and Colors section (Figure 34).
Figure 34. Scroll down to the part of the style.css file that contains the selectors you want to modify. In this example, we're using HTML-Kit on Windows. 
| 3. | To modify the appearance of your blog's name in the header:
- Change the size of text by editing the font-size attribute for h1.
- Change the alignment of text by editing the text-align attribute for H1.
| 4. | To modify the appearance of your blog's description in the header:
- Change the size of text by editing the font-size attribute for #headerimg .description.
- Change the alignment of text by editing the text-align attribute for #headerimg .description.
| 5. | If necessary, scroll down a little farther to the selector for h1, h1 a, h1 a:hover, h1 a:visited, #headerimg .description (Figure 34).
| 6. | To change the color of all header text, edit the color attribute for H1, h1 a, h1 a:hover, h1 a:visited, #headerimg .description.
| 7. | Save or upload the modified file (Figure 35) to replace the original.
Figure 35. Here's the same part of the style.css file after a few changes. 
| 8. | View your blog. The text in the header should reflect your changes (Figure 36).
Figure 36. Your changes appear the next time you view your blog. 
|
To change the background colors 1. | Open Header with the Theme Editor or header.php with a text editor.
| 2. | Delete the lines for the style definitions. These lines begin with <style type="text/css" media="screen"> and end with </style> (Figure 37).
Figure 37. All of this style information in the header.php file must be removed to set custom colors in style.css. 
| 3. | Save or upload the modified file to replace the original.
| 4. | Open Stylesheet with the Theme Editor or style.css with a text editor.
| 5. | To set the background colors, modify or add a background-color attribute for the following rules:
- body controls the entire Web page (Figure 38).
Figure 38. The beginning of the style.css file has three examples of a background-color attribute. Just keep in mind that two of these attributes are redefined later in this file. 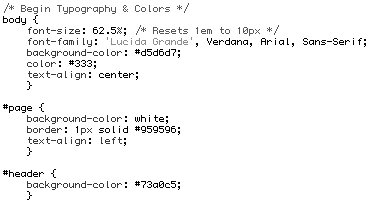
- #page controls the page content other than the header, footer, and sidebar. Be sure to modify the background-color attribute in the second occurrence of the #page rule.
- #header controls the page header. Be sure to modify the background-color attribute in the second occurrence of the #header rule.
- #footer controls the page footer.
- #sidebar controls the sidebar. This rule must be added.
| 6. | Save or upload the modified file to replace the original.
| 7. | View your blog to check your changes (Figure 39).
Figure 39. In this example, we've changed the background colors for all parts of the page. 
|
Tips | Wondering why you deleted the style definitions in step 2? Here's the explanation. The styles in header.php override any styles in style.css because they are referenced after style.css. The lines you deleted tell WordPress to use images in wp-content/themes/default/images for background and shading on blog pages. By deleting them, you make it possible to set colors in style.css. In the Default theme's style.css file, #page and #header are defined twice, each time with a background-color attribute. The second attribute is the one that will be used for your Web pages. If desired, you can "clean up" the style.css file by deleting the second background-color attribute for each of these styles. To add a rule for the background color of the sidebar, copy all three lines for the #footer rule and paste them right beneath the #footer rule. Change #footer to #sidebar in the pasted-in rule to create the new rule. Then change the background-color attribute to the desired color. Figure 40 shows what it might look like when you're done. Figure 40. You can create a #sidebar rule by copying, pasting, and modifying the #footer rule.  You can define the background colors at any point in the stylesheet. If your style changes don't appear to be having an effect, check for typos, missing semicolons, and other errors which may make your stylesheet invalid. You might also want to set your browser's cache setting to 0 (zero) to force all page components to refresh each time you load a page.
|
|