| The Font panel (Figure 43), which is fully integrated with Font Book, offers a standard interface for formatting font characters in a document. Figure 43. TextEdit's Font panel. 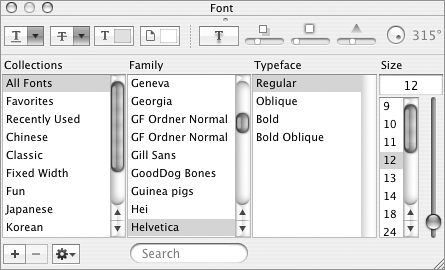
In this part of the chapter, I explain how to use the Font panel to format text.  Tips Tips
This chapter looks at the Font panel as it appears in TextEdit, the text editor that comes with Mac OS X. I discuss TextEdit in detail in Chapter 9. The Font panel is only available in Carbon and Cocoa applicationsthose written to take advantage of Apple-created libraries of code. That's why you'll find the Font panel in only some applications.
To open TextEdit's Font panel With TextEdit active, choose Format > Font > Show Fonts (Figure 42) or press  . The Font panel appears (Figure 43). . The Font panel appears (Figure 43). Figure 42. Choose Show Fonts from the Font submenu under TextEdit's Format menu. 
 Tips Tips
To apply basic font formatting 1. | Open the Font panel (Figure 43).
| 2. | Select a collection from the Collections list.
| 3. | Select a font family from the Family list.
| 4. | Select a style from the Typeface list.
| 5. | Set the font size by entering a value in the Size box, selecting a size from the Size list, or dragging the Size slider up or down (Figure 45).
Figure 45. The Font panel offers three different ways to set the font size. 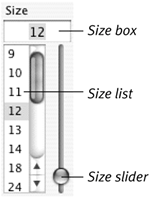
The changes you make are applied to selected text or to text typed at the insertion point.
|
 Tips Tips
The styles that appear in the Typeface list vary depending on the font selected in the Family list. Some font families offer more styles than others. Oblique is similar to italic. Light, regular, medium, bold, and black refer to font weights or boldness.
To apply font effects Use the effects controls at the top of the Font Panel window (Figure 46) to apply other font formatting options to selected text or start formatting at the insertion point: Text Underline offers four underline options: None, Single, Double, and Color. If you choose Color, you can use the Colors panel that appears (Figure 47) to set the underline color. Figure 47. The Colors panel enables you to select a color. 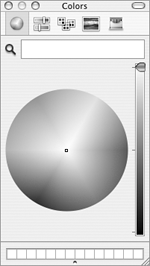
Text Strikethrough offers four strike-through options: None, Single, Double, and Color. If you choose Color, you can use the Colors panel that appears (Figure 47) to set the strikethrough color. Text Color enables you to set the color of text. When you click this button, the Colors panel appears (Figure 47) so you can choose a color for text. Document Color enables you to set the color of the document background. When you click this button, the Colors panel appears (Figure 47) so you can choose a color for the entire document's background. Text Shadow adds a shadow to text characters (Figure 48). Figure 48. It's easy to apply a shadow to text characters. 
Shadow Opacity makes an applied shadow darker or lighter. Drag the slider to the right or left. Shadow Blur makes the shadow sharper or more blurry. Drag the slider to the right or left. Shadow Offset moves the shadow closer to or farther from the text. Drag the slider to the right or left. Shadow Angle changes the position of the shadow in relation to the text. (It's like moving the light source.) Drag the dial around to the desired angle.
Figure 46. Along the top of the Font panel, you'll find a collection of effects menus, buttons, and controls. 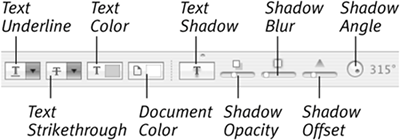
To use the Colors panel 1. | Click the icon along the top of the Colors panel to select one of the color models.
| 2. | How you choose a color depends on the model you selected:
Color Wheel (Figure 47) displays a circle of color. Click inside the circle to choose a color. You can drag the vertical slider up or down to change the brightness. Color Sliders (Figure 49) displays several sliders you can use to change color values. Start by selecting a slider group from the pop-up menu, then move the sliders to create a color. Figure 49. The Colors panel displaying the Color Sliders color model. 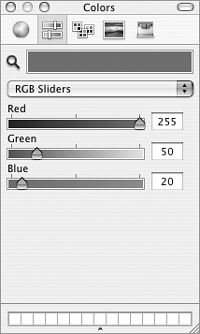
Color Palettes (Figure 50) displays clickable color samples. Choose a palette from the List pop-up menu, then click the color you want. Figure 50. The Colors panel displaying the Color Palettes color model. 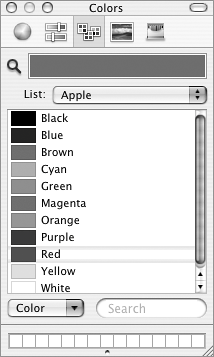
Image Palettes (Figure 51) displays colors from an image. Click a color to select it. Figure 51. The Colors panel displaying the Image Palettes color model. 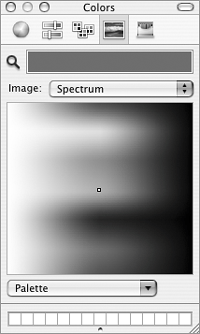
Crayons (Figure 52) displays different colored crayons. Click a crayon to choose its color. Figure 52. The Colors panel displaying my personal favorite color model: Crayons. 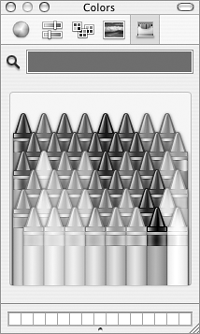
The color of the selected item changes immediately.
|
 Tip Tip
You can use the color wells at the bottom of the Colors panel to store frequently used colors. Simply drag a color into an empty spot. Then, when you open the Colors panel, you can click a stored color to apply it.
|

 Tips
Tips


