The Spelling & Grammar Checkers Word's spelling and grammar checkers help you to identify potential spelling and grammar problems in your documents. They can be set to check text automatically as you type or when you have finished typing. The spelling checker compares the words in a document to the words in its main spelling dictionary, which includes many words and names. If it cannot find a match for a word, it then checks the active custom dictionariesthe dictionary files that you create. If Word still cannot find a match, it flags the word as unknown so you can act on it. The grammar checker works in much the same way. It compares the structure of sentences in the document with predetermined rules for a specific writing style. When it finds a sentence or sentence fragment with a potential problem, it identifies it for you so you can act on it. Both the spelling and grammar checkers are highly customizable so they work the way that you want them to.  Tips Tips
The spelling checker cannot identify a misspelled word if it correctly spells another word. For example, if you type from when you meant to type form, the spelling checker would not find the error. The grammar checker, on the other hand, might find this particular error, depending on its usage. Do not add a word to a custom dictionary unless you know it is correctly spelled. Otherwise, the word will never be flagged as an error.
To enable or disable automatic spelling and/or grammar checking 1. | Choose Word > Preferences (Figure 1).
Figure 1. Choose Preferences from the Word menu. 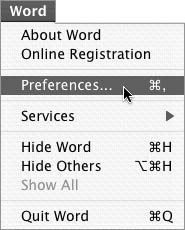
| 2. | In the Preferences dialog that appears, click Spelling and Grammar in the left side of the window to display Spelling and Grammar options (Figure 2).
Figure 2. The default settings in the Spelling & Grammar pane of the Preferences dialog. 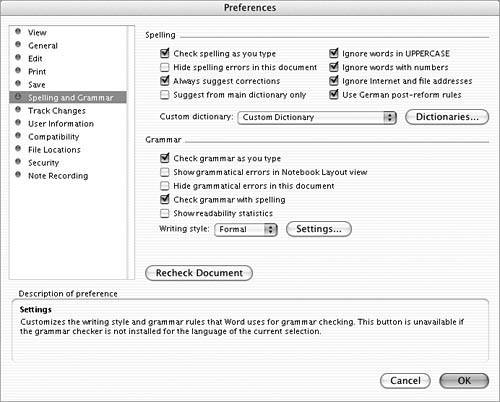
| 3. | To enable automatic spelling checking, turn on the Check spelling as you type check box.
or
To disable automatic spelling checking, turn off the Check spelling as you type check box.
| 4. | To enable automatic grammar checking, turn on the Check grammar as you type check box.
or
To disable automatic grammar checking, turn off the Check grammar as you type check box.
| 5. | Click OK.
|
 Tips Tips
By default, Word is set up to automatically check spelling and grammar as you type. I explain how to set other spelling and grammar preferences in Chapter 20.
To check spelling as you type 1. | Make sure that the automatic spelling checking feature has been enabled.
| 2. | As you enter text into the document, a red wavy underline appears beneath each unknown word (Figure 3).
Figure 3. Two possible errors identified by the spelling checker. 
| 3. | Hold down  and click on a flagged word. The spelling shortcut menu appears (Figure 4). and click on a flagged word. The spelling shortcut menu appears (Figure 4).
Figure 4. A shortcut menu displays options to fix a spelling problem. 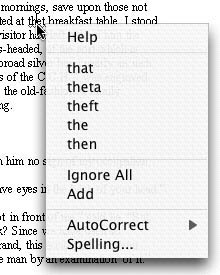
| 4. | Choose the appropriate option:
Suggested spellings appear near the top of the shortcut menu. Choosing one of these spellings changes the word and removes the wavy underline. Ignore All tells Word to ignore the word throughout the document. Choosing this option removes the wavy underline from all occurrences of the word. Add adds the word to the current custom dictionary. The wavy underline disappears and the word is never flagged again as unknown. AutoCorrect enables you to create an AutoCorrect entry for the word using one of the suggested spellings (Figure 5). The word is replaced in the document and will be automatically replaced with the word you chose each time you type in the unknown word. Figure 5. Choose an option from the AutoCorrect submenu to create an Auto-Correct entry. 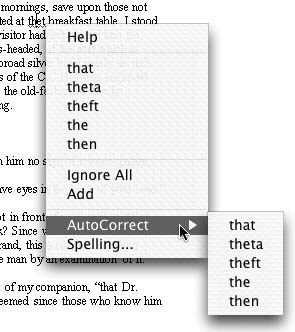
Spelling opens the Spelling dialog (Figure 6) for the word. Figure 6. The Spelling dialog offers additional options for dealing with possible spelling errors. 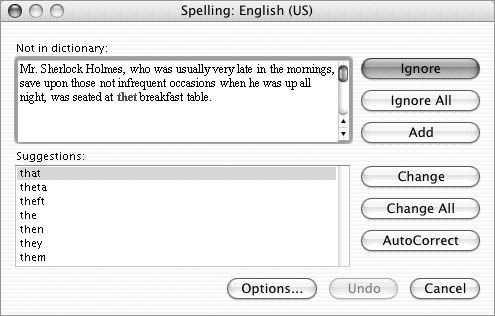
|
 Tips Tips
As shown in Figure 7, Word's spelling checker also identifies repeated words and offers appropriate options. Figure 7. The shortcut menu offers different options for repeated words. 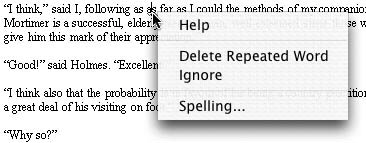
AutoCorrect and the Spelling dialog are discussed later in this chapter.
To check grammar as you type 1. | Make sure that the automatic grammar checking feature has been enabled.
| 2. | As you enter text into the document, a green wavy underline appears beneath each questionable word, phrase, or sentence (Figure 8).
Figure 8. Two possible errors identified by the grammar checker. 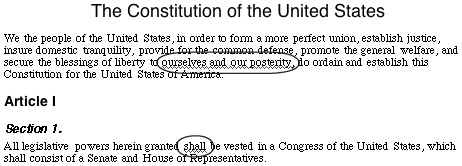
| 3. | Hold down  and click on a flagged problem. The grammar shortcut menu appears (Figures 9 and 10). and click on a flagged problem. The grammar shortcut menu appears (Figures 9 and 10).
Figure 9 & 10. Using the grammar shortcut menu to correct possible grammar problems. 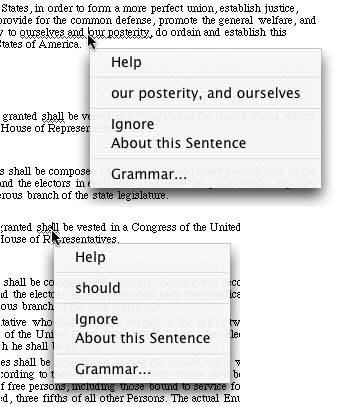
| 4. | Choose the appropriate option:
Suggested corrections appear near the top of the shortcut menu (Figure 9). Choosing a correction changes the text and removes the wavy underline. Ignore tells Word to ignore the problem. Choosing this option removes the wavy underline. About this Sentence provides information about the grammar rule that caused the sentence to be flagged (Figure 11). (The Office Assistant must be displayed for this option to be accessible.) Figure 11. The Office Assistant can explain grammar rules. 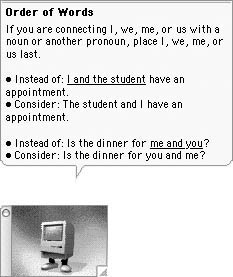
Grammar opens the Grammar dialog (Figure 12). Figure 12. The Grammar dialog offers additional options for working with possible grammar problems. 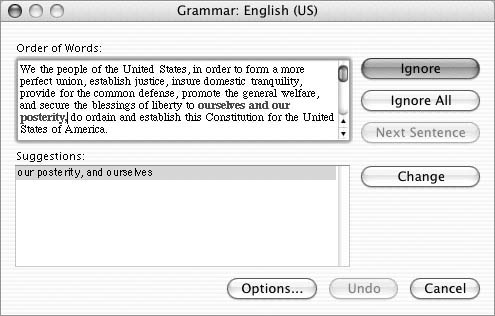
|
 Tips Tips
I tell you more about the Grammar dialog later in this chapter. Word's grammar checker doesn't always have a suggestion to fix a problem. Don't choose a suggestion without examining it carefully. The suggestion Word offers may not be correct.
To check spelling and grammar all at once 1. | Choose Tools > Spelling and Grammar (Figure 13) or press  . .
Figure 13. The Tools menu. 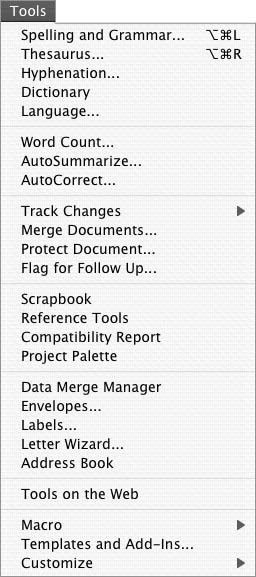
Word begins checking spelling and grammar. When it finds a possible error, it displays the Spelling and Grammar dialog (Figures 14 and 15).
Figure 14. The Spelling and Grammar dialog displaying options for a spelling problem. 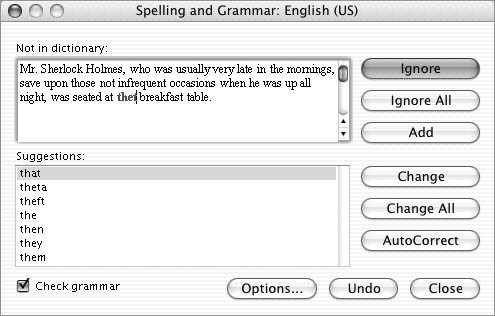
| 2. | For a spelling or grammar problem:
To ignore the problem, click Ignore. To ignore all occurrences of the problem in the document, click Ignore All. To use one of Word's suggested corrections, select the suggestion and click Change. To change the problem without using a suggestion, edit it in the top part of the Spelling and Grammar dialog. Then click Change.
For a spelling problem only:
To add the word to the current custom dictionary, click Add. To change the word throughout the document to one of the suggested corrections, select the suggestion and click Change All. To create an AutoCorrect entry for the word, select one of the suggestions and click AutoCorrect.
For a grammar problem only:
| 3. | Word continues checking. It displays the Spelling and Grammar dialog for each possible error. Repeat step 2 until the entire document has been checked.
|
 Tips Tips
The Spelling and Grammar dialog contains elements found in both the Spelling dialog (Figure 6) and the Grammar dialog (Figure 12). If the Office Assistant is displayed, it will provide additional information (Figure 16) about each grammar problem that appears in the Spelling and Grammar dialog (Figure 15). Figure 15. The Spelling and Grammar dialog displaying options for a grammar problem. 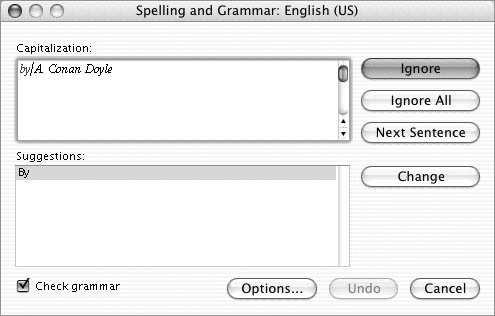
Figure 16. If the Office Assistant is displayed, it provides additional information about possible grammar errors. 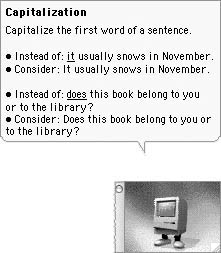
To disable grammar checking during a manual spelling check, turn off the Check grammar check box in the Spelling and Grammar dialog (Figures 14 and 15). Clicking the Options button in the Spelling and Grammar dialog (Figures 14 and 15) displays Spelling & Grammar options (Figure 2). I explain how to use these options to customize a spelling and grammar check in Chapter 20.
|
 Tips
Tips


