Footnotes & Endnotes Footnotes and endnotes are annotations for specific document text. You insert a markerusually a number or symbolright after the text, tell Word where you want the note to go, and enter the note. When you view the document in Page Layout view or Print Preview, or print the document, the note appears where you specified. The difference between a footnote and an endnote is its position in the document: Footnotes appear either after the last line of text on the page on which the annotated text appears or at the bottom of the page on which the annotated text appears (Figure 10). Figure 10. A page with a footnote. Word automatically inserts the footnote separator line, too. 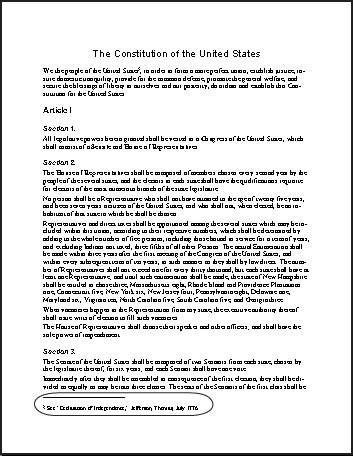
Endnotes appear either at the end of the section in which the annotated text appears or at the end of the document.
 Tips Tips
Footnotes and endnotes are commonly used to show the source of a piece of information or provide additional information that may not be of interest to every reader. Multiple-section documents are covered in Chapter 5. Word automatically renumbers footnotes or endnotes, whenever necessary, when you insert or delete a note. If you're old enough to remember preparing high school or college term papers on a typewriter, you'll recognize this feature as another example of how easy kids have it today. (Sheesh! I sound like my mother!)
To insert a footnote or endnote 1. | Position the insertion point immediately after the text that you want to annotate (Figure 11).
Figure 11. Position the insertion point immediately after the text that you want to annotate. 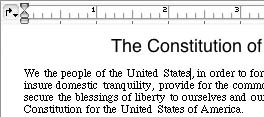
| 2. | Choose Insert > Footnote (Figure 1) to display the Footnote and Endnote dialog (Figure 12).
Figure 12. The Footnote and Endnote dialog. 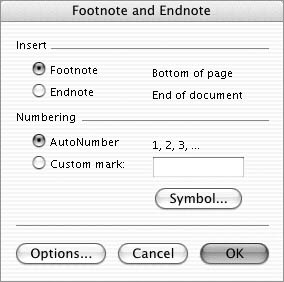
| 3. | In the Insert area, select the option for the type of note you want to insert.
| 4. | In the Numbering area, select the option for the type of numbering you want. If you select Custom mark, enter a character for the mark in the box beside it.
| 5. | Click OK. Word inserts a marker at the insertion point, then one of two things happens:
If you are in Normal or Online Layout view, the window splits to display a footnote or endnote pane with the insertion point blinking beside the marker (Figure 13). Figure 13. Entering a footnote in Normal view. 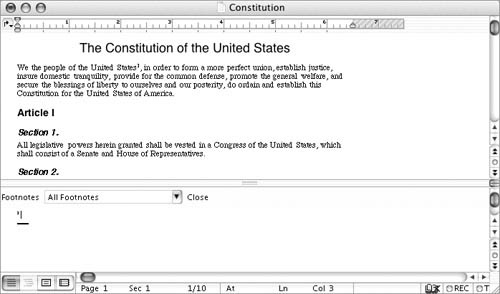
If you are in Page Layout view, the view shifts to the location of the footnote or endnote where a separator line is inserted. The insertion point blinks beside the marker (Figure 14). Figure 14. Entering a footnote in Page Layout view. 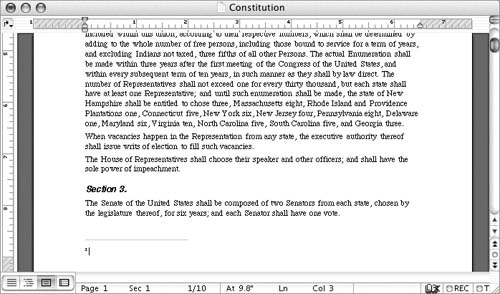
| 6. | Enter the footnote or endnote text (Figure 15).
Figure 15. Enter Footnote text right after the marker. 
|
 Tips Tips
In step 4, you can click the Symbol button to display the Symbol window (Figure 16), click a symbol to select it, and click OK to insert it in the Custom mark box. I explain how to use the Symbol dialog in Chapter 9. Figure 16. You can use the Symbol window to select a symbol (instead of a number) to use as a marker. 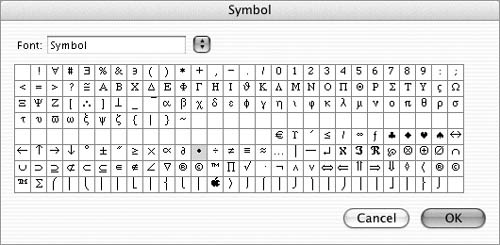
In Normal view, to close the footnote pane, click the Close button at the top of the pane.
To set note options 1. | Choose Insert > Footnote (Figure 1) to display the Footnote and Endnote dialog (Figure 12).
| 2. | Click the Options button to display the Note Options dialog.
| 3. | Click the button for the type of note you want to set options for: All Footnotes (Figure 17) or All Endnotes (Figure 18).
Figure 17 & 18. The Note Options dialog for All Footnotes (top) and All Endnotes (bottom). 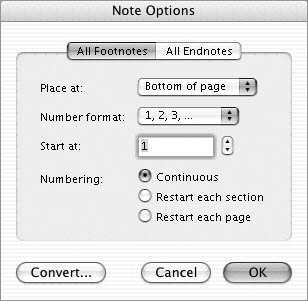 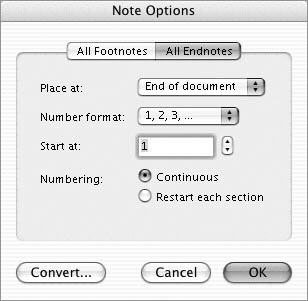
| 4. | Choose an option from the Place at popup menu to determine where the notes should appear.
| 5. | Choose an option from the Number format pop-up menu (Figure 19).
Figure 19. Use the Number format pop-up menu to choose an automatic numbering option. 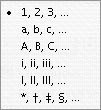
| 6. | If you want the notes to start with a number other than 1, enter a different value in the Start at box.
| 7. | Choose a Numbering option to determine how Word should automatically number the notes.
| 8. | Click OK to save your settings.
| 9. | In the Footnote and Endnote dialog, click Close to save your settings without inserting a footnote or endnote.
|
To convert notes 1. | Choose Insert > Footnote (Figure 1) to display the Footnote and Endnote dialog (Figure 12).
| 2. | Click the Options button to display the Note Options dialog (Figure 17 or 18).
| 3. | Click the Convert button to display the Convert Notes dialog (Figure 20).
Figure 20. The Convert Notes dialog for a document that contains both footnotes and endnotes. 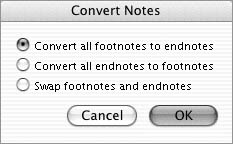
| 4. | Select the option for the type of conversion that you want to do.
| 5. | Click OK to make the conversion.
| 6. | In the Footnote and Endnote dialog, click Close to save your settings without inserting a footnote or endnote.
|
 Tip Tip
To delete a note 1. | In the document window (not the note area or pane), select the note marker (Figure 21).
Figure 21. To delete a footnote or endnote, begin by selecting the note marker. 
| 2. | Press  . The note marker and corresponding note are removed from the document. If the note was numbered using the AutoNumber option, all notes after it are properly renumbered. . The note marker and corresponding note are removed from the document. If the note was numbered using the AutoNumber option, all notes after it are properly renumbered.
|
 Tip Tip
|

 Tips
Tips


