The Tiles Framework
|
| < Day Day Up > |
|
The Tiles framework turns the concept of jsp:includes inside out. Developers can build pages by assembling reusable Tiles. You can think of Tiles as visual components.
A Tile and a Tile layout can be reused on more than one page. Essentially Tiles are other JSP pages or any Web resource. Tile layouts dictate how the Tiles will be laid out on the page.
In many respects, the Tile layout is similar to a template layout. In fact, if you have used Struts templates before, you will note that the Tile framework is backward compatible with the template custom tag library.
The Tile layout is like a display function in some respects. First you pass the Tile layout the parameters you want to use. The parameters are other JSP pages (called Tiles) or Web resources that can be inserted at predefined locations in the layout. The predefined locations are called regions. The parameters also consist of strings that can be inserted into the Tile layout. In fact, you can pass many types of parameters that are used by the Tile. The parameters are attributes in Tile scope.
Tile scope is similar to page scope and is less general than request scope. Tile scope allows users of the Tile to pass arguments (called attributes) to the Tile. The scope lets you pass variables that are available only to that Tile layout or Tile. The parameters become attributes in Tile scope. Custom tags allow you to copy attributes from Tile scope to page, request, session, or application scope, or display the attribute as an included Web resource.
Some programming languages, like C++, Visual Basic, Python, and Ruby allow you to pass default arguments to functions and methods. To further extend the display function metaphor, the Tiles framework also allows you to pass default arguments to a Tile layout. To do this, you must create a Tile definition. Definitions allow you to define default parameters for Tiles. You can create definitions in either JSP or XML.
Definitions can extend other definitions, similar to how one class can extend another class. By using definitions and Tile layouts, you create reusable display components.
Although Tiles can be used in a stand-alone fashion, they also work well with Struts. Struts ships with a Tiles tag library. In addition, the Tiles framework includes its own RequestProcessor for handling Tile layouts as ActionForwards. This means that you can forward to a Tile definition instead of a JSP.
Clarification of Terms
You may find all of these terms a bit overwhelming. Before we get into the details of the Tiles framework, let's review some of the terms (Table 13.1).
| Term | Definition |
|---|---|
| Tiles | The template framework for Struts that you use to create reusable presentation components. |
| Page | A Web resource that is included by a Tile layout. |
| Tile | The same as a page. |
| Region | An area in a Tile layout that inserts another Tile. Regions have logical names, like header, footer, etc. |
| Tile layout | A JSP that describes where other pages should be positioned. It is a template; it defines regions where other Tiles are inserted. A Tile layout can be a Tile to another Tile layout. |
| Definition | Defines parameters for calling a Tile layout. |
A typical Tile layout may define rectangular regions for the header, footer, menu, and body, as shown in Figure 13.1.
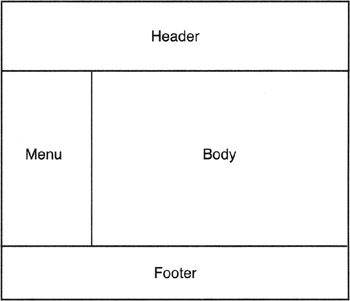
Figure 13.1: A typical Tile layout.
The regions in Figure 13.1 may map to a Web site that looks like the one shown in Figure 13.2.
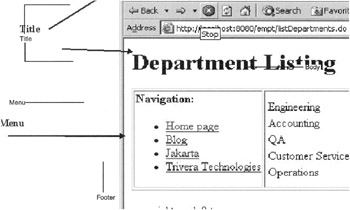
Figure 13.2: The resulting Web site.
Notice that we can easily redefine reusable pieces of this application just by passing the correct parameters. For example, the employee listing might use the same header and footer but a different menu and body, and yet still have full use of the general layout defined by the Tile layout. This approach allows you to reuse the same Tile layout with different contents. Instead of including the HTML markup, you include the content in the markup.
Building and Using Your First Tile Layout
If you remember from our earlier example of the Stock Quote application, we repeat HTML code in both the quote.jsp and the index.jsp. The look and feel of the quote.jsp and index.jsp files are very similar. It would be nice to reuse the same layout (implemented with an HTML table) and images in both without duplicating the same HTML code.
For an example of the Tiles framework, let's refactor quote.jsp and index.jsp to utilize a Tile layout. By the end of this chapter, you will have changed the site to feature the layout shown in Figure 13.3.
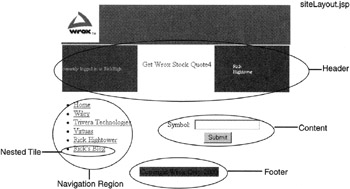
Figure 13.3: The new Web site layout.
Follow these steps:
-
Find the similarities between the two pages.
-
Create a new layout page.
-
Create two new content pages that contain just the differences—that is, the parts of quote.jsp and index.jsp that are not the same
-
Insert the Tile layout in the page—in other words, have index.jsp and quote.jsp insert the Tile layout into their page, passing the content as a parameter and any other parameters that are needed (such as Title).
Finding similarities between the two pages requires skill in HTML layout and Web site usability. It is more of an art than a science. However, this section's focus is on Struts and not on these particular HTML skills. Let's cover steps 2 through 3 in detail.
Creating a Tile Layout
Once you find the similarities, you can create the new layout page. Identifying the similarities is the difficult part; using Tiles is easy. To create a Tile layout, you must do the following:
-
Import the Tiles taglib into the JSP (along with any other taglibs you need) by using the taglib directive.
-
Use string parameters to display such elements as the title of the page using the tiles:getAsString tag.
-
Insert the Tiles in the correct regions of the layout using the tiles:insert tag.
-
Pass any needed parameters to the internal Tiles using the sub-tag of tiles:insert called tiles:put.
First, you import the Tiles taglib (and any other taglibs you need) into the JSP (siteLayout.jsp) as follows. Remember that before you can use the Tiles taglib, you must declare it in your web.xml file.
<%@ taglib uri="/WEB-INF/struts-html.tld" prefix="html" %> <%@ taglib uri="/WEB-INF/struts-bean.tld" prefix="bean" %> <%@ taglib uri="/WEB-INF/struts-tiles.tld" prefix="tiles" %> <taglib> <taglib-uri>/WEB-INF/struts-tiles.tld</taglib-uri> <taglib-location>/WEB-INF/struts-tiles.tld </taglib-location> </taglib>
Next, you use string parameters to display elements such as the page title. Not only do you want to change the content of the page, you also want to change the title that shows up in the browser. To do that, you need to pass in a title that will be used by the Tile layout:
<html> <head> <title> <tiles:getAsString name="title" ignore="true"/> </title> </head>
Notice that we use the tiles:getAsString tag to display string parameters. In addition to passing string parameters, we can pass other pages that we want to insert into this page. This assumes that the calling JSP passes a title to this Tile layout; otherwise, the title will be blank.
If true, the ignore attribute tells the code to ignore the parameter if it is missing. If ignore is false, the Tiles framework throws an exception and the page will not display if the parameter is not passed (false is the default).
To insert the content JSP, use the tiles:insert tag. The tiles:insert tag inserts any page or Web resource that the framework refers to as a Tile. It effectively defines a region in the Tile layout. Here is an example of inserting a Tile into the layout:
<tiles:insert attribute="content"/>
Anytime you insert a Tile, you have the option of passing it parameters. The parameters you pass the Tile are put into that Tile's Tile scope and are referred to as Tile attributes. For example, suppose that in addition to having the title displayed in the browser's title bar you would like it to appear in the header region of the page. You have a header.jsp file that you are using to accomplish this. Even though the title variable is in the Tile layout page scope, it would not be in the scope of the Tiles that the Tile layout inserts. Each Tile and Tile layout has its own context—that is, its own Tile scope. Thus, you need to pass the title variable to the header Tile as follows:
<tiles:insert attribute="header" ignore="true"> <tiles:put name="title" beanName="title" beanScope="tile"/> </tiles:insert>
The tiles:put tag puts the title parameter in this Tile layout scope into the header Tile's scope. That way, the header Tile can use the parameter just as the Tile layout did using the tiles:getAsString tag. The parameter name is the name of the attribute in the header's Tile scope. The bean parameter is the name of the bean in the current scope (i.e., siteLayout.jsp). The beanScope is the scope where you want to look for this attribute (the possible values are page, tile, request, session, and application). You can pass beans from any scope to the Tile.
Listing 13.1 contains the complete new layout page (siteLayout.jsp) that quote.jsp and index.jsp will use. Please take a few moments to study this listing. Notice how we are inserting Tiles into various regions (header, footer, content) and how we are using an HTML layout to define the regions for Tiles, thus defining the complete layout for our application.
Listing 13.1: siteLayout.jsp.
<%@ taglib uri="/WEB-INF/struts-html.tld" prefix="html" %> <%@ taglib uri="/WEB-INF/struts-bean.tld" prefix="bean" %> <%@ taglib uri="/WEB-INF/struts-tiles.tld" prefix="tiles" %> <html> <head> <title> <tiles:getAsString name="title" ignore="true"/> </title> </head> <body> <table width="500" border="0" cellspacing="0" cellpadding="0"> <tr bgcolor="#36566E"> <td height="68" width="48%"> <div align="left"> <img src="/books/2/574/1/html/2/images/hp_logo_wrox.gif" width="220" height="74"> </div> </td> </tr> <tr> <td height="68" width="2000"> <tiles:insert attribute="header" ignore="true"> <tiles:put name="title" beanName="title" beanScope="tile"/> </tiles:insert> </td> </tr> <tr> <td> <div align="center"> <tiles:insert attribute="content"/> </div> </td> </tr> <tr> <td> <tiles:insert attribute="footer" ignore="true"/> </td> </tr> </table> </body> </html>
Using a Tile Layout
Now that you have defined a Tile layout that uses Tiles, you need to take advantage of that layout. Both index.jsp and quote.jsp will use the same layout. This seems like a lot of work for just two pages. However, for a real Web application, you might use the same layout for 20 pages or more. You will not have to repeat this HTML in different 20 locations or include several JSP fragments in 20 different pages.
Including JSP fragments in the right location is a fragile way of reusing HTML. Imagine having 20 pages including the same 5 JSP fragments. You would have to repeat yourself 100 times.
To use a Tile, you need to perform the following steps:
-
Import the Tiles taglib with the taglib directive.
-
Use tiles:insert to insert the Tile layout into the current page.
-
Use tiles:put to pass string parameters.
-
Use tiles:put to pass parameter Tiles.
By using a Tile layout, you can externalize the entire HTML needed for the layout of the site in one location and then just insert it in each page. Here is an example of inserting the Tile layout into index.jsp:
<%@ taglib uri="/WEB-INF/struts-tiles.tld" prefix="tiles" %> <tiles:insert page="/siteLayout.jsp" flush="true"> <tiles:put name="title" type="string" value="Get WROX Stock Quote" /> <tiles:put name="header" value="/header.jsp" /> <tiles:put name="footer" value="/footer.jsp" /> <tiles:put name="content" value="/indexContent.jsp"/> </tiles:insert>
Now when you want to do the same thing in quote.jsp, all you have to do is change the content and the header.
You need to call the Tile layout (the display function) by using the insert tag. Here we use the tiles:insert tag to insert the Tile layout into the current page:
<tiles:insert page="/siteLayout.jsp" flush="true">
The page attribute is used to specify the Tile layout that you defined earlier. If the flush attribute is set to true, this Tile (and the page up to this point) will be written to the browser before the rest of the page (or the buffer fills and forces a flush).
One of the things you need to change between quote.jsp and header.jsp is the page title. To do this, use the sub-tag tiles:put:
<tiles:put name="title" type="string" value="Get WROX Stock Quote" />
In this code snippet, we use tiles:put to pass string parameters to the Tile layout. The name attribute of the tiles:put tag specifies the name of the parameter. The type attribute specifies the type of the parameter. Finally, the value parameter passes the value of the title attribute. This allows you to pass simple strings as parameters when the Tile layout (the display function) is called with the tiles:insert tag. The parameters become attributes of the Tile layout—that is, they are inserted in the Tile scope of the Tile layout.
In our example, we pass three Tiles as parameters—header, footer, and content (header.jsp, footer.jsp, and indexCotent.jsp)—as follows:
<tiles:put name="header" value="/header.jsp" /> <tiles:put name="footer" value="/footer.jsp" /> <tiles:put name="content" value="/indexContent.jsp"/>
The header.jsp page will be inserted in the header region of the Tile layout; footer.jsp will be inserted into the footer region, and indexContent.jsp will be inserted into the content region. If you want to insert a different content and title, all you have to do is change the value of the content parameter.
Notice that the form for index.jsp is no longer in index.jsp. The form has been moved to indexContent.jsp:
<%@ taglib uri="/WEB-INF/struts-html.tld" prefix="html" %> <%@ taglib uri="/WEB-INF/struts-bean.tld" prefix="bean" %> <html:form action="Lookup"> <table width="45%" border="0"> <tr> <td><bean:message key="app.symbol" />:</td> <td><html:text property="symbol" /></td> </tr> <tr> <td colspan="2" align="center"><html:submit /></td> </tr> </table> </html:form>
In addition to specifying Tiles as JSP pages, you can pass in text in the body of the tiles:put tag as the tile. The quote.jsp page does just this:
<%@ taglib uri="/WEB-INF/struts-bean.tld" prefix="bean" %> <%@ taglib uri="/WEB-INF/struts-tiles.tld" prefix="tiles" %> <tiles:insert page="/siteLayout.jsp" flush="true"> <tiles:put name="title" type="string" value="WROX Stock Quote" /> <tiles:put name="header" value="/header.jsp" /> <tiles:put name="footer" value="/footer.jsp" /> <tiles:put name="content" type="string"> <bean:message key="app.price"/> <%= request.getAttribute("PRICE") %> </tiles:put> </tiles:insert> Notice that the body of the tiles:put tag contains the contents of quote.jsp. Everything else is defined by the layout and by the same Tiles we used in the previous example.
The advantage of this approach is that it reduces the number of JSP pages in the system. I've seen long debates about which approach is best, and I've concluded that the answer depends on how much code will be in the body of the put.
Do you see a problem here? We have broken the "don't repeat yourself" (DRY) rule. Let's take a look.
|
| < Day Day Up > |
|
EAN: 2147483647
Pages: 183