Section 3.1. The Dock
As noted briefly in Chapter 1, the Dock is a launcher (like the Windows Start menu) and a "what's open " listing (like the Windows taskbar) rolled into one. Only a tiny triangle beneath a program's icon tells you that it's open.
Apple starts the Dock off with a few icons it thinks you'll enjoy: QuickTime Player, iTunes, iChat, and so on. But using your Mac without putting your own favorite icons on the Dock is like buying an expensive suit and turning down the free alteration service. At the first opportunity, you should make the Dock your own.
The concept of the Dock is simple: Any icon you drag onto it (Figure 3-1) is installed there as a large button. A single click, not a double-click, opens the corresponding icon. In other words, the Dock is an ideal parking lot for the icons of disks, folders, documents, and programs you frequently use.
Tip: You can install batches of icons onto the Dock all at oncejust drag them as a group .
Here are a few aspects of the Dock that may throw you at first:
-
It has two sides . The fine dark line running down the middle of the Dock in Figure 3-1 is the divider. Everything on the left side is a program. Everything else goes on the right side: files, documents, folders, and disks.
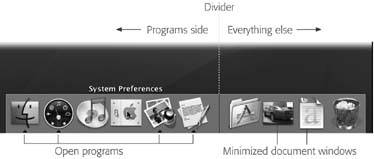
Figure 3-1. To add an icon to the Dock, just drag it there. Note that you haven't moved the original file. When you release the mouse, it remains where it was. What you've actually done is install a copy of its icon onto your Docklike a Macintosh alias or Windows shortcut, you might say.
-
Its icon names are hidden . To see the name of a Dock icon, point to it without clicking. You'll see the name appear just above the icon.
-
Folders and disks are hierarchical . If you retain nothing else in this chapter, remember this: If you hold down the mouse button on a folder or disk icon on the right side of the Dock, a list of its contents sprouts from the icon. It's a hierarchical list, meaning that you can burrow into folders within folders this way. See Figure 3-2 for an illustration.
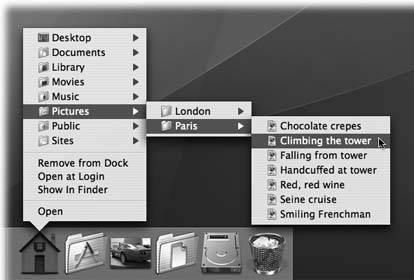
Figure 3-2. As long as you keep the mouse button pressed, you can burrow into folders within folderseither with the intention of opening a file or folder (by releasing the mouse button as you point), or just to see what's inside.
Tip: To make the pop-up menu appear instantly, just Control-click the Dock icon, or (if you have a two-button mouse) right-click it.
-
Programs appear there unsolicited . Nobody but you can put icons on the right side of the Dock. But program icons appear on the left side of the Dock automatically whenever you open a programeven if it's one that you didn't put there. Its icon remains there for as long as the program is running.
3.1.1. Organizing and Removing Dock Icons
You can move the icons of the Dock around just by dragging them horizontally. As you drag, the other icons scoot aside to make room. When you're satisfied with its new position, drop the icon you've just dragged.
Tip: If you don't want the other icons to scoot away, then
To remove a Dock icon, drag it away. Once your cursor has cleared the Dock, release the mouse button. The icon disappears, its passing marked by a charming little puff of animated cartoon smoke. (Mac OS X won't let you remove the Finder, the Trash, or the Dock icon of a program or document that's currently open, however.)
Weirdly enough, this technique (removing a Dock program's icon by dragging it away) works even while a program is still running. Granted, you won't see any change immediately, because the program is still open. But when you ultimately quit the program, you'll see that its previously installed icon is no longer on the Dock.
3.1.2. Three Ways to Get the Dock out of Your Hair
The bottom of the screen isn't necessarily the ideal location for the Dock. Because most screens are wider than they are tall, the Dock eats into your limited vertical screen space. Worse, a bottom-feeding Dock can actually overlap your document windows, interfering with your work.
In these situations, you have three ways out: Hide the Dock, shrink it, or rotate it 90 degrees.
3.1.2.1. Auto-hiding the Dock
To turn on the Dock's auto-hiding feature, choose ![]()
 Dock Turn Hiding On.
In other words, a hidden Dock works just like a hidden taskbar in Windows. When it's hidden, you can make it slide into view by moving the cursor to the Dock's edge of the screen. When you move the cursor back to the middle of the screen, the Dock slithers out of view once again. (Individual Dock icons may occasionally shoot upward into desktop territory when a program needs your attentioncute, very cutebut otherwise , the Dock lies low until you call for it.)
Tip: You may prefer to hide and show the Dock by pressing the hide/show keystroke, Option-
3.1.2.2. Shrinking and enlarging the Dock
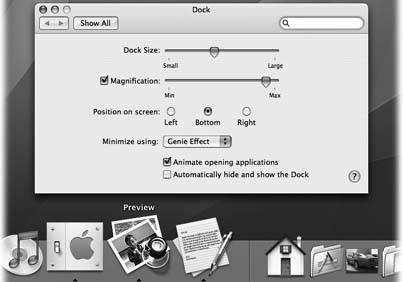
Depending on your screen's size , you may prefer smaller or larger Dock buttons . The official way to resize them goes like this: Choose ![]() Dock Dock Preferences. In the resulting dialog box, drag the Dock Size slider, as shown in Figure 3-3.
Dock Dock Preferences. In the resulting dialog box, drag the Dock Size slider, as shown in Figure 3-3.
There's a much faster way to resize the Dock, however: Just position your cursor directly on the Dock's divider line, so that it turns into a double-headed arrow (shown in Figure 3-3). Now drag up or down to shrink or enlarge the Dock.
Tip: If you press Option as you drag, the Dock snaps to certain canned icon sizesthose that the programmer actually drew.
|

As noted in Figure 3-3, you may not be able to enlarge the Dock, especially if it contains a lot of icons. But you can make it almost infinitely smaller . Which makes you wonder : How can you distinguish between icons if they're the size of molecules?
| GEM IN THE ROUGH Living Icons |
| Mac OS X brings to life a terrific idea, a new concept in mainstream operating systems: icons that tell you something. As shown here, for example, you can often tell documents apart just by looking at their icons. Furthermore, some program icons actually change over time. The Mail icon (see Chapter 10) displays a live counter that indicates how many new email messages are waiting for you. (After all, why should you switch into the Mail program if you'll only be disappointed?) The iChat icon sprouts an indicator to let you know that an instant message is waiting. And if you minimize a QuickTime movie while it's playing, it shrinks down and continues playing right there in the Dock. Think of the possibilities. At this rate, one day the Safari icon could change to let us know when interesting new Web pages have appeared, the Quicken icon could display your current bank balance, and the Microsoft Word icon could change every time Microsoft posts a bug fix.  |
The answer lies in the ![]() Dock Turn Magnification On command. What youve just done is trigger the swelling effect shown in Figure 3-4. Now your Dock icons balloon to a much larger size as your cursor passes over them. It's a weird, rippling sort of animated effect that takes some getting used to. But it's yet another spectacular demonstration of the graphics technology in Mac OS X, and it can actually come in handy when you find your icons otherwise shrinking away to nothing.
Dock Turn Magnification On command. What youve just done is trigger the swelling effect shown in Figure 3-4. Now your Dock icons balloon to a much larger size as your cursor passes over them. It's a weird, rippling sort of animated effect that takes some getting used to. But it's yet another spectacular demonstration of the graphics technology in Mac OS X, and it can actually come in handy when you find your icons otherwise shrinking away to nothing.
|
3.1.2.3. Moving the Dock to the sides of the screen
Yet another approach to getting the Dock out of your way is to rotate it, so that it sits vertically against a side of your screen. You can rotate it in either of two ways:
-
The menu way . From the
 Dock submenu, choose "Position on Left," "Position on Right," or "Position on Bottom," as you see fit.
 -
The mouse way . While pressing Shift, drag the Dock's divider line, as though it's a handle, directly to either side of the screen.
You'll probably find that the right side of your screen works better than the left. (Most Mac OS X programs put their document windows against the left edge of the screen, where the Dock and its labels might get in the way.)
Note: When you position your Dock vertically, the "right" side of the horizontal Dock becomes the bottom of the vertical Dock. So if you use a vertical Dock, mentally substitute the phrase "bottom part of the Dock" when you read references to the "right side of the Dock."
EAN: N/A
Pages: 371
- Key #4: Base Decisions on Data and Facts
- Beyond the Basics: The Five Laws of Lean Six Sigma
- When Companies Start Using Lean Six Sigma
- Making Improvements That Last: An Illustrated Guide to DMAIC and the Lean Six Sigma Toolkit
- The Experience of Making Improvements: What Its Like to Work on Lean Six Sigma Projects