Section 1.11. Window Controls
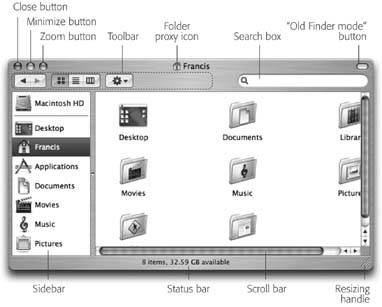
As in Windows , a window on the Mac is framed by an assortment of doodads and gizmos (Figure 1-8). You'll need these to move a window, close it, resize it, scroll it, and so on. But once you get to know the ones on a Macintosh, you're likely to be pleased by the amount of thought those fussy perfectionists at Apple have put into their design.
Here's an overview of the various Mac OS X window-edge gizmos and what they do.
1.11.1. Title Bar
When several windows are open , the darkened window name and colorful upper-left controls tell you which window is active (in front). Windows in the background have gray, dimmed lettering and gray upper-left control buttons . As in Windows, the title bar also acts as a handle that lets you move the entire window around on the screen.
Tip: Here's a nifty keyboard shortcut with no Windows equivalent: You can cycle through the different open windows in one program without using the mouse. Just press
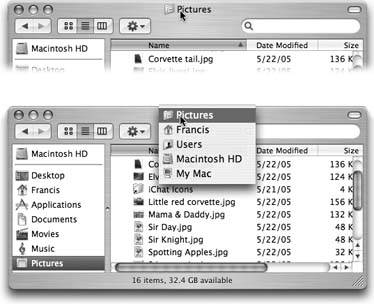
After you've opened one folder inside another, the title bar's secret folder hierarchy menu is an efficient way to backtrackto return to the enclosing window. Figure 1-9 reveals everything about the process after this key move: pressing the ![]() key as you click the name of the window. (You can release the
key as you click the name of the window. (You can release the ![]() key immediately after clicking.)
key immediately after clicking.)
Tip: Instead of using this title bar menu, you can also jump to the enclosing window by pressing
|
One more title bar trick: By double-clicking the title bar, you minimize the window (see the facing page).
Tip: The Option key means "apply this action to all windows." For example, Option-double-clicking any title bar minimizes all desktop windows, sending them flying to the Dock. Option-clicking the Close button closes all open desktop windows, and so on. (The Option-key trick doesn't close all windows in every program, howeveronly those in the current program. Option-closing a Safari window closes Safari windows, but your desktop windows remain open. Moreover, Option-closing doesn't work at all in Microsoft Office programs.)
1.11.2. Close Button
As the tip of your cursor crosses the three buttons at the upper-left corner of a window, tiny symbols appear inside them: x,, and +. The most important window gadget is the close button, the red, droplet-like button in the upper-left corner (see Figure 1-8). It closes the window, exactly like the X button at the upper- right corner in Windows. Learning to reach for the upper-left corner instead of the upper-right will probably confound your muscle memory for the first week of using the Macintosh.
|
If you can't break the old habit, you can avoid the frustration entirely by learning the keyboard shortcut: ![]() -W (for window )an easier keystroke to type than the Windows version (Alt-F4), which for most people is a two-handed operation. If you get into the habit of dismissing windows with that deft flex of your left hand, you'll find it far easier to close several windows in a row, because you don't have to aim for successive close buttons.
-W (for window )an easier keystroke to type than the Windows version (Alt-F4), which for most people is a two-handed operation. If you get into the habit of dismissing windows with that deft flex of your left hand, you'll find it far easier to close several windows in a row, because you don't have to aim for successive close buttons.
Tip: If, while working on a document, you see a tiny dot in the center of the Close button, Mac OS X is trying to tell you that you haven't yet saved your work. The dot goes away when you save the document.
1.11.3. Minimize Button
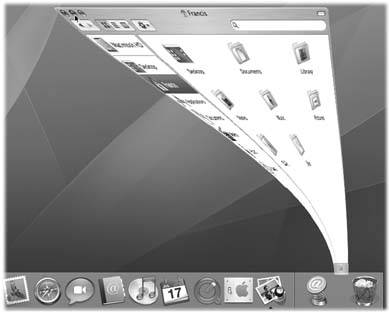
Click this yellow drop of gel to minimize any Mac window, sending it shrinking, with a genie -like animated effect, into the right end of the Dock, where it now appears as an icon. It's exactly like minimizing a window in Windows, except that the window is now represented by a Dock icon rather than a taskbar button (Figure 1-10). To bring the window back to full size , click the newly created Dock icon. See Chapter 3 for more on the Dock.
Tip: If you enjoy the ability to roll up your windows in this way, remember that you actually have a bigger target than the tiny minimize button. The entire striped title bar becomes a giant minimize button when you double-click anywhere on it.Better yet, you can minimize a window from the keyboard (in most programs) by pressing
|
1.11.4. Zoom Button
A click on this green geltab (see Figure 1-8) makes a desktop window just large enough to show you all of the icons inside it. If your monitor isn't big enough to show all the icons in a window, the zoom box resizes the window to show as many as possible. In either case, a second click on the zoom button restores the window to its original size. (The Window  Zoom Window command does the same thing.)
This should sound familiar: It's a lot like the Maximize button at the top right of a Windows window. On the Macintosh, however, the window rarely springs so big that it fills the entire screen, leaving a lot of empty space around the window contents; it only grows enough to show you as much of the contents as possible.
1.11.5. The Folder Proxy Icon
Virtually every Macintosh title bar features a small icon next to the window's name (Figure 1-11), representing the open window's actual folder or disk icon. In the Finder, dragging this tiny icon (technically called the folder proxy icon ) lets you move or copy the folder to a different folder or disk, to the Trash, or into the Dock, without having to close the window first. (When clicking this proxy icon, hold down the mouse button for a half second, or until the icon darkens . Only then are you allowed to drag it.) It's a handy little function with no Windows equivalent.
Tip: In some programs, including Microsoft Word, dragging this proxy icon lets you move the actual file to a different disk or folderwithout even leaving the program. It's a great way to make a backup of the document that you're working on without interrupting your work.
|
1.11.6. The Finder Sidebar and Toolbar
Chapter 3 describes these fascinating desktop-window elements in great detail.
1.11.7. Toolbar Button
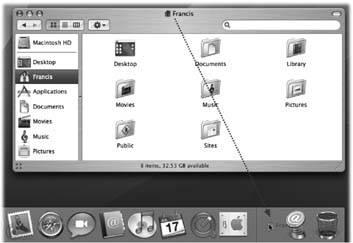
Mac OS X prefers to keep only one Finder window open at a time. That is, if a window called United States is filled with folders for the individual states, double-clicking the New York folder doesn't open a second window. Instead, the New York window replaces the United States window (Figure 1-12). Modern versions of Windows work exactly the same way.
So what if you've now opened inner folder B, and you want to backtrack to outer folder A? In that case, just click the tiny left-arrow button labeled Back, shown in Figure 1-11, or use one of these alternatives:
-
Choose Go
Back. -
Press
 -[ (left bracket ).
 -
Press
-up arrow.
None of that helps you, however, if you want to copy a file from one folder into another, or compare the contents of two windows. In such cases, you'll probably want to see both windows open at the same time.
You can open a second window using any of these techniques:
-
Choose File
New Finder Window ( -N).
Tip: The window that appears when you do this is your Home folder by default, but you can change that setting in Finder Preferences General.
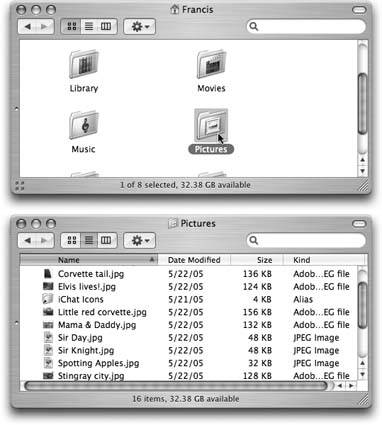
Figure 1-12. In an effort to help you avoid window clutter, Apple has designed Mac OS X windows so that double-clicking a folder in a window (top) doesn't actually open another window (bottom). Every time you double-click a folder in an open window, its contents replace whatever was previously in the window. If you double-click three folders in succession, therefore, you still wind up with just one open window.
- -double-click a disk or folder icon.
-
Double-click a folder or disk icon on your desktop.
-
Choose File
Preferences, and turn on "Always open folders in a new window." Now when you double-click a folder, it always opens into a new window of its own.
Another alternative is to switch to "bare-bones window mode" (not the official Apple terminology). The upper-right corner of every Finder window contains a little button that looks like a half-inch squirt of Crest toothpaste. When you click it, you enter a hidden-toolbar, hidden-Sidebar mode. (You can also enter this mode by pressing Option- ![]() -T, the equivalent for the View Hide Toolbar command.)
-T, the equivalent for the View Hide Toolbar command.)
In this mode, two things happen. First, the Finder window toolbar, identified in Figure 1-7, slides out of sight, along with the Sidebar on the left. Second, double-clicking a folder now opens a new corresponding window.
You can return to regular Mac OS X mode by clicking the toolbar button again, by pressing Option- ![]() -T again, or by choosing View Show Toolbar.
-T again, or by choosing View Show Toolbar.
Note: You'll find this little white toolbar-control nubbin in a number of toolbar-endowed programs, including Mail, Preview, and others. Clicking it always makes the toolbar go away.
1.11.8. Scroll Bars
In general, scroll bars work on the Mac just as they do in Windows.
Tip: One key difference: Out of the box, the Mac 's scroll-up arrow and scroll-down arrow are nestled together, at the same end of the scroll bar. To "fix" them so that they sit at opposite ends as in Windows, choose
System Preferences. Click Appearance. Where it says "Place scroll arrows," click "At top and bottom." It's worth noting, however, that the true speed expert eschews scroll bars altogether. The Mac has the usual complement of navigation keys: Page Up, Page Down, Home, and End (although these don't always work the way you're used to; see Section 8.11). And if you bought a mouse that has a scroll wheel on the top, you can use it to scroll windows, too, without pressing any keys at all.
1.11.9. Resize Box
The lower-right corner of every standard Mac OS X window is ribbed, a design that's meant to imply that you can grip it by dragging. Doing so lets you resize and reshape the window, just as on the PC.
Unfortunately, you can't also change the shape of a Macintosh window by dragging its edges , as you can in Windows.
1.11.10. Status Bar
If you're using the "bare-bones" window view described above, you can choose View Show Status Bar to get a handy information strip just beneath the title bar in every Finder window. It tells you how many icons are in the window ("14 items," for example) and the amount of free space remaining on the disk.
Otherwise, in normal Finder mode, those statistics show up at the bottom of each window.
EAN: N/A
Pages: 371