Section 13.10. Desktop Screen Saver
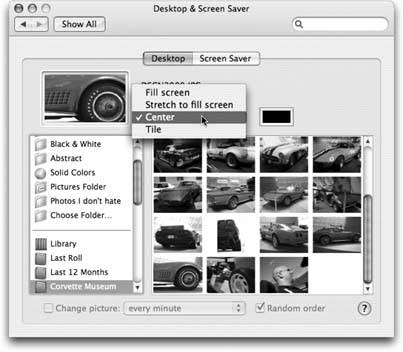
13.10. Desktop & Screen SaverThis pane offers two ways to show off Mac OS X's glamorous graphics features: desktop pictures and screen savers . 13.10.1. DesktopMac OS X comes with several ready-to-use collections of desktop pictures, ranging from National Geographicstyle nature photos to plain solid colors. To install a new background picture, first choose one of the image categories in the list at the left side of the window, as shown in Figure 13-7. Note: Several of Apple's ready-to-use desktop pictures come in two sizes. The elongated versions (with the flatter, squashed-down thumbnails) are designed to perfectly fill the extra-wide screens on 15- and 17-inch PowerBooks, Apple Cinema Displays, and other unusually wide screens.
13.10.1.1. Using your own picturesOf course, you may feel that decorating your Mac desktop is much more fun if you use one of your own pictures. You can use any digital photo, scanned image, or graphic you want in almost any graphics format (JPEG, PICT, GIF, TIFF, Photoshop, and even PDF). That's why your own Pictures folder is also listed here. (If you use iPhoto to manage your digital camera shots, you'll welcome the appearance of the Library, Last Import, and iPhoto album icons here, too.) In any case, when you click one of these icons, you see thumbnail versions of its contents in the main screen to its right. Just click the thumbnail of any picture to apply it immediately to the desktop. (There's no need to remove the previously installed picture first.) Tip: If there's one certain picture you like, but it's not in any of the listed sources, you can drag its image file onto the well (the mini-desktop displayed in the Desktop panel). A thumbnail of your picture instantly appears in the well and, a moment later, the picture is plastered across your monitor. 13.10.1.2. Making the picture fitNo matter which source you use to choose a photo of your own, you have one more issue to deal with. Unless you've gone to the trouble of editing your chosen photo so that it matches the precise dimensions of your screen (1280 x 854 pixels, for example), it probably isn't exactly the same size as your screen. Tip: The top 23 pixels of your graphic are hidden by the menu barsomething to keep in mind when you prepare the graphic. Fortunately, Mac OS X offers a number of solutions to this problem. Using the pop-up menu just to the right of the desktop preview well, you can choose Fill Screen, Stretch, Center, or Tile, each of which enlarges the picture (relative to your screen) in a different way. 13.10.1.3. Auto-picture changingThe novelty of any desktop picture, no matter how interesting, is likely to fade after several months of all-day viewing. That's why the randomizing function is so delightful. Turn on "Change picture" at the bottom of the dialog box. From the pop-up menu, specify when you want your background picture to change: "every day," "every 15 minutes," or, if you're really having trouble staying awake at your Mac, "every 5 seconds." (The option called "when waking from sleep" refers to the Mac waking from sleep, not its owner.) Finally, turn on "Random order," if you like. If you leave it off, your desktop pictures will change in alphabetical order by file name. That's all there is to it. Now, at the intervals you specified, your desktop picture will change automatically, smoothly cross-fading between the pictures in your chosen source folder like a slideshow. You may never want to open another window again, because you'll hate to block your view of the show. 13.10.2. Screen SaverOn the Screen Saver pane, you can create your own screen-saver slideshowsan absolute must if you have an Apple Cinema Display and a cool Manhattan loft apartment. Tip: A screen saver doesn't really save your screen. LCD flat-panel screenspractically the only kind Apple sellsare incapable of "burning in" a stationary image of the sort that originally inspired the creation of screen savers years ago. (And even on CRT screens, you'd have to leave the same picture up for two solid years before the image would begin to burn in.)No, these screen savers offer two unrelated functions. First, they mask what's on your screen from passersby whenever you leave your desk. Second, they're a blast. Apple provides a few displays to get you started. Some of the most interesting:
When you click a module's name in the Screen Savers list, you see a mini-version of it playing back in the Preview screen. Click Test to give the module a dry run on your full monitor screen. Tip: To customize a screen saver, click Options. When you've had enough of the preview, just jiggle the mouse or press any key. You return to the Screen Saver panel. 13.10.2.1. Activating the screen saverYou can control when your screen saver takes over your monitor in a couple of ways:
Tip: You can find dozens more screen saver modules at www.epicware.com/macosxsavers.html. |
 Pictures folderinto a self-playing slideshow, complete with spectacular zooming and dissolving effects. If youve created a slideshow
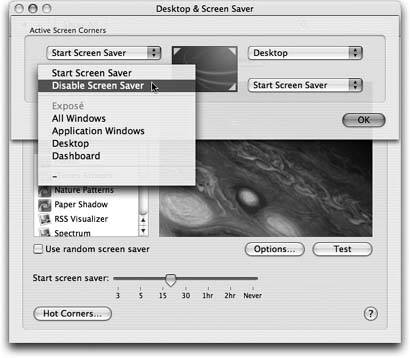
EAN: N/A
Pages: 371