| Whether the images that you place in a file are linked or embedded, it's important to be able to track where those images came from and to access additional information about the images themselves. To manage all of the placed images in your document, choose Window > Links to open the Links palette. By default, the Links palette lists all of the images in your document. However, from the Links palette menu, you can specify that the Links palette only display missing, modified, or embedded images (Figure 8.7). In addition, you can choose to have the Links palette list images sorted by name (filename), kind (file type), or status (up to date, or modified). Figure 8.7. Icons in the Layers palette indicate additional information about the images that are placed in your document. No icon indicates a place-linked file. 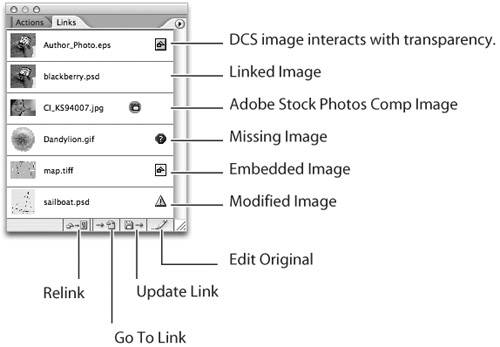
Double-clicking any file listed in the Links palette opens a Link Information dialog, offering additional information about the image. Besides listing the file size of the image, the Link Information dialog also gives you the location of the image (the file path), and detailed scaling and rotation information (Figure 8.8). Figure 8.8. Double-clicking a listing in the Links palette brings up Link Information, a dialog containing useful information. 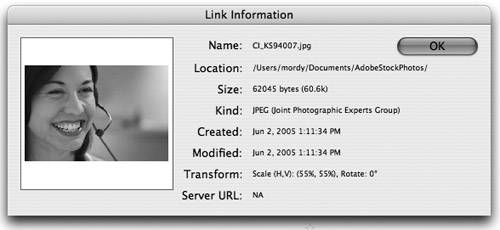
Along the bottom of the Links palette are four buttons (refer back to Figure 8.7) that allow you to perform certain functions with the images in your document. To use these functions, first highlight an image in the Links palette, and then click the desired button. Relink. The Relink button allows you to replace one image with a different one. When you click the Relink button, the Place dialog appears, allowing you to choose another file, which replaces the selected image. You can use Relink to either swap high-resolution files for low-resolution ones, or to replace FPO (For Position Only) placeholder images with final copies. Additionally, you can use the Relink function and choose to replace your file with the same image (replacing it with itself), which allows you to access different Place settings or to replace an embedded image that was updated. Go To Link. The Go To Link button adjusts the view setting of your document window so that the highlighted image in the Links palette is centered on your screen. In addition, the image becomes selected. This makes it easy to quickly find an image and it is especially useful in documents that contain many placed images. Update Link. The Update Link button is used to update place-linked images when Illustrator detects that external files have been modified outside of Illustrator. Images that have been modified appear with a yellow warning icon in the Links palette. The Update Link button is dim when an embedded image is chosen. Edit Original. The Edit Original button is used when you want to modify a place-linked image in the image's creator application. When you highlight an image in the Links palette and choose Edit Original, Illustrator launches the application that was used to create the file (or that is set to open files of that type on your system) and then opens the file for you. Once you perform any necessary edits on the file, simply save and close it and return to Illustrator, where the image updates accordingly. The Edit Original button is dim when an embedded image is chosen.  | Refer to Appendix C, Application Preferences, for information on the Update Links setting in the File Handling & Clipboard preference panel, which controls whether Illustrator updates modified files automatically or manually. |
Additional Links Palette Functionality In addition to the functions in the Links palette that we've already discussed, you can take advantage of several other settings through the use of the Links palette, which you'll find listed in the palette menu (Figure 8.9). Figure 8.9. The Links palette menu grants you access to additional features for working with placed images. 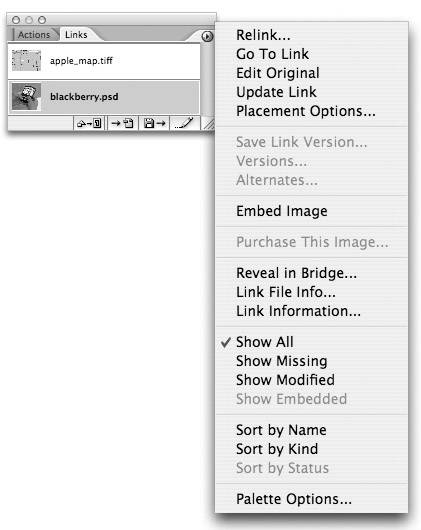
Link File Info. Images and files can contain metadata (refer to Chapter 1 for more information), and at times, you may need to view the metadata of images that you've placed into your document. For example, you may want to know if you have rights to reproduce the image, or whom you need to credit for using an image. The Link File Info option in the Links palette menu allows you to view the placed image's metadata (you won't be able to edit it, however). Placement Options. When you relink or replace a file, you can use the Placement Options setting to define how an image appears once it has been placed into your document. By default, Illustrator preserves any transforms that you've applied to the image that you're replacing, but you can also choose from four other settings. A helpful illustration within the Placement Options dialog explains what each setting does (Figure 8.10). Figure 8.10. Each setting in the Placement Options dialog offers an illustration and a description for what it does. 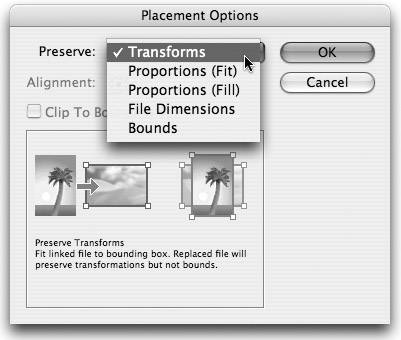
Purchase This Image. When placing a comp that you've downloaded using the Adobe Stock Photos service, Illustrator displays a special icon that indicates that the image is an Adobe Stock Photos comp image (the Adobe Stock Photos service can be found in Adobe Bridge). After the client approves the use of an image, you can choose the Purchase This Image option in the Links palette menu, at which point you are led through the process of purchasing the image through the Adobe Stock Photos service. Embed Image. If you have a placed-linked image in your document, you can select the image in the Links palette and choose the Embed Image option from the Links palette menu to embed that image in your file. Palette Options. Always trying to accommodate, Illustrator allows you to customize the Links palette somewhat by choosing Palette Options from the Links palette menu. You can choose a thumbnail size, or if you prefer, you can eliminate thumbnails altogether (Figure 8.11; useful when you have many placed images in your document). Additionally, you can choose the Show DCS Transparency Interactions option to have Illustrator alert you when placed DCS (Desktop Color Separations) files interact with transparency in your document. This setting results in slower performance though. Figure 8.11. With thumbnails turned off, the Links palette in Illustrator looks just like the one in InDesign. 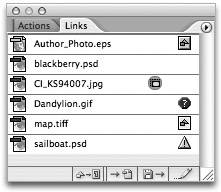
Faster Access to Image Settings with the Control Palette Although the Links palette offers a single location from which to track information about your placed images, you can also use the Control palette to quickly access certain settings and features that pertain to a selected image. The Control palette displays the file name, the color mode, and the resolution of a selected image. In addition, for linked images, the Control palette offers options to embed or edit the file via the Edit Original feature, which was discussed earlier in the chapter. You can also click the image's file name in the Control palette to access additional features that are found in the Links palette (Figure 8.12). Figure 8.12. Clicking the file name of a linked image in the Control palette offers a shortcut to several often-used functions. 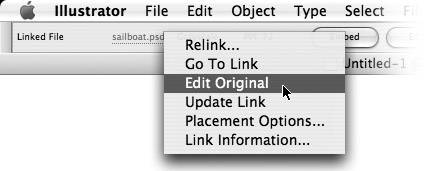
| During the transparency flattening process, Illustrator cannot process linked DCS files, so when using transparency, it is best to avoid using DCS files. Use PSD or EPS files instead. |
Using the Document Info Palette The Links palette isn't the only place where you'll find information about place-linked and place-embedded images. You can choose Window > Document Info to open the Document Info palette, which offers information on a lot more than just images. In fact, the Document Info palette can prove quite useful for providing document information on a variety of attributes and settings (Figure 8.13). Figure 8.13. The Document Info palette provides detailed information on just about anything you could ask for about your file, including linked images. 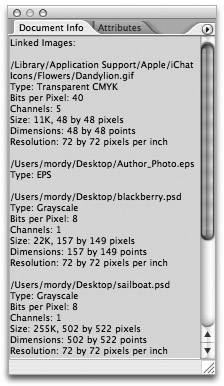
By default, the Document Info palette only shows information on objects that are selected on the artboard. To find out information about all of the objects in a file, choose Select > All, or you can uncheck the Selection Only option in the Document Info palette menu. To find out information about certain aspects of an Illustrator document, choose from one of these settings in the Document Info palette menu: Document. The Document setting displays the color mode for your document along with a listing of other important document settings like text editability and color profile. Objects. This setting displays the total number of objects in your file, broken down by object type. This setting offers a quick way to find out how many linked or embedded images you have in your document, how many objects are colored with spot colors, or how many transparent objects there are. Graphic Styles. To see a list of all the Graphic Styles that are used in your document, as well as how many objects each style is applied to, choose this setting. Brushes. The Brushes option lists all brushes that are used in your document. Spot Color Objects. This setting provides a list of spot colors that are used in your document. Pattern Objects. The Pattern Objects option lists all of the patterns that are used in your document. This is especially helpful because it includes patterns that are used inside of complex appearances and Pattern brushes. Gradient Objects. This setting lists all of the gradients that are used in your document. Fonts. The Fonts option provides a list of the all of the fonts used in your document. Linked Images. The Linked Images option lists all of the linked images that appear in your document, along with information about each image. Embedded Images. The Embedded Images setting provides a list of all the embedded images that appear in your document, along with information about each image. Font Details. The Font Details option lists information about the fonts that are used in your document. This is helpful when you want to quickly find out if you are using OpenType, TrueType, or PostScript fonts in your document.
You can save all of the information listed in the Document Info palette by choosing Save from the Document Info palette menu. A text file is created that contains the information for all of the items just outlined. |
|