| Clicking the New Document icon creates a new Illustrator document, and Illustrator presents you with the New Document dialog (Figure 1.2), allowing you to specify certain settings for the document you're about to create. You can change any of the settings in the New Document dialog later. Figure 1.2. The New Document dialog gives you options for selecting the color mode and the layout of your document. 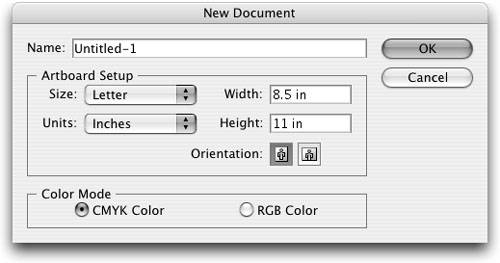
 | Press Command-Option-N (Ctrl-Alt-N) to create a new document while bypassing the New Document dialog. The new file uses the same settings as the last document you created. |
Depending on the kind of project you're working on, the document height and width aren't that important. For the most part, Illustrator is used in two ways: to create art that is printed from Illustrator itself (such as a single-page advertisement), or for art that is placed into another application (such as a logo or masthead). By default, when you place Illustrator art into other applications, the art's bounding box is what determines the dimensions of the file, not the page or artboard size that you specify in the Illustrator document.  | The New Document dialog is sticky, which means that it remembers the last settings you used. So if you create an RGB file to create a Web graphic, the next time you create a new document, the dialog is set to RGB. |
Anatomy of a Bounding Box Every Illustrator file has several different regions, or boxes, that determine how the portions of a file are displayed (Figure 1.3): Art box. Also called the bounding box, this area is defined by the art that appears in the document. Trim box. This area is defined by the Illustrator artboard and is the size you specify when creating a new document. Crop box. This area is defined by using the Object > Crop Area > Make command in Illustrator. Bleed box. This area is defined by the Bleed setting you define in Illustrator and extends beyond the trim box area. Media box. This area is defined by the size of the page on which you choose to print your file.
Figure 1.3. The dotted line outlines the different boxes that are used to define the boundaries of a file. 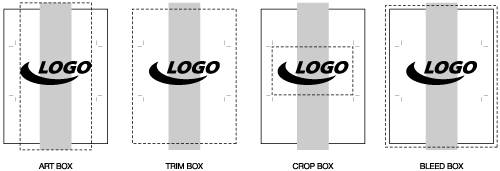
Most applications, when placing a file saved from Illustrator, honor the art box so that you can easily align the Illustrator art with other elements in your layout. Some applications, like Adobe Acrobat Professional, InDesign, and Photoshop, allow you to choose between the different boxes. | If these box terms look familiar, that's because they are part of the PDF specification. Illustrator's native file format is actually PDF, and later in the book, we'll talk more about the benefits of this. |
Choosing a Color Mode When creating a new document in Illustrator, you can choose between two color modes in the New Document dialog: CMYK and RGB. Although it isn't necessary to take a course in color theory to learn these two color modes, it does help to get a basic understanding of what they are so that you know when it's best to use them. Since version 9, all Illustrator documents are restricted to either RGB or CMYK, and you can't have both in the same file. Even though Illustrator lets you specify an RGB color in a CMYK file, as soon as you apply that color to an object in the document, that color is converted to CMYK. If you ever select an object and see that the CMYK breakdown contains odd decimal values (like C=59.43, for example), you may be working in an RGB document. | If a monitor uses RGB to display color, how do you see CMYK colors on a computer screen? That's a good question; the answer is that a computer simulates what CMYK looks like. Remember that RGB has a significantly larger gamut than CMYK does, so an RGB device is able to display just about any CMYK colors. |
When opening some older files, you might see a dialog telling you that the file contains mixed color spaces (Figure 1.4). You can choose what color mode to convert to when opening the file. Illustrator conveniently indicates the document's color mode in the Document title bar. You can convert files between the two color modes at any time by choosing File > Document Color Mode. Remember that each time a color conversion is applied, information is lost and color shifts can occur. Figure 1.4. Illustrator alerts you when opening a file that contains mixed color spaces and asks you to choose which color mode you want to convert the file to. 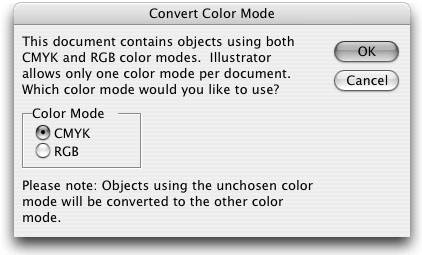
If you plan to use the artwork that you're creating for both print and Web applications, it's recommended that you use RGB, which gives you brighter colors for your screen presentations and more options (certain filters or effects are only available in RGB). You can then convert to CMYK as you need to. | It is possible to have both RGB and CMYK data in the same document by place-linking an external file. See Chapter 8, Mixing It Up: Working with Vectors and Pixels for more information. |
 | Featured Match-Up: CMYK vs. RGBCMYK stands for cyan, magenta, yellow, and black (called K because printers sometimes refer to the black plate as the key plate). Mixing these colors creates a gamut (range) of colors. It's easier to think of colors in CMYK because the mode seems to follow the rules that we all learned in preschool. Mixing cyan and magenta (blue and red) makes purple, mixing yellow and magenta makes orange, and so on. Today's printing presses use the four CMYK inks to produce printed material in color. For jobs that you want physically printed, you should choose the CMYK color mode. RGB stands for red, green, and blue and is used to display color on TV screens, computer monitors, and other electronic devices like digital cameras. Unlike CMYK where you start out with a white sheet of paper and then add colors to get to black, RGB works in reverse. For instance, when your TV screen is off, it's dark, and when you turn it on and add red, green, and blue, the cumulative effect is white. The RGB color mode has a significantly larger gamut of colors than CMYK does, especially in the area of bright fluorescent colors. For jobs that you want displayed on the Web or video, RGB is the color mode you should choose. |
|
Document Setup There was a time when the Document Setup dialog was accessed quite frequently, but since a lot of the page and printing settings were moved to the Print dialog, you don't have to go to Document Setup nearly as often. However, it's helpful to know what options you have that you may want to set when you create a new document. There are three panels to the Document Setup dialog, which you can access by choosing File > Document Setup. The Artboard panel. This panel allows you to change some of the settings that you saw in the New Document dialog, like artboard size and orientation (Figure 1.5). Additionally, there's a setting for how raster-based images appear when you're in the Outline view mode. By default, images only appear as an empty box in Outline mode for performance reasons, but with the Show Images In Outline Mode option activated, raster images are visible (in black and white) in Outline mode. Figure 1.5. The Artboard panel in the Document Setup dialog lets you specify the physical dimensions of your artboard. 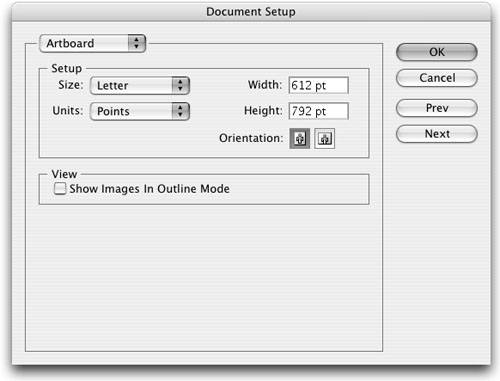
The Type panel. There are several important settings for how text is used in Illustrator found in this panel (Figure 1.6). You can choose to have Illustrator highlight substituted fonts or glyphs, which can be helpful when opening files that other designers created. With these options activated, Illustrator highlights missing fonts in pink and missing glyphs in yellow so that you can quickly find where these problem areas are in a file. Figure 1.6. The Type panel in the Document Setup dialog is where you can specify how legacy text is exported when saving to legacy Illustrator and EPS formats. 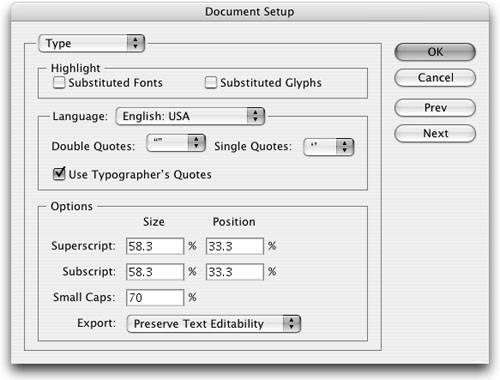
Additionally, you can specify the language for the file and how double and single quote marks should appear when you type them in your document. There's also an option to use typographer's quotes, which means the correct curly quotes are automatically used instead of straight marks. Illustrator also allows you to define the size and position percentages for creating superscript, subscript, and small caps characters. However, if you're using OpenType fonts, you can take advantage of the built-in support for these specific features, which we'll cover extensively in Chapter 6, Typography. The final option in the Type panel is for specifying how text is exported when you are saving to legacy file formats (any version prior to Illustrator CS). When you choose the Preserve Text Editability option, text is broken up into individual type objects. When you choose the Preserve Text Appearance option, all type objects are converted to vector outlines. The Transparency panel. This panel (Figure 1.7) allows you to specify settings for Illustrator's transparency grid (which you can turn on by choosing View > Show Transparency Grid). Similar to the transparency grid found in Photoshop, this checkerboard pattern makes it easy to identify transparent areas in a file. If your file is going to be printed on colored paper, you can also have Illustrator simulate that color onscreen by using the Simulate Colored Paper option. Figure 1.7. The Transparency panel in the Document Setup dialog allows you to specify a paper color to simulate what your file might look like on colored paper. 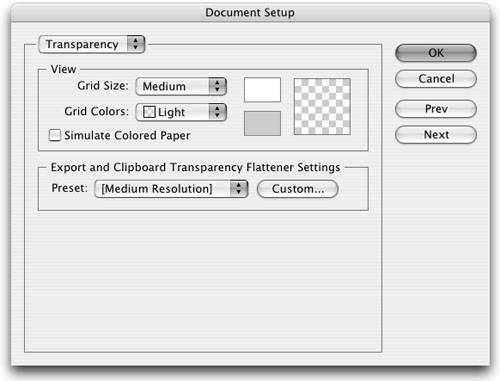
In Chapter 11, Prepress and Printing, we'll pick apart transparency and understand how it prints. For now, it's important to know that a process called flattening has to occur to correctly process artwork with transparency in it. This flattening process has many different options and you choose from different presets to specify how flattening should occur. Specifying a preset in the Export and Clipboard Transparency Flattener Settings area sets a default preset that you use when copying art with transparency to the clipboard or when exporting files to formats that don't support transparency. |