14.1. Smart documents Smart documents are documents for which there are customized, context-sensitive, Document Actions task panes that assist the user in working with the document. They are context-sensitive in that the task pane changes depending on the type of element in which the cursor is positioned. Some applications of smart documents include: -
Providing customized help for a specific set of users. Medical personnel filling out a health insurance claim form could be provided with a help pane whose content changes as they navigate from field to field. -
Allowing users to access data from a variety of sources by clicking on the task pane. Users preparing legal documents could include different types of boilerplate text from other documents or from a Web service. -
Guiding users through a process. Employees filling out an expense report can be guided step by step (calculate totals, validate, submit, etc.) based on the information that has already been completed in the worksheet. -
Providing context-sensitive data. Customer service representatives responding to a customer complaint can choose an explanation from a drop-down list in the task pane. The list members vary depending on the nature of the complaint. -
Allowing common actions to be performed at the click of a button. Smart document solutions can be configured to email the original author of a document when you have made revisions to it, or send a document to a Web service once it is complete. This section explains smart documents, and provides an overview of how to build and use them in Word. We will revisit our customer letter example to illustrate the capabilities and walk you through the underlying code.[2] [2] Microsoft provides a Smart Documents Software Development Kit (SDK), downloadable from its website, which provides further detailed information and examples. A smart document solution is designed to work with XML documents that conform to a specific schema. Our letter solution, for example, will only work with documents that conform to the letter.xsd schema. You cannot use it with a non-XML Word document, or with an XML document that conforms to another schema. Although the example uses Word, you can also use smart documents with Excel, in areas of worksheets that are mapped to the appropriate schema. 14.1.1 The customer letter example, revisited In Chapter 6, "Using external XML data in documents", on page 114 we learned about Worldwide Widget's award-winning customer service program. The company prides itself on how quickly it responds to a customer complaint with a sincere personalized form letter. It decides to build a smart document solution to improve response time and the sincerity of the generated content. We can add a variety of functions to the task pane, which will allow the user to: -
see different help text depending on where the cursor is positioned -
select a value for salutation or format from a group of radio buttons, as shown in Figure 14-1 Figure 14-1. A smart document pane with radio buttons 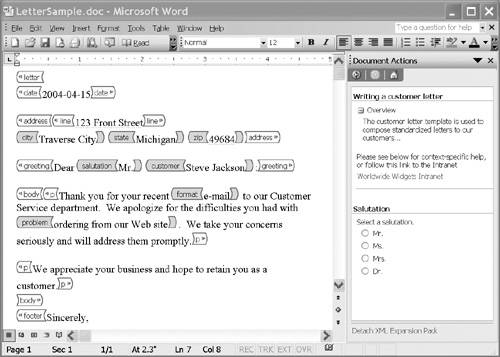
-
select boilerplate text to insert into the body of the document, as shown in Figure 14-2 Figure 14-2. Listing document fragments for insertion 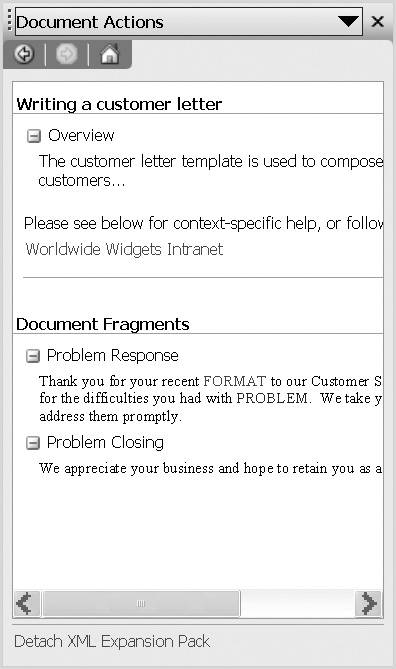
-
press a button to fill in the customer address based on the customer name -
link to websites for further assistance A working customer letter example named LetterSample.doc can be found in the example files on the book's website. 14.1.2 Installing a smart document solution Word documents and templates, and Excel workbooks, have to be associated with smart document solutions much like they need to be associated with schemas. Every smart document solution has a manifest, which is an XML document that lists all the components of the solution and their locations. We will look more closely at manifests in 14.4, "XML expansion packs and manifests", on page 346. To associate a smart document solution with a Word document: - 1. Open the document, in this case letter_smart.doc, in Word. It does not matter whether the letter schema has been added to the schema library yet.
- 2. Click Templates and Add-ins on the Tools menu.
- 3. Click the XML Expansion Packs tab, which results in the dialog shown in Figure 14-3.
Figure 14-3. The XML Expansion Packs tab of the Templates and Add-ins dialog 
- 4. Click Add. In the resulting dialog, browse to the location of letter_manifest.xml and select it.
- 5. This will return you to the Templates and Add-ins dialog, this time with the attached solution listed as an available expansion pack, as shown in Figure 14-4.
Figure 14-4. The XML Expansion Packs tab with expansion pack added 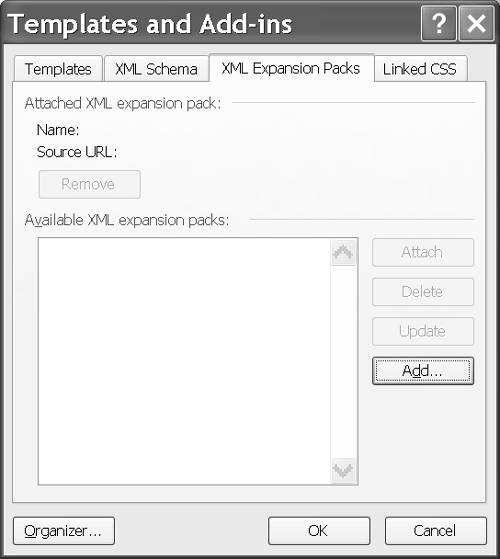
- 6. Click OK to return to your document.
Attaching the manifest not only associated the smart document solution with your document, it associated a schema (which is listed in the manifest) with your document. You can now use the example to test out the capabilities of smart documents. 14.1.3 How smart documents work The smart document solution is sensitive to element types. Whenever the mouse is clicked within an element, the Document Actions task pane displays user controls that are associated with that element type. In Figure 14-1, for example, the cursor is currently positioned in the salutation element, which is associated with the radio button group at the bottom of the task pane. The four controls above that – help text, a hyperlink, etc. – belong to the ancestors of the current element, since the click occurred within them as well. In this case there are two ancestors – greeting and letter – but all four of the other controls belong to letter. Each of the two element types has a caption that introduces its controls. The caption for letter is "Writing a customer letter", while the caption for salutation is "Salutation". The controls themselves may have captions and internal text. The caption for the radio group is "Select a salutation". Its internal text appears next to each of the buttons. If the user interacts with a control, a behavior will occur. In our example, if a radio button is clicked, its text will be inserted into the document as the content of the salutation. In order for the smart document processing to accomplish these things, your solution must provide it with the necessary information. Specifically: -
The element-type names and captions for each element type that has controls. -
The number of controls and types of control that are associated with each element type. The complete list of control types is found in Table 14-1. Table 14-1. Control types | Control-type name constant | Description | | C_TYPE_ACTIVEX | ActiveX control | | C_TYPE_BUTTON | Command button | | C_TYPE_CHECKBOX | Check box | | C_TYPE_COMBO | Combo box | | C_TYPE_DOCUMENTFRAGMENT | Document fragment that is specified as an XML string | | C_TYPE_DOCUMENTFRAGMENTURL | Document fragment that is specified as a URL that returns an XML string | | C_TYPE_HELP | Help text that is specified as an XHTML string | | C_TYPE_HELPURL | Help text that is specified as a URL that returns an XHTML string | | C_TYPE_IMAGE | Image | | C_TYPE_LABEL | Label that is specified as a plain text string | | C_TYPE_LINK | Hyperlink | | C_TYPE_LISTBOX | List box | | C_TYPE_RADIOGROUP | Radio button group | | C_TYPE_SEPARATOR | Horizontal line | | C_TYPE_TEXTBOX | Text box |
-
The desired appearance of the controls, including their captions, display properties (such as fonts), and internal text such as the strings that appear with each radio button. -
The behavior that occurs when a user interacts with the controls, for example by pressing a button or selecting an item from a list. Tip  | If you are able to limit your solution to using only hyperlink, separator, label, image, embedded help, and button controls (with buttons limited to hyperlink actions), you can provide this information in XML without writing any program code. The Smart Documents SDK has the details on this. It is an extension of the smart tags list that we discuss in 14.2.1, "Using smart tag lists (MOSTL)", on page 338. |
14.1.4 The smart document interface The code for the letter solution is written in Visual Basic 6.0.[3] The Visual Basic project can be found in the example file LetterSample.vbp. It consists of a single class file, clsActions.cls, that is used to make LetterSample.dll. [3] Smart document solutions can also be developed in Visual Basic .NET, C# .NET and Visual C++. The class implements the properties and methods of the ISmartDocument interface.[4] The interface has eight properties of element types and controls, and 17 methods for initializing controls and responding to interactions, as follows: [4] The interface is in the Microsoft Smart Tags 2.0 Type Library. element-type properties When a smart document is opened, or a smart document solution is attached to an open document, Office gets the values for element-type properties from your code. These include the number of element types that have controls, the element-type names and captions, and the number of controls for each element type. control properties Office also gets properties of each individual control, including its type, caption, and a numeric ID (ControlID). control rendering methods When the user clicks in an element, Office invokes a method for each of the element type's controls. The method supplies the information needed to render the control in the task pane. The method names are usually derived from the control type names; for example, PopulateRadioGroup, our implementation of which is shown in Example 14-8.[5] [5] In Visual Basic 6.0, the property and method names are prefixed with "ISmartDocument_". control action methods When the user interacts with a control, Office invokes a method that performs the desired behavior. The method name is usually derived from the control type name; for example, OnRadioGroupSelectChange, our implementation of which is shown in Example 14-10. The number of properties and methods that your class needs to implement depends on the types of control you use. In the following sections we will see how our example class implements these properties and methods.[6] [6] Only enough of the code is included to show how it works. 14.1.4.1 Element-type properties The beginning of the class code is shown in Example 14-1. The third line defines the constant cTYPES to be the number of element types with associated controls. Office gets this value from the SmartDocXmlTypeCount property. It is the basis for initializing the other element-type properties. Example 14-1. Defining constants for later reference Option Explicit Implements ISmartDocument Const cTYPES As Integer = 10 Const cNAMESPACE As String = "http://xmlinoffice.com/letter" Const cLETTER As String = cNAMESPACE & "#letter" Const cDATE2 As String = cNAMESPACE & "#date" Const cADDRESS As String = cNAMESPACE & "#address" Const cSALUTATION As String = cNAMESPACE & "#salutation" Const cCUSTOMER As String = cNAMESPACE & "#customer" Const cBODY As String = cNAMESPACE & "#body" Const cP As String = cNAMESPACE & "#p" Const cFORMAT As String = cNAMESPACE & "#format" Const cPROBLEM As String = cNAMESPACE & "#problem" Const cEMP As String = cNAMESPACE & "#emp"
14.1.4.1.1 Element-type names The smart document interface requires element-type names to be name-space-qualified. In XML that would mean declaring a namespace abbreviation and prefixing it with a colon to the element-type name. Smart document code doesn't have XML's syntactic constraints and doesn't need the abbreviation; the prefix is the complete namespace URI and a pound sign.[7] [7] For that reason, in smart document parlance an element-type name is called a namespace#element name or smart document type name. In the code, the namespace URI is assigned to the constant cNAMESPACE, which is used to construct the qualified names for the ten element types that are to have controls associated with them (e.g. cLETTER, cSALUTATION). At this point, Office knows the number of element types that have controls, but not the element-type names. The property in Example 14-2 provides the names. Example 14-2. Get the relevant element-type names Private Property Get ISmartDocument_SmartDocXMLTypeName (ByVal SmartDocID As Long) As String Select Case SmartDocID Case 1 ISmartDocument_SmartDocXMLTypeName = cEMP Case 2 ISmartDocument_SmartDocXMLTypeName = cADDRESS Case 3 ISmartDocument_SmartDocXMLTypeName = cLETTER 'REST OF THE CASES GO HERE Case Else End Select End Property
Tip | When you implement this property, you are in effect assigning sequential numeric IDs to the element types. Be sure to create a case for each element type that has associated controls. Any order is acceptable. |
14.1.4.1.2 Element-type captions Each element type has a caption, which is displayed before all the controls for that element type. In Figure 14-1, the caption for the salutation element type is Salutation. Office gets the captions from the property in Example 14-3, which functions the same way as the previous example. Example 14-3. Get the element-type captions Private Property Get ISmartDocument_SmartDocXMLTypeCaption (ByVal SmartDocID As Long, ByVal LocaleID As Long) As String Select Case SmartDocID Case 1 ISmartDocument_SmartDocXMLTypeCaption = "Employee Name" Case 2 ISmartDocument_SmartDocXMLTypeCaption = "Look up address" Case 3 ISmartDocument_SmartDocXMLTypeCaption = _ "Writing a customer letter" 'REST OF THE CASES GO HERE Case Else End Select End Property
Tip | Make sure the case numbers for the captions are the same as the case numbers for the corresponding element-type names in the previous example. |
The LocaleID parameter indicates the location in which the code is running. You can use conditional logic with it to localize the captions. 14.1.4.1.3 Control count In order to determine the control IDs for an element-type, Office needs to know how many controls there are. It uses the property in Example 14-4 to get the control count. For example, as we saw in 14.1.3, "How smart documents work", on page 326, letter has four controls. Example 14-4. Get the control count for an element type Private Property Get ISmartDocument_ControlCount (ByVal SmartDocName As String) As Long Select Case SmartDocName Case cEMP ISmartDocument_ControlCount = 1 Case cADDRESS ISmartDocument_ControlCount = 1 Case cLETTER ISmartDocument_ControlCount = 4 'REST OF THE CASES GO HERE Case Else End Select End Property
Tip | When you implement this property, be sure to supply the correct quantity for each element type. Note that the argument is the element-type name (SmartDocName), not the numeric ID as in the previous examples. |
14.1.4.2 Control properties Once Office knows the element types and the number of controls each has, it gets the property values for each control. 14.1.4.2.1 Control ID At this point, Office does not have a unique identifier for each control. For any given element type, however, it knows the number of controls. It therefore knows a sequential index number that uniquely identifies each control among the others for its element type. For example, the four controls associated with the letter element type have the index numbers 1, 2, 3 and 4. Office gets a solution-wide unique number from the ControlID property implemented in Example 14-5, by passing it the element type name and the control's sequential index number. For example, the one control associated with the address element type is assigned the control ID 101. The four controls associated with the letter element type are assigned 201, 202, 203 and 204. Example 14-5. Get the unique numeric control ID Private Property Get ISmartDocument_ControlID (ByVal SmartDocName As String, ByVal ControlIndex As Long) As Long Select Case SmartDocName Case cEMP ISmartDocument_ControlID = ControlIndex Case cADDRESS ISmartDocument_ControlID = ControlIndex + 100 Case cLETTER ISmartDocument_ControlID = ControlIndex + 200 'REST OF THE CASES GO HERE Case Else End Select End Property
14.1.4.2.2 Control type Office now has a numeric ID for each control, but not the control type. It gets that information from the property shown in Example 14-6. Example 14-6. Get the control type Private Property Get ISmartDocument_ControlTypeFromID (ByVal ControlID As Long, ByVal ApplicationName As String, ByVal LocaleID As Long) As SmartTagLib.C_TYPE Select Case ControlID Case 1 ISmartDocument_ControlTypeFromID = C_TYPE_TEXTBOX Case 101 ISmartDocument_ControlTypeFromID = C_TYPE_BUTTON Case 201 ISmartDocument_ControlTypeFromID = C_TYPE_HELP Case 202 ISmartDocument_ControlTypeFromID = C_TYPE_LABEL 'REST OF THE CASES GO HERE Case Else End Select End Property
In the example, the control whose ID is 202, which is the second control associated with the letter element type, is a label. A complete list of control types is shown in Table 14-1. The ApplicationName parameter indicates the application in which the code is running. You can use conditional logic with it to specify different control types for Word and Excel. 14.1.4.2.3 Control caption We have seen that each element type has a caption. Some control types also allow captions. In Figure 14-1, the caption for the salutation radio group is Select a salutation. Office gets the control captions from the property implemented in Example 14-7. The control whose numeric ID is "1" has the caption "Please enter your name:". Example 14-7. Get the control caption Private Property Get ISmartDocument_ControlCaptionFromID (ByVal ControlID As Long, ByVal ApplicationName As String, ByVal LocaleID As Long, ByVal Text As String, ByVal Xml As String, ByVal Target As Object) As String Select Case ControlID Case 1 ISmartDocument_ControlCaptionFromID = _ "Please enter your name:" Case 101 ISmartDocument_ControlCaptionFromID = _ "Look up address" Case 201 ISmartDocument_ControlCaptionFromID = _ "Overview" Case 202 ISmartDocument_ControlCaptionFromID = _ "Please see below for context-specific help, " + _ "or follow this link to the Intranet" 'REST OF THE CASES GO HERE Case Else End Select End Property
Additional parameters that we have not yet seen allow more criteria for conditional logic to modify the captions. -
Text is the data content of the current element, concatenated with the data content of any subelements. -
Xml is the XML representation of the current element (which, by definition, includes its attributes and subelements). -
Target is the Word or Excel range object with the current element's content. By using Target.Document you can address the entire Word document; Target.Worksheet lets you address the entire Excel worksheet. 14.1.4.3 Control initialization methods As Office renders controls in the task pane, it invokes methods – usually specific to the control type – that specify their appearance and internal content. The method names begin with Populate and are typically derived from the control type name; for example, the method PopulateRadioGroup is called to initialize a radio group. An implementation of this method is shown in Example 14-8. Example 14-8. Initializing a control Private Sub ISmartDocument_PopulateRadioGroup (ByVal ControlID As Long, ByVal ApplicationName As String, ByVal LocaleID As Long, ByVal Text As String, ByVal Xml As String, ByVal Target As Object, ByVal Props As SmartTagLib.ISmartDocProperties, List() As String, Count As Long, InitialSelected As Long) Select Case ControlID Case 401 ReDim List(1 To 3) As String Count = 3 List(1) = "letter" List(2) = "e-mail" List(3) = "phone call" InitialSelected = -1 Case 501 ReDim List(1 To 4) As String Count = 4 List(1) = "Mr." List(2) = "Ms." List(3) = "Mrs." List(4) = "Dr." InitialSelected = -1 End Select End Sub
The same method is invoked for all controls of a type, regardless of where they occur in the smart document, so it is necessary to test for the control ID if you want to perform different actions for specific controls. In our example, control 401 is a radio group for the format element type, while control 501 belongs to the salutation element type. The Props parameter points to a structure that can be used to set display properties for the control, such as: -
the size of the control (height and width); -
positioning of the control (alignment, indentation and spacing between controls); and -
fonts of text labels (face, size, style and weight). For example, to set the properties for a label, you might use the code shown in Example 14-9. Example 14-9. Setting the properties of a control With Props .Write Key:="FontFace", Value:="Arial" .Write Key:="FontWeight", Value:="bold" .Write Key:="Align", Value:="left" End With
In addition to parameters like Props and the others we have seen, which are passed to all the control initialization methods, there are parameters that are passed only to specific control types. For example, the List(), Count and InitialSelected parameters are passed only to methods that initialize controls that have lists. The initialization methods are executed each time the user moves between element types. Your implementations can therefore use conditional logic and the appropriate parameters to display the controls differently depending on the state of the document. For example, if the user has already inserted a type attribute of body with a value of problem, you can display document fragments that differ from those displayed for a body type of sales. 14.1.4.4 Control action methods When the user interacts with a control in the Document Actions task pane, Office performs the control's built-in behavior if it has one. Clicking a hyperlink, for example, will always result in a browser being pointed toward the specified URL. For other control types, Office calls the appropriate action method. For example, if a user clicks on a radio button, Office invokes the OnRadioGroupSelectChange method. An example implementation of this method is shown in Example 14-10. Example 14-10. Setting the properties of a control Private Sub ISmartDocument_OnRadioGroupSelectChange (ByVal ControlID As Long, ByVal Target As Object, ByVal Selected As Long, ByVal Value As String) Dim objRange As Word.Range Set objRange = Target.XMLNodes(1).Range objRange.Text = Value Set objRange = Nothing End Sub
As with the initialization methods, there is only one action method for all controls of the same type. In our example, we want the same behavior regardless of which radio group control is clicked, so we do not test for the control ID. We simply copy the selected Value into the current XML element. However, we are not limited to such a simple action. In this method, we could change any part of the current element or the document in any way, access external code or a database or Web service, perform Word tasks such as applying styles or printing, or any other action that can be expressed in code. |