Lesson 2: Supporting Excel 2003
After end users begin using Excel 2003 and start performing configuration tasks on their own, creating spreadsheets, performing calculations, using macros, and accessing some of the more advanced features available in the application, they might encounter problems using them. In this lesson, you examine some of the common troubleshooting tasks in Excel 2003.
After this lesson, you will be able to
-
Resolve issues related to calculations.
-
Work with Excel macros.
-
Recover lost Excel files.
Estimated lesson time: 30 minutes
Calculations
Word 2003 end users do a lot of text formatting; Excel 2003 end users perform a lot of calculations. After calculations are complete, users also sort, filter, validate, consolidate, and group data. You need to have functional familiarity with each of these tasks and be able to troubleshoot various issues with Excel as they arise. In addition to performing calculations and working with their results, Excel users also create tables and charts; format text, cells, rows, and columns; and use AutoFormat in ways similar to Word users. You need to make sure that you are versed in these tasks also.
As in the last section, in this section you will learn how to resolve end-user problems by using Microsoft Office Online Help and Support. It is the best way to resolve problems, get to know the applications, and learn new skills all at the same time.
Using the Formula Bar
The Formula bar is where you enter formulas, and these formulas determine how calculations are created for cells. You must start a formula with an equal sign (=), followed by the formula itself. For instance:
-
=100+200 adds 100 and 200.
-
=15+2*4 adds 15 to 8 (2 times 4).
-
=AVERAGE(A1:B6) averages the numbers between cells A1 and B6.
The plus sign (+), multiplication sign (*), and similar elements of formulas are called operators. Users often require help entering or troubleshooting formulas using these operators. To be able to help them resolve calculation queries, you need to know in what order Excel performs operations, which operators perform which calculations, and how to enter the most commonly used formulas.
Users can create a formula from scratch or use one of Excel’s functions (such as Sum or Average) to enter a simple formula into the Formula bar. To use a function to create a simple formula and create a calculation, follow these steps:
-
Open Excel 2003, and open a new workbook.
-
Type random numbers in cells A1 through A10.
-
Select cell A11.
-
On the Formula bar, click FX. The Insert Function dialog box opens. Both the spreadsheet and the dialog box are shown in Figure 7-6.
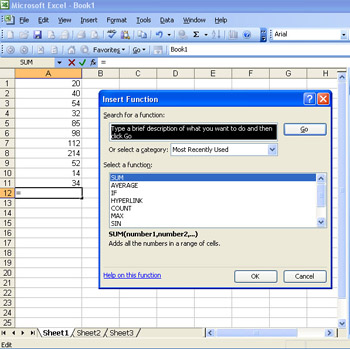
Figure 7-6: Create a simple formula using one of Excel’s functions. -
Double-click Sum in the Insert Function dialog box. In the Function Arguments dialog box, shown in Figure 7-7, notice that the numbers to be added include cells A1 through A11. In this example, the value is 755. Click OK to insert the formula.
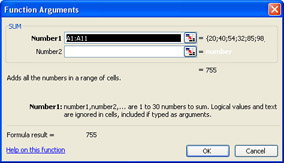
Figure 7-7: The Function Arguments dialog box.
The cell now contains the sum of the cells and a related formula. To view the formula, click the cell and you can view the formula in the Formula bar. You can add various types of formulas in the same manner, or you can type them in manually. As you become more adept with the program, you can decide what you are most comfortable with.
Common Formulas
As you can probably surmise, formulas can be quite complex and can be used to do much more than just add a list of numbers. Users can create Excel formulas to perform calculations on dates and times, keep a running balance, calculate the median of a group of numbers, average a set of numbers, round numbers, convert measurements (Celsius to Fahrenheit, for example), and more. Table 7-3 lists several common types of formulas that you will be called on to troubleshoot; the procedure following this table guides you through learning how to create and enter any or all of them.
| Formula Type | Common Formulas |
|---|---|
| Dates and times | Add dates, add times, calculate the difference between two dates or two times, convert times, count down days until a date, and insert the date and time in any cell. |
| Basic math | Add, subtract, multiply, divide, round, and average lists of numbers. |
| Advanced math | Calculate a percentage of the difference between two numbers, raise a number to a power, calculate the median of a group of numbers, and convert measurements. |
| Conditional | Calculate based on a previous calculation. For instance, if a number is larger than x, perform some other calculation. |
| Financial | Calculate various interest rates, annuity payments, annual yields, depreciation rates, and accrued interest. |
| Statistical | Calculate probabilities, deviations, frequency distributions, trends, slope, and variance. |
These and many additional formulas are already created and ready to use from Microsoft Office Online Help and Support files. To learn how to create and enter any of the formulas listed in Table 7-3 (and many others), follow these steps:
-
Open Excel 2003 and a working document.
-
From the View menu, verify that Task Pane is selected.
-
In the task pane, click the down arrow and select Help.
-
Under Assistance, in the Search For text box, type List of worksheet functions, and from the list choose About Functions. Press Enter on the keyboard, or click the green arrow.
-
Read About The Syntax Of Functions, and then click See Also. In the See Also list, select List Of Worksheet Functions (By Category).
-
Browse through the worksheet functions. To see an example of how you use any worksheet function, select it. A new page appears with information about entering the formula.
-
Return to the About Functions page by using the Back button, and from the See Also options, select Examples Of Commonly Used Formulas. Browse through those options. Figure 7-8 shows instructions for creating a formula to raise a number to a power. These and similar tutorials are available from these Help files.
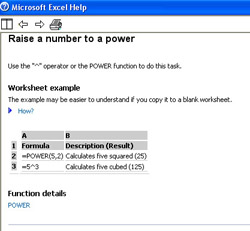
Figure 7-8: Learn about functions and formulas from the Microsoft Office Help files.
Understanding the Operators
To use a formula, create a formula, or troubleshoot a formula created by an end user, you must understand the operators used in the formula. These can include signs such as plus (+), minus (-), multiply (*), divide (/), less than (<), greater than (>), and raise to a power (^), as well as text operators such as SUM, IF, AVERAGE, POWER, CONVERT, and similar arguments. Although there is no simple way to learn all of the uses of these operators, plenty of help is available from Microsoft Office Online.
In addition to becoming familiar with operators, you must also understand in which order operators are calculated. For instance, when parentheses are involved, Excel performs the calculations within them first. Multiplication and division are always performed before addition and subtraction. Successful troubleshooting of calculations includes knowing the basic order of operations. From left to right, calculations are performed in the following order:
-
Parentheses
-
Exponents
-
Multiply and divide
-
Add and subtract
-
Equal to, less than, greater than, or comparisons
Note To troubleshoot Excel for end users, you need to have a good understanding of basic math, algebra, and formulas. To be the best DST that you can be might mean taking an additional math class to brush up on your skills.
Here’s a simple phrase that, believe it or not, can earn you a lot of respect in the desktop support world: “I don’t know, but I’ll find out.” As a DST, you may often feel as though you are expected to know everything that relates to computers— even concepts such as advanced financial calculations in Excel. Obviously, it is an unreasonable expectation, but that does not make the pressure any less real.
When you come upon something you do not know, regardless of whether you feel it is something you should know, do not be afraid to admit it. And do not be afraid to do some work finding out the answer. You have a wealth of information at your disposal in the form of books, the Internet, newsgroups, Microsoft TechNet and Microsoft Knowledge Base, and other users. A good DST is one who can isolate a problem and figure out the answer—even if you do not know the answer off the top of your head.
Troubleshooting Calculations
When a calculation has a logical error or an error with its syntax, the end user is alerted to it with the error message #VALUE! in the cell box instead of a numeric value. If it is your job to troubleshoot this error, you have to understand what calculation the user is trying to make, look up the correct formula in the Help files or create your own, or rewrite the formula that the user has already written. Excel offers some help as well, and sometimes that help is sufficient.
Figure 7-9 shows an example of an error message. Notice that there is a box next to the error, and clicking the arrow in this box opens the drop-down menu shown. It is an error in value, and there are options to get help for the error, show calculation steps, edit the formula in the Formula bar, and more. Generally, selecting Help On This Error is the best choice for beginners.
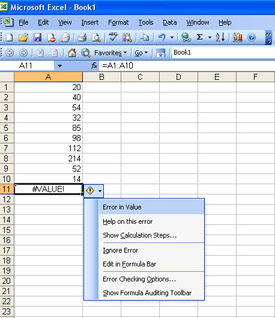
Figure 7-9: Automatic help with errors is available from the drop-down menu.
You will have to practice creating formulas and performing calculations to get a feel for how Excel works and to troubleshoot problems for end users. If your end users use Excel to perform their daily tasks, you might consider taking a short course in the subject or working through the Microsoft Office Online Excel tutorials.
Working with Macros
Another component of Excel (and other Office applications) that many users employ is the macro. A macro is a short program that a user can create to automate tasks. When a user creates a macro, keystrokes and mouse movements are recorded, and the user can play those movements back at any time with only a few quick clicks of the mouse. For instance, if calculating the company’s payroll each month requires the user to repeat the same steps—perhaps selecting a range of cells, selecting various menus and menu options, and creating the same print configurations—the user can automate those steps by recording a macro for them. The next time the user needs to perform that task, he or she simply runs the macro.
Your role as a DST might require you to create and troubleshoot macros. In the next three sections, you learn to do both.
Creating Macros
To create a simple macro for an end user in Excel 2003 (the procedure is similar in other applications), follow these steps:
-
From the Tools menu, choose Macro and then Record New Macro.
-
In the Macro Name text box, enter a name for the macro. The name of the macro must start with a letter and must not contain any spaces. It cannot be a name used as a cell reference.
-
To create a shortcut key for running a macro, type a letter in the Shortcut Key box.
-
In the Store Macro In drop-down list, select the location in which to store the macro. If you want the macro to be available each time you use Excel, select Personal Macro Workbook. If you want the macro to be available only to this workbook, select This Workbook. If you want the macro to be available for a new workbook, select New Workbook. See Figure 7-10.
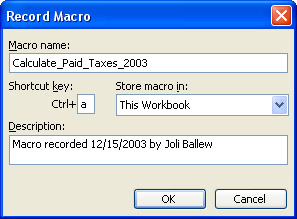
Figure 7-10: Configure the macro by using the Record Macro dialog box. -
In the Description text box, type a description if desired. Click OK.
-
If the macro is to run relative to the position of the active cell (the selected cell), click Relative Reference on the Stop Recording toolbar. Relative reference means that the macro will run based on which cell is chosen when the macro is run. When Relative Reference is not selected, the macro runs using the cells chosen in the initial creation of the macro each time, no matter which cell is chosen and active.
-
Perform the steps involved in the procedure to record the macro. Click Stop Recording when finished.
To run the macro, on the Tools menu, choose Macro and then Macros, select the macro you want to run, and then click Run. If the macro does not work properly, you will either have to rerecord the macro or troubleshoot it.
Macros and Security
Because macros are Visual Basic programs, they can contain viruses or pose security risks. Microsoft Excel offers several choices for dealing with this risk. Four security levels can be set for macros:
-
Very High When this is selected, only macros installed from trusted locations can be run. All other macros are disabled.
-
High Unsigned macros are disabled, and signed macros are dealt with depending on their source.
-
Medium Unsigned macros are disabled, and signed macros are dealt with depending on their source. This setting is similar to but more lenient than the High security setting.
-
Low Almost all macros can be run. This is not a recommended setting.
Exam Tip Remember the levels of macro security and what they mean.
To use macros in Excel or any other Office program effectively, you must set the macro security level to Medium or Low. To set the security level, follow these steps:
-
On the Tools menu, choose Options, and select the Security tab.
-
Select Macro Security.
-
On the Security Level tab, select Medium or Low, as shown in Figure 7-11.
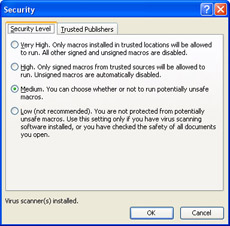
Figure 7-11: Set a macro security level to control which macros are allowed to run. -
Click OK to save your changes, and then click OK again to close the Options dialog box.
Note To disable macros installed from all sources, even trusted sources, click Tools, point to Macro, and select Security. From the Trusted Publisher tab, deselect the Trust All Installed Add-Ins And Templates option.
Troubleshooting Macros
There are several reasons why a macro might not run properly or be available, including a user selecting the wrong macro from the list or typing the wrong shortcut key, having the macro security level set too high, or having the macro assigned to a specific workbook that the user does not currently have open. Changing the security setting to Low or Medium solves the security issue. The other issues can be resolved by using the Macro dialog box, as follows:
-
From the Tools menu, choose Macro and then Macros.
-
In the Macro dialog box are several options:
-
Run Runs the macro.
-
Cancel Closes the dialog box.
-
Step Into Opens the Visual Basic Editor, which you can use to manually debug the macro using its Visual Basic code.
-
Edit Opens the Visual Basic Editor, which you can use to manually edit the macro using its Visual Basic code.
-
Delete Deletes the macro.
-
Options Opens the Macro Options dialog box, where you can view or change the macro’s description and shortcut key.
-
Macros In Use this list to sort the macros by All Open Workbooks, by This Workbook, or by a file name.
-
Excel might also encounter problems if the macro was recorded incorrectly, if the macro looks for a specific cell that is no longer there, if a cell is formatted incorrectly, or if the macro needs to access data that is no longer available.
If the macro is a fairly simple one, sometimes it is better just to re-create it. If the macro produces an error message, which it often does under these circumstances, the message usually offers some insight into the problem. If you see an error message when you run a recorded macro, follow this procedure:
-
Copy the macro error and error number.
-
From the Tools menu, choose Macro, and then choose Visual Basic Editor.
-
In the new Visual Basic Editor window, select Help, and choose Microsoft Visual Basic Help. Verify that you are connected to the Internet.
-
In the task pane, type the error number and press Enter.
-
In the Microsoft Visual Basic Help results, locate the error and the solution.
Some errors are because of known issues with Excel, and you can find their solutions in the Microsoft Knowledge Base. If your search using the Visual Basic Editor Help files does not produce a solution, try the Knowledge Base articles.
Recovering Lost Files
The first section of this chapter on Word 2003 detailed options for recovering lost files. The same options that are available for Word are also available for Excel 2003. When a user reports that a file has been lost because of a computer problem, power outage, or user error, you should work through those options, which include the following:
-
Using Microsoft Office Application Recovery From the Start menu, choose All Programs, Microsoft Office, Microsoft Office Tools, and Microsoft Office Application Recovery. In the Microsoft Office Application Recovery dialog box, select Microsoft Office Excel. Select either Recover Application or End Application.
-
Using AutoRecover Restart or recover the application by using Microsoft Office Application Recovery or by restarting the computer. In the Document Recovery task pane, shown in Figure 7-12, select the document to recover. You can configure AutoRecover on the Tools menu by choosing Options and selecting the Save tab.
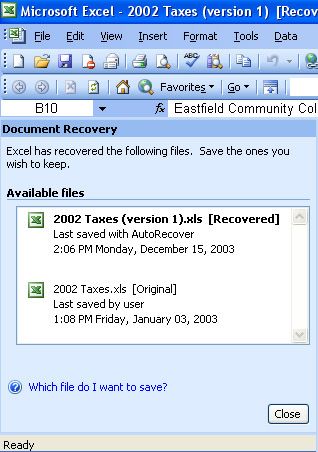
Figure 7-12: The Document Recovery task pane offers several options. -
Using Open and Repair From the File menu, choose Open, and select the file to recover. Click the arrow next to the Open button, and select Open And Repair.
-
Dealing with User Errors From the File menu, locate the lost file, or on the Start menu, choose My Recent Documents and select the file to reopen.
Practice: Configuring and Supporting Excel 2003
In this practice, you will create a chart in Excel, and then you will create and modify an Excel macro.
| Note | These exercises require a file named Lilliputian500 that is found in the Tools folder on the CD included with this book. You should copy this file from the Tools folder on the CD to your My Documents folder before starting these exercises. |
Exercise 1: Create a Chart in Excel
-
Log on to Windows XP.
-
From the Start menu, point to All Programs and then to Microsoft Office, and select Microsoft Office Excel 2003.
-
From the File menu, select Open.
-
Navigate to your My Documents folder, and open the Excel spreadsheet named Lilliputian500.
-
In Microsoft Office Excel 2003, in the Lilliputian500 worksheet, click cell A4: 31- Dec-69.
-
Scroll down to row 413, and while holding down the Shift key, click cell B413: 1,252.33. The block of cells from A4 to B413 should now be selected.
-
From the Insert menu, select Chart.
-
In the Chart Wizard – Step 1 Of 4 – Chart Type dialog box, in the Chart Type list, select Line. In the Chart sub-type section, select the upper left option: Line. (The chart type is described below the Chart sub-type section.) Click Finish.
Note Do not close Excel. The next exercise continues from this point.
Exercise 2: Create an Excel Macro
-
Select the plot line in the chart by clicking it.
-
From the Tools menu, select Macro, and then select Record New Macro.
-
In the Record Macro dialog box, in the Macro Name text box, type Trendliner. In the Shortcut Key text box, type t. Click OK.
-
Right-click the plot line, and select Add Trendline.
-
In the Add Trendline dialog box, on the Type tab, under Trend/Regression Type, verify that Linear is selected and click OK.
-
Right-click the plot line, and select Add Trendline.
-
In the Add Trendline dialog box, on the Type tab, under Trend/Regression Type, select Moving Average. In the Period text box, type 180. Click OK.
-
Right-click the plot line and select Add Trendline.
-
In the Add Trendline dialog box, on the Type tab, under Trend/Regression Type, select Moving Average. In the Period text box, type 130. Click OK.
-
Right-click the plot line and select Add Trendline.
-
In the Add Trendline dialog box, on the Type tab, under Trend/Regression Type, select Moving Average. In the Period text box, type 60. Click OK.
-
On the Stop Recording toolbar, click the Stop Recording button (the small square).
-
Click a blank area in the chart, and press Delete. This deletes the chart.
-
Re-create the chart according to steps 5 through 8 in Exercise 1.
Note Do not close Excel. The next exercise continues from this point.
Exercise 3: Edit an Excel Macro
-
From the Tools menu, select Macro and select Macros.
-
In the Macro dialog box, verify that in the Macro Name text box Trendliner appears and click Edit.
-
In the Microsoft Visual Basic –
 Lilliputian500.xls window, verify that the Lilliputian500.xls – Module1 (Code) window is the active window.
 -
From the Edit menu, select Find.
-
In the Find dialog box, in the Find What text box, type 130 and click Find Next.
-
Change the found instance of 130 to 120. Click Cancel to close the Find dialog box.
-
From the File menu, select Save Lilliputian500. Close Microsoft Visual Basic.
-
In Microsoft Excel, select the plot line in the line chart. Press Ctrl+T.
-
Close Microsoft Excel, saving changes to the Lilliputian500 file.
Lesson Review
The following questions are intended to reinforce key information presented in this lesson. If you are unable to answer a question, review the lesson materials and try the question again. You can find answers to the questions in the “Questions and Answers” section at the end of this chapter.
-
An Excel 2003 user needs to create a formula for calculating the average of 10 numbers in cells A1 through A11. Which of the following formulas is best?
-
=AVERAGE(A1:A11)
-
AVERAGE(A1:A11)
-
=SUM(A1:A11)\10
-
=AVERAGE(A1;A11)
-
-
An Excel 2003 user reports that he needs to build his own equations by picking symbols from a toolbar, as well as by typing numbers and variables. You determine that he needs the Equation Editor, which is not currently installed on his computer. What should you do?
-
Download and install the Equation Editor from the Microsoft Office Online website.
-
Install the Equation Editor from the Microsoft Office 2003 CD, under Office Tools on the Advanced Customization page.
-
Open Excel 2003, click Tools, click Options, and from the Calculation tab, enable the Equation Editor.
-
Open Excel 2003, click View, and click Equation Editor.
-
Lesson Summary
-
After calculations are complete, users also sort, filter, validate, consolidate, and group data. You need to have functional familiarity with each of these tasks and be able to troubleshoot various issues with Excel as they arise.
-
A macro is a short program that a user can create to automate tasks. When a user creates a macro, keystrokes and mouse movements are recorded, and the user can play those movements back at any time with only a few quick clicks of the mouse. Macros also carry security risks, so you should be aware of the macro security offered by Office applications.
-
Recovering lost files in Excel 2003 is a lot like recovering lost files in Word 2003. Tools for recovering lost files include Microsoft Office Application Recovery, AutoRecover, and Open and Repair.
EAN: N/A
Pages: 237