Lesson 1: Supporting Word 2003
In Chapter 6, “Install and Configure Office Applications,” you learned to install and configure Word 2003. After users begin using Word 2003 and perform configuration tasks on their own, create documents with sounds and images, use macros, and access the advanced features in the application, they might encounter problems using them. In this lesson, you will learn how to resolve some of the more common troubleshooting tasks in Word 2003.
After this lesson, you will be able to
-
Troubleshoot missing toolbars, features, and components.
-
Resolve issues related to text formatting.
-
Resolve issues with embedded and linked objects.
-
Recover lost files.
Estimated lesson time: 45 minutes
Missing Toolbars, Features, and Components
As users start customizing the user interface in Word 2003, you will start receiving calls about missing toolbars, features, and components. Users might accidentally hide or customize a toolbar so that the default options are absent, move or resize toolbars, or remove components and features, thus making them unavailable. You will need to be able to resolve these types of calls and locate missing interface items.
Restoring the Defaults
When users request that the changes they have made be removed or when a computer is transferred to another user, you will need to restore the defaults to the menus, buttons, menu choices, and default toolbars. These changes can affect both menus and toolbars. Table 7-1 details how to reset the default arrangements for a single menu, for a single toolbar, and for all menus and toolbars.
| To Restore Original Settings For | Perform These Steps |
|---|---|
| A menu |
|
| A built-in toolbar |
|
| All default toolbars and menu commands |
|
Creating a Custom Toolbar
When users report that the default toolbars that they use and access do not suit their purposes, you can guide the users through creating a custom toolbar. Custom toolbars allow users to add their own buttons, add various built-in menus, and even create a custom name for the new toolbar. This is the perfect solution for those users who are constantly tweaking the default toolbars and menus. To create a custom toolbar for an end user, follow these steps:
-
From the Tools menu, choose Customize, and select the Toolbars tab.
-
Click New.
-
In the New Toolbar dialog box, in the Toolbar Name text box, type a name for the new toolbar.
-
From the Make Toolbar Available To drop-down list, select the template or document in which you want to make the toolbar available. Click OK.
-
Select the Commands tab.
-
To add a button, select a category in the Categories list box, and drag the command you want to the new toolbar.
-
To add a built-in menu, select Built-In Menus in the Categories list box, and drag the menu you want to the new toolbar. Figure 7-1 shows an example of a customized toolbar.

Figure 7-1: This customized toolbar has several formatting options. -
Click Close when finished, and drag the new toolbar to an area of the interface to dock it.
Adding or Removing Components
When you originally install Office, certain components are installed with it. If components are missing or are no longer needed, you will have to locate the original source files (they might be on a network server, CD, or mapped drive) and use the Windows Add Or Remove Programs feature in Control Panel to add or remove them.
Some of the components for Word 2003 include the following:
-
.NET Programmability Support Allows for programmability with Microsoft .NET Framework version 1.1
-
Help Help for Microsoft Word
-
Repair Broken Text Repairs documents that display text incorrectly (Eastern European and complex script languages only)
-
Wizards And Templates Includes various wizards and templates for Word
-
Address Book Provides tools for integrating the Microsoft Exchange Personal Address Book and Microsoft Office Outlook Address Book
-
Page Border Art Includes page borders to enhance documents
When components are missing or not needed, you will need to add or remove them from Control Panel by following these steps:
-
Open Control Panel, and open Add Or Remove Programs.
-
Select Microsoft Office Professional Edition 2003, and click Change.
-
On the Microsoft Office 2003 Setup page, select Add Or Remove Features. Click Next.
-
On the Custom Setup page, clear the check boxes for any applications you would like to remove (if applicable), select the check boxes for any applications you would like to install, leave the other components in their current state, select the Choose Advanced Customization Of Applications check box, and click Next.
-
Expand the tree for Microsoft Office Word. (You can use this same technique for components of other Office applications.) Components not installed will have a red X beside them. Figure 7-2 shows an example.
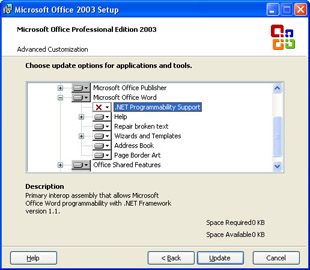
Figure 7-2: Add missing components by using Add Or Remove Programs in Control Panel. -
To add a component, click the down arrow beside it, and select Run All From My Computer. That option will be added. To remove a component, click the down arrow beside it and select Not Available. Figure 7-3 shows an example.
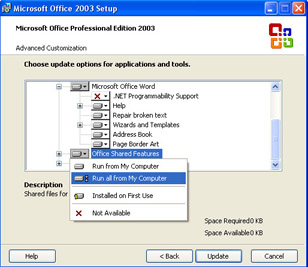
Figure 7-3: Select a component to add or remove from the component’s drop-down list. -
Click Update, and click OK when finished. Click Close to close Add Or Remove Programs.
Exam Tip If a user feels that something is missing from the interface, there are three common reasons: personalized menus are enabled and the user is not seeing all the commands available, a user has customized the interface and certain commands are missing, or the feature was not installed.
You might also need to add Office Tools components such as Microsoft Office Picture Manager, Equation Editor, Office Binder Support, Research Explorer Bar, or others. You can view these components and information about them by expanding the Office Tools tree on the Advanced Customization page. When you select a component, you will see a description listed in the Description area.
| See Also | There is a wealth of free information about Office 2003 in the Help files. Just type any query in the task pane. For example, you could type the query formatting, and look through the search results for items that start with Training. (For example, the previous example, formatting, returns a training article titled, “Format your document with styles.”) Selecting a Training link takes you to Microsoft Office Online, where a free course automatically starts. There is even a friendly voice to guide you through it. Work through these free training courses in your spare time, and urge your end users to do the same. |
Text Formatting
Formatting queries are fairly common in an office environment. Although most users are able to format their own text, you might be called on to resolve advanced text formatting issues when they arise. These calls might be for you to teach an end user to perform a task, which might require you to search for the procedure by using the task pane and Microsoft Office Online. The queries might also be for you to resolve known issues, which will require you to visit the Knowledge Base or TechNet. As a desktop support technician (DST), you should be prepared for anything.
Because queries relating to formatting will be varied, it is far easier to detail where to find answers than how to resolve specific issues. In the following section, you will learn a little about both.
| Note | The Microsoft Office Online Help and Support files work only if the user is connected to the Internet. The rest of this section makes this assumption. |
Customizing Bulleted and Numbered Lists
Most users know how to create bulleted and numbered lists, but they may need help customizing the number format, number style, or even the number’s position in the list to meet a company’s style requirements for Web pages, publications, or documents. Although you might have an idea about how to do this, walking the user through finding the answer and following a written procedure will be the best solution in the long run. You will not only resolve the call but most likely will prevent future calls from the same user.
To customize a bulleted or numbered list, and to teach the end user to use Microsoft Office Online Help and Support at the same time, follow this procedure:
-
Open Word 2003 and the working document.
-
From the View menu, verify that the task pane is selected.
-
In the task pane, click the down arrow and select Help. The task pane with Help selected is shown in Figure 7-4.
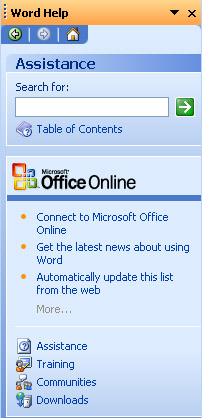
Figure 7-4: The Word Help task pane offers a wealth of information. -
Under Assistance, in the Search For text box, type Customize bullets and numbering and press Enter on the keyboard, or click the green arrow beside the text box.
-
From the search results offered, select Modify Bulleted Or Numbered List Formats.
Note Notice that you can also choose Troubleshoot Bulleted And Numbered Lists, Restore A Customized List Format To Its Original Setting, Create A Multiple-Level Picture Bullet List, and Convert Bullets To Numbers And Vice Versa.
-
From the Microsoft Office Word Help window, follow the directions offered for modifying any bulleted or numbered list. These procedures cover using a unique symbol or picture bullet, customizing numbered list formats, and formatting bullets and numbers differently.
Changing the Language Format
As with customizing bulleted and numbered lists, you can get help from Microsoft Office Online to change the language format of a document. Again, walking the user through this procedure reduces further service calls for that user, helps you learn new tasks and skills, and resolves the problem quickly for the user.
To resolve problems with the language format of a document, follow these steps:
-
Open Word 2003 and the working document.
-
From the View menu, verify that Task Pane is selected.
-
In the task pane, click the down arrow and select Help.
-
Under Assistance, in the Search For text box, type Language format. Press Enter on the keyboard, or click the green arrow next to the text box.
-
From the search results offered, select Change The Language Format Of Text.
Note Notice that you can also choose Install System Support For Multiple Languages, Troubleshoot Automatic Language Detection, Enable Editing Of Multiple Languages, and Change The Language Of The User Interface Or Help In Office Programs.
-
From the Microsoft Office Word Help window, follow the directions offered for changing the language format of the text.
AutoFormat
AutoFormat quickly applies formatting, including headings, bullets, numbered lists, borders, numbers, fractions, and similar items, with little effort from the end user either while the document is being created or afterward. Users typically have problems with AutoFormat when it is configured to format text as they create a document, usually because they dislike the formatting Word applies. They typically have problems when applying formatting to a document after it is created for the same reason.
AutoFormat has several listings in the Microsoft Office Online Help and Support files, including:
-
Review AutoFormat Changes.
-
Turn On Or Off Automatic Formatting.
-
Troubleshoot Automatic Formatting.
-
About Automatic Formatting.
These Help files, like others associated with Word, guide you through resolving various AutoFormat issues. For instance, to learn how to review and accept or decline AutoFormat changes, follow these steps:
-
Open Word 2003 and the working document.
-
From the View menu, verify that Task Pane is selected.
-
In the task pane, click the down arrow and select Help.
-
Under Assistance, in the Search For text box, type AutoFormat. Click the green arrow.
-
From the search results offered, select Review AutoFormat Changes.
-
From the Microsoft Office Word Help window, follow the directions offered for reviewing, accepting, and rejecting changes.
Embedded and Linked Objects
You can insert objects, which can include files, tables, charts, spreadsheets, images, and sounds, into a working document (a destination file) when you want to include additional information from other sources (source files). For instance, you might insert into a Word document an Excel file that contains sales data that is updated daily, a Publisher file that contains a table that is updated weekly, a Microsoft Access file that contains an employee phone list that is updated monthly, or a simple sound or image that is stored on a network server that is never updated. These inserted objects come from various sources and are thus referred to as source files. Items that you insert into a Word document can be either embedded or linked.
When you embed an object, the information in the destination file does not change if you modify the source file. An embedded object is like a snapshot of the object. These objects become part of the destination file, making this type of insertion useful for distributing multiple files in a single document. When embedded objects are edited, they are double-clicked in the destination file and edited in the source file’s native program. Files with embedded data can be quite large.
When you link an object, the information in the destination file is updated when you modify the source file. Linked data is stored in the source file, not the destination file. The destination file stores only information about where the source file is located. With linked files, you can maintain data in a separate program, and when you open the destination file, Word automatically accesses the most up-to-date information. When you edit linked objects, you use the Links command from the Edit menu, and you edit the data in the source file’s native application. Files with linked data are generally smaller than those with embedded data.
Embedding and Linking Objects
You embed and link objects by using the Insert and Edit menus, and sometimes by using the Copy and Paste Special commands. The easiest type of object you can add to a document is a new embedded Microsoft Excel file: All you have to do is click the Insert Microsoft Excel Worksheet icon on the Standard toolbar and select the size of the worksheet to embed. Figure 7-5 shows an example. After the worksheet is embedded, you edit it as you would in Excel, using Excel’s toolbars. After you have completed the Excel worksheet, click outside the worksheet area, and Word’s toolbars reappear.
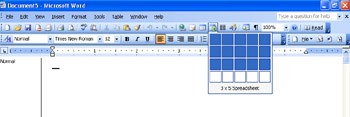
Figure 7-5: Embed a new Excel worksheet.
You can also embed preexisting objects or files that have already been created by using the Insert menu and the Object command, as follows:
-
Open Word 2003, and click where the embedded object should be inserted.
-
From the Insert menu, choose Object, and then select the Create New tab.
-
In the Object Type list box, select the type of object you want to create.
-
Select the Display As Icon check box.
-
Click OK.
-
In the application that opens, open or create and save the file you want to embed. Minimize or close the file’s application. The file will be embedded.
Note You can also choose not to select Display As Icon, but failing to make this selection changes the default process of embedding a file. For instance, if you embed an Excel file but do not choose Display As Icon, an actual Excel document will be added to the existing document, not an existing Excel file. If you choose to embed a wave sound using this same technique, you will have to create the sound before it can be embedded. You will not be given the option of opening an existing wave file.
Here is an example of how to embed or link cells from an Excel file:
-
Open both Word and Excel.
-
In Excel, copy the cells you want to embed or link.
-
In Word, position the mouse pointer on the page where you want the data, and then choose Paste Special from the Edit menu.
-
Select Paste from the Paste Special dialog box to embed the file; select Paste Link to link the file.
-
If you want to link the object, select the Display As Icon check box to display the linked file as an icon.
-
In the As list, select the format that you want to use to embed or link the file. Click OK to save your changes.
After you have embedded or linked an object, you can edit it by right-clicking and selecting from the options. Links can be updated, edited, opened, and more. Embedded objects can be opened, edited, formatted, and converted; hyperlinks can be added; and more. Experiment with the different options for both.
Troubleshooting Linked and Embedded Files
Users will have problems with both embedded and linked files, but problems with linked files can be a little more difficult to diagnose. Table 7-2 lists some common issues with linked files and their solutions. You can find these and other tips and tricks in the Microsoft Office Online Help and Support files.
| Problem | Solution |
|---|---|
| The error message “Cannot Edit” appears when a linked or embedded object is double-clicked. | Verify that the program that is used to create or open the file is installed on the computer and is running. If the object is linked, verify that the file has not been moved. If the linked object is on another computer on the network, verify that you can connect to that computer. |
| The linked or embedded object cannot be opened because the program used to create it is not installed on the computer. | Convert the object to the file format of a program that is installed by choosing Edit, Linked Worksheet Object, Video Clip Object, Slide Object, or a similar option and then clicking Convert. |
| The linked or embedded object is cropped around the edges. | In the source program, reduce the size of the data. You can do this by choosing a smaller font, resizing an image, or reducing the column size in a worksheet. |
| Excel objects do not open in Word. | Open Excel. On the Tools menu, choose Options, and on the General tab, clear the Ignore Other Applications check box. |
These and other troubleshooting problems and solutions are available from Microsoft Office Online Help and Support, from the Knowledge Base, and from TechNet. You can also get help from newsgroups and third-party Internet sites. A good DST accesses these sites and resources not only to solve problems but also to learn about common issues before they happen.
Recovering Lost Files
The most disastrous problem from an end user’s point of view has to be dealing with lost files. A user can lose a file for many reasons, including a power outage, a computer problem, or a user error. Other times, files are lost because the document is damaged or the data is corrupt. When the file is lost because of a power outage, power surge, or computer problem, chances are good that you can find the file on the hard disk as long as the computer can be rebooted.
| Note | Configure Word to always keep a backup copy of open files. On the Tools menu, choose Options, and select the Save tab. Select the Always Create Backup Copy check box. In addition, select the Allow Background Saves and Save AutoRecover Info Every __ Minutes check boxes. |
Using Microsoft Office Application Recovery
If an end user reports that Word 2003 is not responding, you can recover the program. This causes Word to attempt to recover the files the end user was working on and restart the application. To access this recovery feature, follow these steps:
-
From the Start menu, choose All Programs, Microsoft Office, Microsoft Office Tools, and Microsoft Office Application Recovery.
-
In the Microsoft Application Recovery dialog box, select the program that is not responding, and click Recover Application or Restart Application (only one will be available), or choose End Application if you want to close the application. The latter option causes you to lose recent changes.
-
If you want to report the problem to Microsoft, click Report Problem; otherwise, click Don’t Report Problem.
-
Reopen the application if necessary. In the Document Recovery task pane, click the arrow next to the file name and either select Open or Save As. Click Yes if prompted to replace the existing file.
Using AutoRecover
AutoRecover files are the files that Word automatically creates in the background every few minutes as specified by the end user. By default, AutoRecover saves files every 10 minutes. If a user encounters a problem with an application, the application offers the last saved version of the file to the user the next time he or she starts the application. Word stores the AutoRecover files in the folder specified in the Options dialog box (accessed from the File Locations tab). You can change both the file location and AutoRecover default behavior quite easily by following these steps:
-
Open Word 2003. From the Tools menu, choose Options.
-
On the Save tab, verify that the Save AutoRecover Info Every __ Minutes check box is selected and that a number between 1 and 120 is configured in the box. You can disable AutoRecover by clearing the check box.
-
On the File Locations tab, select AutoRecover Files, and click Modify to change the location of the recovered files. Browse to a new location, and click OK.
-
Click OK to close the Options dialog box.
Note You can also manually recover files by browsing to the AutoRecover file location.
Using Open And Repair
Additionally, you can help end users recover text from a damaged or corrupt document by using the Open And Repair option. To open and repair documents, follow these steps:
-
Open Word. From the File menu, choose Open.
-
In the Look In drop-down list, browse to the location of the file you want to open. Select the file, but do not click Open.
-
Click the arrow next to the Open button, and then select Open And Repair.
There are other options for recovering lost data, so if none of these options work, you might have to restore the data from backup; contact a network administrator; or, if the user created the lost file since the last backup, accept that the file is lost. Encourage users to create backup copies, schedule regular backups, and allow background saves.
| Note | These recovery options are also available in other Microsoft applications. |
Dealing with User Errors
If a user forgets where he or she saved a file, you can search for it by using the Search Results window that is available on the Start menu. You can search by the date the file was created or modified, by its name, or using other options. In addition, all Microsoft applications offer a list of most recently opened documents from the File menu. Finally, clicking Start, pointing to My Recent Documents, and accessing a document shown there is also helpful in finding missing files.
Practice: Configure and Troubleshoot Word 2003
In this practice, you will restore the default menu settings in Word 2003, remove unneeded components from Office 2003, use the Open and Repair feature, and use Microsoft Office Application Recovery.
| Note | Exercise 4 and Exercise 5 each require files from the Tools folder on the CD that is included with this book. Exercise 4 requires a file named Disclaimer. Exercise 5 requires a file named Bad Macro. You should copy these files from the Practice folder on the CD into your My Documents folder before starting these exercises. |
Exercise 1: Restore Default Menu Settings in Word 2003
-
Log on to Windows XP.
-
From the Start menu, select All Programs, select Microsoft Office, and then select Microsoft Office Word 2003.
-
In Word, from the Tools menu, select Customize.
-
In the Customize dialog box, on the Commands tab, in the Categories list, select File.
-
In the Commands list, drag Web Page Preview into the File menu and drop it under Close.
-
In the Customize dialog box, click Close.
-
From the Tools menu, select Customize.
-
In the Customize dialog box, on the Commands tab, click Rearrange Commands.
-
In the Rearrange Commands dialog box, under Choose A Menu Or Toolbar To Rearrange, verify that Menu Bar is selected. In the drop-down list adjacent to Menu Bar, verify that File is selected. Click Reset.
-
In the Reset Toolbar message box, click OK. Note that the Preview Web Page command has been removed from the File menu.
-
Close all open windows and programs. Do not save changes.
Exercise 2: Remove Unneeded Components from Office
-
Log on to Windows XP using an account with administrator privileges.
-
From the Start menu, select Control Panel.
-
In Control Panel, click Add Or Remove Programs.
-
In the Add Or Remove Programs window, in the Currently Installed Programs scroll window, select Microsoft Office Professional Edition 2003. Click Change.
-
In the Microsoft Office 2003 Setup Wizard, on the Maintenance Mode Options page, verify that Add Or Remove Features is selected and click Next.
-
On the Custom Setup page, select the Choose Advanced Customization Of Applications check box. Click Next.
-
On the Advanced Customization page, click the Microsoft Office Publisher node drop-down list. Select Installed On First Use. Click Update.
-
The Now Updating Office page measures the progress of uninstalling the component. When it is finished, a Microsoft Office 2003 Setup message box appears. Click OK.
-
Close the Add Or Remove Programs window and Control Panel.
Exercise 4: Use the Open and Repair Feature
-
Log on to Windows XP.
-
From the Start menu, select All Programs, select Microsoft Office, and then select Microsoft Office Word 2003.
-
In Word, from the File menu, select Open.
-
In the Open dialog box, ensure that All Word Documents is selected in the Files Of Type drop-down list. Navigate to your My Documents folder.
-
Select the document named Disclaimer, but do not click Open. Instead, click the down arrow on the Open button. Select Open And Repair.
-
Close Word.
Exercise 5: Use Microsoft Office Application Recovery
-
Log on to Windows XP.
-
From the Start menu, select All Programs, select Microsoft Office, and then select Microsoft Office Word 2003.
-
From the Tools menu, select Options.
-
In the Options dialog box, on the Security tab, in the Macro Security section, click Macro Security.
-
In the Security dialog box, on the Security Level tab, select Medium. Click OK.
-
In the Options dialog box, click OK.
-
From the File menu, select Open.
-
In the Open dialog box, navigate to your My Documents folder. Select the document named Bad Macro, and click Open.
-
In the Security Warning message box, click Enable Macros.
-
In the Bad Macro document, after Text:, type two lines of text and press Enter.
-
From the Tools menu, point to Macro and select Macros.
-
In the Macros dialog box, ensure that BadMacro appears in the Macro Name text box, and click Run.
-
Microsoft Word will stop responding.
-
Press Ctrl+Esc to open the Start menu. Point to All Programs, point to Microsoft Office, point to Microsoft Office Tools, and select Microsoft Office Application Recovery.
-
In the Microsoft Office Application Recovery dialog box, ensure that in the Application section Microsoft Office Word is selected, and click Recover Application.
-
In the Microsoft Office Word message box, click Don’t Send.
-
A Microsoft Office Word message box appears and indicates the progress of recovering your document. When you are asked whether you want to load the normal document template, click Yes. After this, Word is launched automatically.
-
In the Security Warning dialog box, click Disable Macros.
-
The Bad Macro document should appear with the text you added plus the line, “Microsoft Word will now stop responding.” On the left, the Document Recovery task pane has automatically opened.
-
In the Document Recovery task pane, in the Available Files section, click the down arrow on the Bad Macro [Recovered] button and select Save As.
-
In the Save As dialog box, in the File Name text box, type Lab7-Recovered. Click Save.
-
Close Word.
Lesson Review
The following questions are intended to reinforce key information presented in this lesson. If you are unable to answer a question, review the lesson materials and try the question again. You can find answers to the questions in the “Questions and Answers” section at the end of this chapter.
-
A user needs to insert a table into her Word document that a colleague created by using Access. The table is updated daily with the latest company statistics and is stored on a network server. The user wants her Word file to always offer the most up-to-date information each time the file is opened. Unfortunately, each time she opens the document, she gets the same information, and the table is never updated. What is the problem?
-
The user embedded the table instead of linking it.
-
The user linked the table instead of embedding it.
-
The user needs to choose Package For CD to package the Word file with the table so that both are available when the file is opened.
-
The user needs to be made a member of the Domain Power Users group so that she can have automatic access to domain resources.
-
-
A user complains to you that she cannot find the command for inserting a text box into a Word document. What is most likely the problem?
Lesson Summary
-
To restore missing toolbars and to customize features in any Office application, use the View menu and choose Customize.
-
Embedded objects become a permanent part of the document into which they are embedded. Linked objects are still attached to the source document from which they are generated. If you change the source document, linked objects are updated, whereas embedded objects are not.
-
You can normally recover lost files just by restarting an application after it crashes. Office applications use saved files called AutoRecover files to safeguard against data loss. You can also use the Microsoft Office Application Recovery tool when a program crashes.
EAN: N/A
Pages: 237