Lesson 1: Configuring E-Mail Accounts
As a desktop support technician (DST), you must be able to configure e-mail accounts by using Outlook and Outlook Express. Creating accounts also includes testing, troubleshooting, and importing or exporting existing address books and messages.
After this lesson, you will be able to
-
Identify common e-mail protocols.
-
Create e-mail accounts in Outlook 2003 and Outlook Express.
-
Work with address books and messages.
Estimated lesson time: 45 minutes
Understanding E-Mail Protocols
Post Office Protocol 3 (POP3) and Simple Mail Transfer Protocol (SMTP) are protocols for moving e-mail across the Internet. SMTP is used to send e-mail from one server to another or from a client computer to a mail server. POP3, and another protocol called Internet Message Access Protocol (IMAP), are used to retrieve e-mail from those servers.
When supporting users, you are primarily going to be concerned with the receiving protocols, POP3 and IMAP. Of these two, POP3 is by far the most commonly used. With a POP3 e-mail account, messages are received and held on a mail server (either on a local network or at an Internet service provider [ISP]). The user’s client software accesses the server and downloads those messages at the user’s convenience. The client software deletes the messages from the server after they are downloaded. IMAP, an extension of POP3, is similar except that instead of the messages being downloaded from the server, they are stored on the server and the user works with them there.
Creating Accounts
Creating accounts using either Microsoft Outlook 2003 or Outlook Express is achieved by using a wizard. You can set up several types of e-mail accounts in Outlook 2003, including an e-mail account for Microsoft Exchange Server, POP3, IMAP, Hypertext Transfer Protocol (HTTP), and additional e-mail account types, including those that access third-party mail servers. As a DST in a tier 1 or tier 2 position, you will be called on to set up only POP3, IMAP, and HTTP accounts. Domain administrators will set up accounts to Exchange servers and third-party servers.
| Note | In this section, you will learn to create new e-mail accounts in Microsoft Office Outlook 2003; Outlook Express is briefly discussed at the end of this section. |
In the following example, you will learn to add a POP3 account, and the procedures for adding an IMAP or HTTP account are quite similar. To add a POP3 e-mail account for an Outlook 2003 client, follow these steps:
-
Open Outlook 2003.
-
Click Tools, and click E-Mail Accounts to open the E-Mail Accounts Wizard.
-
On the E-Mail Accounts page, choose Add A New E-Mail Account, and click Next.
-
On the Server Type page, click POP3, and click Next.
-
On the Internet E-Mail Settings (POP3) page, shown in Figure 4-1, type the required information.
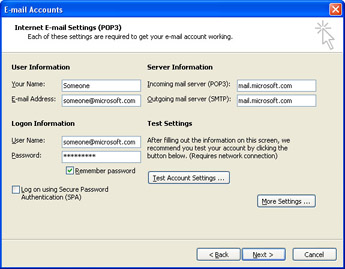
Figure 4-1: Internet e-mail settings.-
Your Name The user’s name as it should appear in the From: line of e-mail messages that are sent from the user.
-
E-Mail Address The user’s full e-mail address, including the suffix (that is, user@domainname.com).
-
User Name The user name that is required to authenticate to the mail server. This can be a name or the e-mail address. If you are setting up an account for a user with an ISP, the ISP should have provided the information to the user.
-
Password The password that is required to authenticate to the mail server.
-
Incoming Mail Server (POP3) The name of the incoming mail server. The names of incoming and outgoing servers should also have been provided by the user’s ISP (if you are setting up an ISP account). If the user cannot find this information, it is often available on the ISP’s website.
-
Outgoing Mail Server (SMTP) The name of the outgoing mail server.
-
Log On Using Secure Password Authentication (SPA) Select this check box if the server requires it. (Most do not.)
-
-
Click Test Account Settings. If an error occurs, as shown in Figure 4-2, double- check the information entered in step 5. If problems persist, contact your network administrator for the correct settings, and if an administrator is not available, refer to Lesson 4, “Troubleshooting Outlook,” in this chapter.
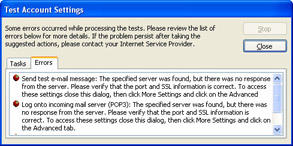
Figure 4-2: Test account settings. -
If you know you need to configure advanced options such as additional user information, additional SMTP settings, or connection options or to configure the account to leave a copy of messages on the server, click More Settings. For a home user, the defaults are generally fine, and for many corporate users, the same is true. Click Next, and then click Finish to close the wizard. If advanced options are necessary or the e-mail account does not work properly, you will need to configure advanced options, which are detailed in the following section.
Configuring Advanced E-Mail Account Settings
If you need to configure advanced settings, either while you are creating an e-mail account or after it has been created, you can do so from the Internet E-Mail Settings dialog box, shown in Figure 4-3. This dialog box can be accessed by clicking More Settings while creating the account on the Internet E-Mail Settings page (shown earlier in Figure 4-1) or by editing an existing account.
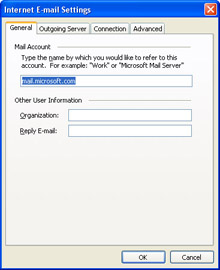
Figure 4-3: The Internet E-Mail Settings dialog box.
There are several additional settings, detailed in Table 4-1.
| Tab | Setting and Description |
|---|---|
| General |
|
| Outgoing Server |
|
| Connection |
|
| Advanced |
|
-
Open Outlook 2003, click Tools, and click E-Mail Accounts.
-
On the E-Mail Accounts page, click View Or Change Existing E-Mail Accounts, and click Next.
-
On the E-Mail Accounts page, select the account to change, and click Change.
-
On the Internet E-Mail Settings (POP3) page, click More Settings.
-
In the Internet E-Mail Settings dialog box, click any tab and enter or configure the required information. Click OK when finished to close the Internet E-Mail Settings dialog box.
-
Click Finish on the E-Mail Accounts page.
With the e-mail account configured, send a test e-mail from the new account and to the new account to verify that e-mail can be both sent and received. If there are problems, refer to Lesson 4, “Troubleshooting Outlook,” in this chapter.
Connecting to an Exchange Server Account
If you are working in a corporate environment, it is likely that the company will use an internal mail server such as Microsoft Exchange Server to provide e-mail services within the company. After an Exchange administrator has configured a mailbox for a user on an Exchange server, connecting Outlook 2003 to that mailbox is not difficult.
| Note | If a company is using Exchange Server as its e-mail server, the chances are high that they have settled on Outlook as the default mail client for use in the company. Used together, Outlook and Exchange offer a lot of advanced functionality. However, it is possible that some users, especially those connecting remotely, will use Outlook Express or a third-party e-mail client to connect. Fortunately, Exchange Server supports POP3 connections, so you can connect a mail client to it the same way you would to a POP3 server. This section details the connection of Outlook 2003 to an Exchange Server using the Message Application Programming Interface (MAPI) protocol, the likely choice for connections inside a company network. |
To connect to an Exchange server mailbox using Outlook 2003, you have two options. If you have not run Outlook 2003 since you installed it, you can start up Outlook and set up the Exchange Server account during the startup wizard that runs the first time you start Outlook. If you have already set up accounts in Outlook and need to add an Exchange Server account, you will need to do it using the Mail tool in the Windows Control Panel. You cannot add an Exchange account while Outlook is running. This section shows you how to set up an Exchange account using the Control Panel method; if you are using the Outlook Startup Wizard instead, you will find the process nearly identical.
To add an Exchange Server mailbox to an existing Outlook profile, use the following steps:
-
On the Start menu, select Control Panel.
-
In the Control Panel window, click User Accounts.
-
In the User Accounts window, click Mail.
-
In the Mail Setup – Outlook window, click E-Mail Accounts.
-
Select the Add A New E-Mail Account option, and click Next.
-
On the Server Type page, select the Microsoft Exchange Server option, and click Next.
-
On the Server Type page, select Microsoft Exchange Server, and click Next.
-
On the Exchange Server Settings page, type the name or IP address of the Microsoft Exchange Server, and type the user name. Both of these should have been provided to the user by the Exchange administrator.
-
Click Check Name to have the E-Mail Accounts Wizard verify that the mailbox you typed exists on the Exchange server. If the verification is successful, you see the server and user name appear in underlined text in the fields (as shown in Figure 4-4). Click Next.
-
On the Congratulations page, click Finish.
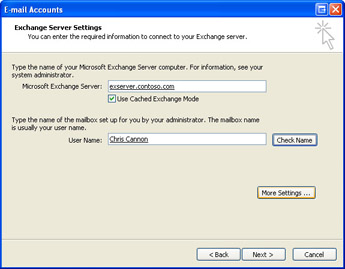
Figure 4-4: Connecting to an Exchange Server mailbox.
Working with Address Books and Messages
When Outlook 2003 is run for the first time after being installed on a user’s computer, Outlook offers to import mail, addresses, and mail account settings from an existing e-mail application that is already installed on the computer. For many users, this is Outlook Express, but it can also be Eudora Light or Eudora Pro. In addition, data from previously saved files, such as Microsoft Excel or Microsoft Access files, can be imported. You can even import messages from previous Outlook data files.
Users might also need to export address books and messages for the purpose of backing them up or moving them to another location. Importing and exporting tasks are performed by using the Import And Export Wizard, available on the Outlook File menu.
Importing Address Books and Messages
Address books and e-mail messages can be imported in many ways, and in this section we cover two of them. You will learn to import mail messages and address books from Outlook Express and Eudora (Pro and Light), and you will learn to import mail and messages from an Excel file. Although there are other options, including importing the data from a previously exported text or comma-separated values (CSV) file, an Access file, a personal folder file, or an application such as Lotus Organizer or ACT!, the procedures are basically the same as the two you will see here.
To import Internet e-mail and addresses from Outlook Express, Eudora Light, or Eudora Pro, follow these steps:
-
Open Outlook. On the File menu, click Import And Export.
-
On the first page of the Import And Export Wizard, click Import Internet Mail And Addresses, and click Next.
-
On the Outlook Import Tool page, select the Internet Mail application to import from. Figure 4-5 shows this page with Outlook Express selected.
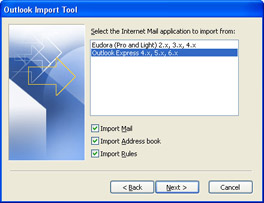
Figure 4-5: The Outlook Import Tool. -
Select the items to import. Choose any combination of Import Mail, Import Address Book, and Import Rules. Click Next.
-
If you are importing only e-mail messages or rules, click Finish. If you are also importing an address book, click Next.
-
If importing addresses, on the Import Addresses page, choose one of the following options and then click Finish:
-
Replace Duplicates With Items Imported Existing data will be overwritten with the data imported.
-
Allow Duplicates To Be Created Existing data will not be overwritten, and duplicates will be added.
-
Do Not Import Duplicate Items Existing data will be kept, and duplicate information will not be copied.
-
-
To save a report of the Import Summary, click Save In Inbox on the Import Summary page.
To import data from another program or file, follow these steps:
-
Open Outlook. On the File menu, click Import And Export.
-
In the Import And Export Wizard, select Import From Another Program Or File, and click Next.
-
On the Import A File page, select Microsoft Excel. (To import from another program, select another option.) Click Next.
-
Click Browse to locate the file. Select the appropriate option for dealing with duplicate entries. Click Next.
-
On the Import A File page, choose the appropriate folder from the Select Destination Folder list. Figure 4-6 shows an example. Click Next.
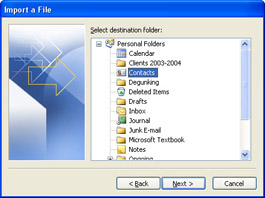
Figure 4-6: Importing a file to the Contacts folder. -
To map custom fields or to change the folder selected, click Map Custom Fields or Change Destination. When mapping custom fields, drag and drop the field on the left (configured fields) to the field on the right (address book fields). When finished, click Next. Click Finish.
Exporting Address Books and Messages
For the purpose of backing up an address book or a message, or to store the information on a hard drive for the purpose of exporting to another computer later, use the Import And Export Wizard as detailed in the preceding sections. When prompted, select Export To A File (instead of selecting any importing choice). You will be prompted to save the file as one of the following:
-
Comma Separated Values (DOS) Choose this if you need to export the data so that it can later be imported into a third-party e-mail client.
-
Comma Separated Values (Windows) Choose this if you need to export a file for use in Microsoft Word, PowerPoint, or third-party applications.
-
Microsoft Access Choose this to save the data in a Microsoft Access file.
-
Microsoft Excel Choose this to save the data in a Microsoft Excel file.
-
Personal Folder File (.pst) Choose this if you need to organize and back up your Outlook data. These data files can be read only by Outlook. Only the content is preserved; permissions, rules, forms, views, and descriptions are not preserved.
-
Tab Separated Values (DOS) Choose this if you need to export the data so that it can later be imported into a third-party e-mail client.
-
Tab Separated Values (Windows) Choose this if you need to export a file for use in Word, PowerPoint, or third-party applications.
After making the appropriate choice, click Next, and continue through the wizard as detailed in earlier sections.
| Exam Tip | For the exam, be sure you know the programs and formats from which Outlook and Outlook Express can import and those to which they can export. |
Outlook 2003 stores all items (messages, calendar entries, contacts, notes, and so on) in a single database file known as a personal storage file. By default, this file is named Outlook.pst, and you can find it in C:\Documents and Settings\username\Local Settings\Application Data\Microsoft\Outlook. This folder is also the default storage location for archived information, which is stored by default in a separate personal storage file named Archive.pst.
If one of the accounts you use in Outlook 2003 is an Exchange Server mailbox, you should note that all messages associated with that account are actually stored on the Exchange server and not as part of the local .pst file. If you are using Outlook 2003 in cached mode, messages on the Exchange server are copied to a temporary file (called an offline folder, or .ost, file) on the local computer so that the user can work while disconnected from the Exchange server.
Outlook 2003 stores other program information in C:\Documents and Settings\username\Application Data\Microsoft\Outlook. (Notice that the only difference in this path is that the Local Settings folder is not involved.) In this folder, you will find the following files:
-
Outcmd.dat stores Outlook menu customizations.
-
Outitems.log identifies Outlook items to be placed automatically in the journal.
-
Outlook.NK2 lists nicknames used for AutoComplete.
-
Outlook.srs stores Outlook Send/Receive group settings.
-
Outlook.xml stores navigation bar customizations.
-
OutlPrnt stores customized print settings.
If you plan on troubleshooting Outlook 2003, you can save yourself a lot of headaches and embarrassment by making a backup copy of these two Outlook folders somewhere else on the user’s computer.
Using Outlook Express
The goal of this section is to introduce you to Outlook Express and to detail the most common tasks you will be asked to perform. Although using Outlook Express is similar to using Outlook, the processes are not exactly the same for both. As a DST, you must support both Outlook (commonly used in corporations, companies, and small businesses) and Outlook Express (commonly used by home users and small home-based businesses). In this section, you will learn the most basic Outlook Express tasks, such as creating a POP3 or IMAP account for a home user, testing and troubleshooting that account, and importing an existing address book and messages.
| Note | Teach your end users to export their address book to a floppy disk. The floppy disk makes an excellent backup. |
Creating a POP3 or IMAP Account
To create a POP3 account using Outlook Express for a small business owner or home user, follow these steps:
-
Open Outlook Express.
-
Click Tools, and then click Accounts.
-
Click the Mail tab. Click Add, and then click Mail.
-
Using the Internet Connection Wizard, on the Your Name page, type the name of the user as he or she wants it to appear to others. Because this is a display name only, any name is fine. Click Next.
-
On the Internet E-Mail Address page, type the e-mail address. Click Next.
-
On the E-Mail Server Names page, in the My Incoming Mail Server Is A ___ Server drop-down list, choose POP3, IMAP, or HTTP. In the Incoming Mail (POP3, IMAP, Or HTTP) Server box, type the name of the incoming mail server. In the Outgoing Mail (SMTP) Server box, type the name of the outgoing mail server. Figure 4-7 shows an example. Click Next.
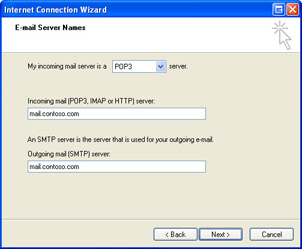
Figure 4-7: Configure e-mail server names. -
On the Internet Mail Logon page, type the account name and password. If the home user requests it, select the Remember Password check box. Click Next.
-
Click Finish when prompted, and click Close in the Internet Accounts dialog box.
Testing and Troubleshooting
You will want to verify that the account works as it should. To test and troubleshoot the new account, follow these steps:
-
Open Outlook Express, and click Create Mail.
-
In the To: box, type the address of the e-mail account you just created. This is the user’s account. In the Subject box, type Test, and then click Send.
-
After the e-mail has been sent, click Send/Recv. Verify that the e-mail was sent and received. If an error occurs or if the display name is incorrect, troubleshoot the account using the steps listed next.
If an error was received while you were testing the account, specifically a failure notice issued by the ISP that the e-mail could not be sent, that an error occurred when trying to receive the e-mail, or that the display name is incorrect, follow these steps:
-
Click Tools, and click Accounts.
-
Click the Mail tab, and select the account that was just configured and is not working.
-
Click Properties.
-
On the General tab, verify the user information, including name and e-mail address. Make the appropriate corrections.
-
On the Servers tab, verify the server information, including incoming server name, incoming and outgoing mail servers, account name, password, and authentication settings. If in doubt, contact the ISP to double-check the settings. Make the appropriate corrections. Click OK, and then click Close. Send another test e-mail.
-
If the e-mail still fails, verify that the user is connected to the Internet, verify with the ISP that the e-mail address used is the correct one, and verify the names of the mail servers.
Importing and Exporting
With the account working properly, you can now import a user’s address book and existing messages. There are multiple ways to import an address book, as you learned earlier. However, when configuring a new account for a home user, the easiest way to import an address book is to have previously exported it as a CSV text file. Working with an address book using this technique works in almost any situation, including moving address books between computers (such as from a home PC to a laptop or from an old computer to a new one) and moving an existing address book from an old e-mail account configuration to a new one on the same or on different computers. It also provides an excellent way to back up the address book, and teaching the end user to do this is a good idea.
In this example, you will learn how to first export an existing address book as a CSV text file and then how to import it into the new account. To export the address book, follow these steps:
-
Open Outlook Express on the old computer, laptop, or existing computer; click File; point to Export; and click Address Book.
-
In the Address Book Export Tool, select Text File (Comma Separated Values) and click Export.
-
In the CSV Export dialog box, click Browse and choose a location in which to save the file. Name the file, and then click Save in the Save As dialog box. Click Next.
-
In the second CSV Export dialog box, select the fields to export. Be sure you select First Name, Last Name, and E-Mail Address. Click Finish.
-
Click OK when prompted that the export process is complete, and then click Close to close the Address Book Export Tool.
To import the address book, follow these steps:
-
Click File, point to Import, and select Other Address Book.
-
In the Address Book Import Tool dialog box, shown in Figure 4-8, select Text File (Comma Separated Values). Click Import.
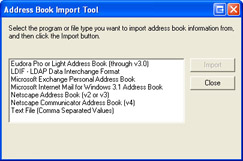
Figure 4-8: Import an address book. -
In the CSV Import dialog box, click Browse. Locate the exported address book, and click Open. Click Next in the CSV Import dialog box.
-
In the second CSV Import dialog box, select the fields to import and click Finish. Be sure you select First Name, Last Name, and E-Mail Address.
-
Click OK when prompted that the import process is complete, and then click Close to close the Address Book Import Tool.
Finally, importing existing messages is achieved as follows:
-
Open Outlook Express, click File, point to Import, and select Messages.
-
In the Select Program dialog box, select Microsoft Outlook Express 6. Click Next.
Note The program from which you choose to import governs what you see from this point on. This procedure details the steps for importing from an Outlook Express 6 message store.
-
In the Import dialog box, select the appropriate identity and click Next.
-
In the Location Of Messages dialog box, accept the defaults (unless the mail folder has been moved), and click Next. If the mail folder has been moved, you will need to use the Browse button to locate it before clicking Next.
-
In the Select Folders dialog box, select All Folders or Selected Folders. If Selected Folders is chosen, select the folders to import. To select more than one folder, hold down the Ctrl key. Click Next.
-
Click Finish after the messages are imported successfully.
Note As with Outlook, there are various ways to import and export data. Make sure you are familiar with the additional techniques.
Practice: Set Up and Configure E-Mail Accounts
In this practice, you will configure Outlook 2003 as a POP3 client and as an IMAP client. You will also back up Outlook data.
| Note | You will need to have a computer running Windows XP with Office 2003 installed to complete these practices. To work through Exercise 1, it must be the first time that you have started Outlook following installation. When setting up an e-mail account, it is helpful if you have an actual mail server (such as at your ISP) to use to configure accounts. If you do not, you can still enter the information in Outlook 2003 and set up the account; you just will not be able to test the setup. |
Exercise 1: Configure Outlook 2003 as a POP3 Client by Using the Outlook 2003 Startup Wizard
-
Log on to Windows XP.
-
On the Start menu, choose E-Mail. If Outlook 2003 is not configured as your default e-mail software, on the Start menu, point to All Programs and then to Microsoft Office, and select Microsoft Office Outlook 2003.
-
In the Outlook 2003 Startup Wizard, click Next.
-
On the Account Configuration page, verify that Yes is selected, and click Next.
-
In the E-Mail Accounts Wizard, on the Server Type page, select POP3, and click Next.
-
On the Internet E-Mail Settings (POP3) page, under User Information, in the Your Name text box, type your name. In the E-Mail Address text box, type your e-mail address. If you are setting up a nonworking account, you can enter anything here.
-
Under Logon Information, in the Password text box, type your password. Again, it does not matter what you enter if you are setting up a nonworking account.
-
Under Server Information, in the Incoming Mail Server (POP3) text box, and in the Outgoing Mail Server (SMTP) text box, type the name of your server (or just make up a name for a nonworking account). Click Next.
-
On the Congratulations page, click Finish.
-
In the Microsoft Office 2003 Activation Wizard, verify that I Want To Activate The Software Over The Internet is selected, and click Next.
-
In the Microsoft Office 2003 Activation Wizard, click Close.
Exercise 2: Configure Outlook 2003 as an IMAP Client by Using the Mail Control Panel
-
Log on to Windows XP.
-
On the Start menu, choose Control Panel.
-
In Control Panel, click User Accounts.
-
In the User Accounts window, click Mail.
-
In the Mail Setup – Outlook dialog box, click Show Profiles.
-
In the Mail dialog box, click Add.
-
In the New Profile dialog box, in the Profile Name text box, type IMAP and click OK.
-
In the E-Mail Accounts Wizard, in the E-Mail section, verify that Add A New E-Mail Account is selected and click Next.
-
On the Server Type page, select IMAP and click Next.
-
On the Internet E-Mail Settings (IMAP) page, under User Information, in the Your Name text box, type your name. In the E-Mail Address text box, type your e-mail address.
-
Under Logon Information, in the Password text box, type your password.
-
Under Server Information, in the Incoming Mail Server (IMAP) text box, and in the Outgoing Mail Server (SMTP) text box, type the names of your servers. Click Next.
-
On the Congratulations page, click Finish.
-
In the Mail dialog box, select Prompt For A Profile To Be Used. Click OK.
-
Start Outlook 2003.
-
In the Choose Profile dialog box, in the Profile Name drop-down list, select IMAP and click OK. You should now be able to test your new IMAP account.
Exercise 3: Create a Connection to an Exchange Server
In order to complete this practice, you will need the application named MiniDir, which is found in the Tools folder on the CD included with this book. This application simulates an Exchange server for the purposes of creating an account within Outlook. Please note that the MiniDir application does not allow you to send or receive messages. Its only purpose is to simulate the experience of setting up an Outlook account.
-
Log on to Windows XP.
-
On the Start menu, point to All Programs and then to Accessories, and select Windows Explorer.
-
In the Folders pane of Windows Explorer, expand the My Computer node, and then select Local Disk (C:).
-
On the File menu, point to New, and then select Folder.
-
The new folder is created in the right-hand pane and selected automatically. Type MiniDir to change the name of the folder.
-
Insert the CD that was included with this book. If a splash screen opens automatically, close it.
-
In the Folders pane of Windows Explorer, navigate to your CD drive and select the Tools folder on the CD.
-
Select the MiniDir application (it is a single file), and then, on the Edit menu, select Copy.
-
In the Folders pane of Windows Explorer, navigate to the new MiniDir folder that you created on the C drive. On the Edit menu, select Paste. You should now see a copy of the MiniDir application in the MiniDir folder you created.
-
Close the Windows Explorer window.
-
On the Start menu, point to All Programs and then to Accessories, and select Command Prompt.
-
In the Command Prompt window, type cd c:\minidir and press Enter.
-
Type minidir.exe and press Enter. At this point, the MiniDir application is running, although you see no visual indication of it other than the phrase “Hit RETURN to terminate MiniDir” in the Command Prompt window. Minimize the Command Prompt window, and leave MiniDir running for the remainder of this exercise.
-
On the Start menu, select Control Panel.
-
In the Control Panel window, click User Accounts.
-
In the User Accounts window, click Mail.
-
In the Mail Setup – Outlook window, click E-Mail Accounts.
-
Select the Add A New E-Mail Account option, and click Next.
-
On the Server Type page, select the Microsoft Exchange Server option, and click Next.
-
On the Start menu, point to All Programs and then to Accessories, and select Command Prompt to open a second Command Prompt window. In this window, type ipconfig and note the IP address listed for your local area connection.
-
On the Exchange Server Settings page of the E-Mail Accounts Wizard, in the Microsoft Exchange Server field, type the IP address you identified in the preceding step.
-
In the User Name field, type Test User.
-
Click Check Name. You should see both the Exchange Server address and the user name become underlined. Click Next.
-
On the Congratulations page, click Finish, and you are returned to the Mail Setup – Outlook dialog box. Click E-Mail Accounts.
-
On the E-Mail Accounts page, select the View Or Change Existing E-Mail Accounts option and click Next.
-
In the list of accounts, select the new Microsoft Exchange Server account you just created and click Remove. Click Yes to confirm the removal. Click Finish.
-
Click Close to exit the Mail Setup – Outlook dialog box.
-
Locate the Command Prompt window that you used to determine your IP address. Type Exit and press Enter to close the window.
-
Locate the Command Prompt window that you used to run the MiniDir application. Press Enter to end the MiniDir application. Type Exit and press Enter to close the window.
Exercise 4: Back Up Outlook Data
-
Log on to Windows XP.
-
On the Start menu, choose E-Mail. If Outlook 2003 is not configured as your default e-mail software, on the Start menu, point to All Programs, then to Microsoft Office, and select Microsoft Office Outlook 2003.
-
On the File menu, choose Import And Export.
-
In the Import And Export Wizard, in the Choose An Action To Perform list, select Export To A File. Click Next.
-
On the Export To A File page, in the Create A File Of Type list, select Personal Folder File (.pst) and click Next.
-
On the Export Personal Folders page, in the Select A Folder To Export From list, click Personal Folders (the outermost folder), select the Include Subfolders check box, and then click Next.
-
On the Export Personal Folders page, click Browse.
-
In the Open Personal Folders dialog box, click the Desktop icon on the left, and click OK.
-
On the Export Personal Folders page, click Finish.
-
In the Create Microsoft Personal Folders dialog box, click OK.
Lesson Review
The following questions are intended to reinforce key information presented in this lesson. If you are unable to answer a question, review the lesson materials and try the question again. You can find answers to the questions in the “Questions and Answers” section at the end of this chapter.
-
A user has a POP3 e-mail account from an ISP, and he reports that he cannot send e-mail. He can receive e-mail. Which of the following is most likely the problem?
-
The Mail Account name in the Internet E-Mail Settings dialog box (accessed by clicking More Settings in the E-Mail Accounts dialog box) has a typographical error.
-
The SMTP server name is incorrectly configured in the user’s e-mail settings.
-
The ISP’s POP3 mail server is down.
-
The user has not typed in the correct password.
-
-
A client who has been using Outlook Express has recently installed Microsoft Office 2003. He reports that when he opened Outlook for the first time, he tried to create an e-mail account, but as the procedure progressed, he got confused and clicked Cancel in the remaining dialog boxes instead of working through them. He now reports that he can send and receive e-mail, but he cannot access his address book and he cannot locate his old mail messages. What should you tell the user to do?
-
Uninstall and reinstall Outlook 2003. After the application has been reinstalled, tell him to call back, and you will walk him through the procedure.
-
Delete the existing account using the E-Mail Accounts Wizard. Re-create the account using the same wizard, and follow the prompts for importing the address book and mail messages.
-
Click Tools, and click Address Book. In the Address Book window, click File, and click Import And Export. Import the address book used for Outlook Express.
-
Open Outlook, and on the File menu, click Import And Export. Work through the Import And Export Wizard to import both mail messages and the address book.
-
-
There are several ways to export address books and e-mail messages. Match the user’s requirements on the left with the best export option on the right.
1. The address book will be stored in a Word document.
a) Personal folder files
2. The address book will be stored as a database file.
b) Microsoft Excel
3. Messages will be stored as a backup of Outlook data and will not be used by any other program.
c) CSV (Windows)
4. The address book will be stored as an .xls file.
d) Microsoft Access
Lesson Summary
-
POP3 and IMAP are protocols used by clients to receive e-mail from servers. SMTP is a protocol used by clients and servers to send e-mail.
-
To create, test, and troubleshoot e-mail accounts in Outlook and Outlook Express, use the Internet Accounts dialog box. From there you can add accounts, view properties, and make changes to existing accounts.
-
Importing and exporting messages and address books provides a good method for backing up and restoring Outlook and Outlook Express, and a method for migrating from other e-mail software.
EAN: N/A
Pages: 237
- Structures, Processes and Relational Mechanisms for IT Governance
- Linking the IT Balanced Scorecard to the Business Objectives at a Major Canadian Financial Group
- Measuring and Managing E-Business Initiatives Through the Balanced Scorecard
- Managing IT Functions
- The Evolution of IT Governance at NB Power