Lesson 1: Resolving Taskbar and Start Menu Issues
The taskbar and the Start menu are the two main liaisons between the end user and his or her computer. The taskbar defines for the user the files and programs that are currently open and running and the programs that are running in the background. The taskbar also allows the user to switch easily between open files and applications, group items, and open the most often used programs quickly. The Start menu provides access to the other available programs, network places, connections, help and support files, recent documents, and more.
After this lesson, you will be able to
-
Identify the types of questions that relate to the Start menu and taskbar.
-
Troubleshoot and customize the notification area.
-
Troubleshoot and customize the taskbar.
-
Troubleshoot and customize the Start menu.
Estimated lesson time: 50 minutes
Common Start Menu and Taskbar Requests
Because of the amount of time the end user spends using these two components, you may come across several configuration (or troubleshooting) requests, including the following:
-
The taskbar is always disappearing, and I’d like that to stop. I also want to be able to move the taskbar to another area of the screen.
-
John, my colleague down the hall, has an icon next to his Start menu that he uses to open our accounting program. I do not have any icons there. How do I create one of those so that I do not always have to locate the program on the Start menu or place a shortcut on the desktop?
-
I do not have enough room on my taskbar to show all of my open programs, and I have to scroll to see the additional programs. Is there some way of grouping the programs together?
-
Can I remove or hide the icons for my antivirus software, my pop-up stopper program, and other programs that run in the background? If I remove them, do they stop running?
-
There are a lot of icons in the notification area that I do not think I need. How can I get rid of those for good? I do not think they should be running in the background, and I do not even know what some of them are.
-
There are lots of programs in my Start menu that I do not need, and some I need that are not there. Can you fix that for me?
-
I want to be able to open My Network Places, open Control Panel, and access System Administrative Tools from the Start menu, but I do not want my recent documents to be listed. I also do not want to see the My Music or My Pictures folder or any other folders that are not work related.
To answer these questions, you must understand the options that are available and how to access and configure them. By the time you reach the end of this lesson you will be able to resolve all of these issues and more.
| Note | These questions and their answers constitute Review Question 1. |
Troubleshooting the Notification Area
The notification area shows the time, volume control, and icons for programs that start and run automatically. These program icons can be for antivirus programs, music programs, CD-burning programs, or third-party programs that have been downloaded or purchased. If an item is in the notification area, its program is running in the background, making it quickly available when needed. The notification area also shows icons for network connections, and it can show whether the connections are enabled or disabled.
In this section, you will learn to configure and troubleshoot the notification area. Troubleshooting can also include cleaning up the area by removing unnecessary programs. After completing this section, you will be able to do the following:
-
Add items to the notification area if the program supports it
-
Hide inactive icons so that the notification area does not take up too much room on the taskbar
-
Remove icons and close running programs temporarily
-
Remove icons and close running programs permanently
Adding Items to the Notification Area
You can add an icon to the notification area only if the program supports that feature in its preferences or configuration options, and many times icons are added by default when a new program is installed. (There is no support for dragging and dropping a program in the notification area.) You can also add icons for network connections, including Ethernet connections to local area networks (LANs), wireless connections through wireless access points, and dial-up connections to the Internet.
If a user requests that you add an icon to the notification area for an application such as an antivirus program, open the program and browse through the available options and preferences. If an option to show or remove the program in the notification area is available, it should look similar to what is shown in Figure 3-1.
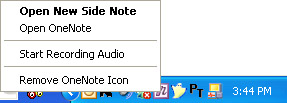
Figure 3-1: Microsoft OneNote offers the option to remove the icon from the tray.
| Note | When you remove an item from the notification area, it does not necessarily disable the program; it may only remove the icon. Check the instructions for an application to make sure. |
If a user requests that you add an icon to the notification area for any network or Internet connection on a computer running Microsoft Windows XP, follow these steps:
-
Click Start, click Connect To, and then click Show All Connections. If the Connect To option is not available on the Start Menu, in Control Panel, open Network Connections.
-
Right-click the connection that you want to show in the notification area, and then click Properties
-
On the General tab of the connection’s Properties dialog box, select the Show Icon In Notification Area When Connected check box, and then click OK.
Figure 3-2 shows a notification area that has three active network connections. One is a wireless connection, one is a dial-up Internet connection, and one is a connection to a LAN. It also shows antivirus software and a third-party pop-up stopper application.
![]()
Figure 3-2: The notification area shows active programs and connections.
Hiding Inactive Icons
If the computer has several programs that start automatically when Microsoft Windows loads and there are multiple icons in the notification area as shown in Figure 3-2, the end user might complain that the notification area is taking up too much space on the taskbar. If this happens, enable Hide Inactive Icons, and the icons for programs that are not active but are still running in the background will be hidden. To hide inactive icons, follow these steps:
-
Right-click an empty area of the taskbar, and choose Properties.
-
On the taskbar tab, select the Hide inactive icons check box. Click OK.
The inactive icons are hidden behind the arrow. Figure 3-3 shows a notification area configured with hidden icons. Compare this with Figure 3-2; both show the same notification area.
![]()
Figure 3-3: Hidden icons in the notification area are accessed by clicking the arrow.
| Exam Tip | Keep in mind that items in the notification area can be hidden behind the arrow. You (or the user) might not see them, but that does not mean they are not there. Check there before you access the program’s preferences or restart the program. |
Removing Icons and Temporarily Closing Programs That Are Running
To close a program and remove an item from the notification area temporarily so that you can free up resources, disable the program, or briefly unclutter the notification area, right-click the icon and look at the choices. Figure 3-4 shows the choices for MSN Messenger 6.1, a program that a home user might have installed.
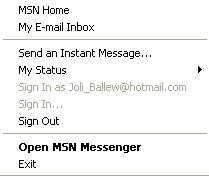
Figure 3-4: Click Exit to close this program and remove the icon from the notification area.
The choices for removing the icon and editing the program differ depending on the application or connection. Common options include the following:
-
Exit
-
Disable
-
Close
-
End
-
Preferences (locate the Exit command in the dialog box)
Removing icons from the notification area in this manner is not permanent; it only removes an icon until the program is started again or you reboot the computer. Removing items permanently requires a little more work.
Removing Icons and Permanently Closing Programs That Are Running
A cluttered notification area is a good indicator that too many programs are starting when you start Windows. Having too many programs running can be the cause of many common problems, including a slower than necessary startup process, an unstable system, or a computer that generally displays slow response times when accessing applications or performing calculations. When a user complains that the system exhibits these systems, check the notification area first.
Even if the computer seems to be running smoothly, you should remove items from a computer’s notification area if the applications are never used. There is no reason to allow unused programs to start each time Windows does; this only drains necessary system resources.
If you decide to remove programs from the notification area permanently, follow these steps:
-
Click Start, and then click Run.
-
In the Run dialog box, type msconfig.exe and click OK.
-
In the System Configuration Utility dialog box, click the Startup tab.
-
Scroll through the list, as shown in Figure 3-5, and clear the check box of any third-party item you do not want to start automatically when Windows does.
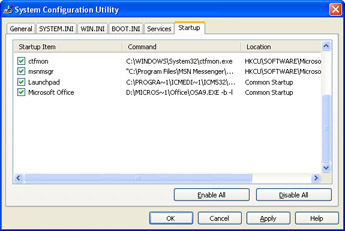
Figure 3-5: The System Configuration Utility dialog box offers lots of information. -
Restart the computer, and when prompted by the System Configuration Utility, verify that you understand that changes have been made.
Part of your job as a DST is learning to listen to users. Remember that users are not trained and often do not know the proper terminology to use. For example, you may know what the notification area is, but it is not a name that is posted anywhere obvious or that just suggests itself. If a user is trying to explain something to you, feel free to let the user know the proper terminology, but try not to make it sound like something he or she should have known.
If you are explaining something to a user, use the proper terminology so that the user has the chance to hear it, but be prepared to help him or her navigate the first couple of times. Users are often embarrassed to speak up and tell you they do not know what something is. Use landmarks that everyone understands to help guide the way. For example, you might tell a user, “Look in the notification area; it’s on the bottom right where the clock and all the other icons are.”
Locking and Unlocking the Taskbar
By default, the taskbar’s position on the desktop is locked, which means that it cannot be moved to any other location and cannot be resized, and that toolbars that are displayed on the taskbar cannot be moved or resized. If a user wants to unlock the taskbar, the procedure is easy: right-click an empty area of the taskbar, and from the resulting list, deselect Lock The Taskbar. Remember to lock it back when you get things the way the user wants them. When locked, the taskbar is protected from accidental changes and you gain a little extra room because the toolbar handles are not displayed.
| Note | If a toolbar is enabled and the taskbar is locked, there will be no handle (the rows of dotted lines) in front of the toolbar area. If a toolbar is enabled and the taskbar is unlocked, the handle is visible, as shown in the figures in this chapter. You can reposition a toolbar or even move it off the taskbar entirely by dragging the handle when the taskbar is unlocked. |
Grouping Similar Items and Enabling Quick Launch
Two additional ways to enhance the taskbar are enabling Group Similar Taskbar Buttons and enabling the Quick Launch toolbar, which are available options in the Taskbar And Start Menu Properties dialog box. Grouping similar open items saves room on the taskbar by grouping similar entries together; enabling Quick Launch lets you permanently add icons to the Quick Launch area of the taskbar for any program a user accesses often.
Enabling Group Similar Taskbar Buttons
As a DST, you will work with users of all levels. Some users will just be learning how to use e-mail, some will work with a single program and one or two files most of the day, and others will work with multiple programs and have multiple open files. Users who multitask among multiple programs and have several open files will likely have a crowded taskbar and might ask you about their options for organizing the files and programs shown on the taskbar.
Figure 3-6 shows a crowded taskbar, and Figure 3-7 shows the same taskbar with the grouping option enabled. Both taskbars include three open Windows Explorer folders, three open Microsoft Excel worksheets, two open graphics in Microsoft Paint, and three open Microsoft Word documents. In Figure 3-6, you cannot see some of these open files without using the arrow on the taskbar.
![]()
Figure 3-6: An crowded taskbar is disorganized and hard to use.

Figure 3-7: Grouping similar taskbar buttons makes programs and documents easier to find.
If the user wants you to configure his or her computer to use these grouping options, open the Taskbar And Start Menu Properties dialog box as detailed earlier. On the Taskbar tab, select the Group Similar Taskbar Buttons check box and click OK.
Enabling Quick Launch
Quick Launch is the area of the taskbar directly to the right of the Start menu that contains icons for your most-used programs. If you enable Quick Launch right after installing Windows XP, you will have three icons: E-Mail, Launch Internet Explorer Browser, and Show Desktop, as shown in Figure 3-8. Clicking the respective icons opens these programs. You can also customize the Quick Launch area to include whichever programs you access most often, and you can even resize it if the taskbar is unlocked. (Figure 3-9 shows a customized Quick Launch area.) Some programs also add icons to the Quick Launch area automatically during the program’s installation, so what you see when you first enable Quick Launch will vary.
![]()
Figure 3-8: Quick Launch is shown here with the taskbar unlocked.
If a user contacts you and wants to use Quick Launch or asks you to add or remove program icons from it, follow these steps:
-
Right-click an empty area of the taskbar, and choose Properties.
-
In the Taskbar And Start Menu dialog box, click the Taskbar tab.
-
Select the Show Quick Launch check box, and then click OK.
-
To remove any item from the Quick Launch area, right-click the icon and select Delete. Click Yes in the Confirm File Delete dialog box. (You will not be deleting the program, only removing the icon from the Quick Launch area.)
-
To add any item to the Quick Launch area, locate the program in Windows Explorer, the Start menu, or the All Programs list; right-click it; drag the program to the Quick Launch area; and then choose Create Shortcuts Here. If this option is not available, choose Copy Here. A new icon will be added to the Quick Launch area.
Tip An even quicker way to get things onto your Quick Launch toolbar is to drag them there. Use your right mouse button to drag any shortcut from the Start menu (or desktop or any folder) to the Quick Launch area. When you let go of the mouse button, a menu pops up asking whether you want to copy or move the shortcut. Choose Copy to add the item to Quick Launch and also leave a copy in its original location. You might move items to the Quick Launch bar if, for example, you are cleaning shortcuts off of a cluttered desktop.
Figure 3-9 shows a personalized Quick Launch area with icons (from left to right) for Microsoft Outlook Express, Microsoft Internet Explorer, Microsoft Photo Editor, MSN Messenger 6.1, Help and Support, Backup, and Control Panel. Depending on the user’s needs and preferences, you might be called on to create a Quick Launch area like this one.
![]()
Figure 3-9: A personalized and resized Quick Launch area is shown here with the taskbar unlocked.
Troubleshooting a Locked, Hidden, or Missing Taskbar
If an end user contacts you about a locked, hidden, or missing taskbar, carrying out the repair is most likely a simple procedure; this taskbar issue is also a surprisingly common complaint. Most of the time, the Start Menu And Taskbar Properties dialog box simply has the Lock The Taskbar, Auto-Hide The Taskbar, or Keep The Taskbar On Top Of Other Windows check box selected. Clearing the check box solves the problem immediately.
-
Lock The Taskbar When this check box is selected, the user cannot move or resize the taskbar by dragging. The user might complain that the taskbar is “locked.”
-
Auto-Hide The Taskbar When this check box is selected, the taskbar is hidden until the user moves his or her mouse over the area where the taskbar should be. The user might complain that the taskbar is “missing” or “malfunctioning.”
-
Keep The Taskbar On Top Of Other Windows When this check box is selected, the taskbar stays on top of all other running applications. The user might complain that the taskbar is “always in the way.”
The user might also complain that the taskbar is too large or in the wrong area of the desktop. When this happens, inform the user that he or she can drag the top of the taskbar (when the mouse pointer becomes a two-headed arrow) to resize it. Moving the taskbar to another area of the screen is achieved by dragging it there.
Advanced Troubleshooting
If you cannot solve a taskbar problem by using the preceding techniques, the problem is more advanced. Table 3-1 lists some known issues with the taskbar and the Knowledge Base article number and brief solution.
| Problem | Knowledge Base Article Number and Brief Solution |
|---|---|
| The taskbar is missing when you log on to Windows. | KB 318027. This behavior can occur if the Windows settings for a particular user account are corrupted. The solution involves checking for bad drivers, followed by creating a new user account, followed by performing an in-place repair of the operating system. |
| The taskbar stops responding intermittently. | KB 314228. This is caused if the Language Bar is minimized and a Windows-based program is busy. Installing the latest service pack solves this problem. |
| After moving the taskbar from the bottom of the screen to the right side, the background picture is not displayed correctly. | KB 303137. Microsoft has confirmed that this is a problem. To solve this problem, click once on an empty area of the desktop and then press F5 to refresh the background. |
| A part of the ToolTips or a message from the status area remains behind or partially displayed on the status area of the taskbar after it should be gone. | KB 307499. To resolve this behavior, right-click another location that does not contain the leftover message, click the displayed message, move the mouse pointer over the icon, or resize the taskbar. |
If the end user’s problem is among these, search the Knowledge Base for additional articles and solutions.
| See Also | Refer to Chapter 2, “Resolving a Service Call,” for more troubleshooting techniques, including the order in which available information should be sought and which techniques you should attempt. |
Configuring Taskbar Toolbars
Adding any taskbar toolbar adds a link on the taskbar that can be used to quickly access the chosen component. For instance, adding the Desktop toolbar allows you to easily access items on the desktop by clicking the link to them on the taskbar. Adding the Links toolbar allows a user to access Internet sites stored in their Links folder (in Internet Explorer Favorites) from the taskbar.
You can add toolbars to the taskbar by right-clicking the taskbar, pointing to Toolbars, and making the appropriate selection from the choices available. Some choices you can add include the following:
-
Address
-
Windows Media Player
-
Links
-
Language Bar
-
Desktop
-
Quick Launch
-
New Toolbar
If users need access to any of these items often, inform them of the ability to add them.
Troubleshooting the Start Menu
Usually service calls regarding the Start menu involve what is or is not on it. A CEO might want My Network Connections, My Recent Documents, Internet, E-Mail, and the company’s accounting program. The lead artist in the graphics department might want My Pictures, Printers and Faxes, My Music, and his or her favorite art program. When you are queried to personalize the Start menu, the combinations of ways in which the service call comes in are numerous. Figure 3-10 shows an example of a personalized Start menu.
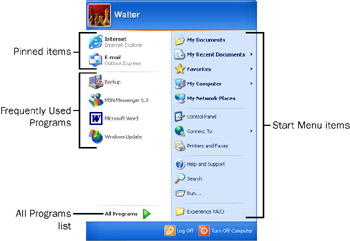
Figure 3-10: A customized Start menu offers personalized access to programs.
Two types of Start menus are available in Windows XP, the Start menu and the Classic Start menu. In this section, you learn about the Start menu and how to resolve the most basic troubleshooting calls. The tasks include adding or removing programs or Start menu items, permanently pinning items to the Start menu, and reordering the All Programs list. The Classic Start menu is discussed briefly in the next section.
Adding or Removing Items in the All Programs List
Adding and removing items in the All Programs list on the Start menu are common requests from end users. You can add a program in many ways, but you will learn the easiest way here. Removing a program is the simpler of the two tasks.
To add an item to the All Programs list, follow these steps:
-
Right-click the Start menu, and choose Open All Users.
-
Click File, point to New, and click Shortcut.
-
In the Create Shortcut dialog box, click Browse.
-
Locate the local or network program, file, folder, computer, or Internet address to create a shortcut for, and click OK.
-
Click Next. On the Select A Title For The Program page, type a name for the shortcut and click Finish.
-
Close the Documents And Settings\All Users\Start Menu window.
To see the new addition, click Start, point to All Programs, and look toward the top of the All Programs list. You can now move that item by dragging it to any other area of the All Programs list, the Frequently Used Programs area of the Start menu, or the pinned items list. You can also add a shortcut for an item to the Start menu by dragging the item’s icon to a position on the Start menu.
To remove an item from the All Programs list, simply right-click it and choose Delete. Click Yes when prompted to verify this action.
| Note | You can reorder items on the All Programs list by dragging and dropping, or you can order them alphabetically by right-clicking any entry and choosing Sort By Name. |
Adding or Removing Items on the Start Menu
End users often initiate a service call because a colleague one cubicle over has something on the Start menu that they do not, or there are items on the Start menu that they simply do not need. They might call to say that sometimes the program they want is in the frequently used area of the Start menu and sometimes it isn’t, and they would like it to always be available. Start menu items can include just about anything, such as frequently accessed programs, pinned items, and operating system components such as Control Panel, My Network Places, Help and Support, Search, Run, and similar items.
Items are added to the frequently used programs area as they are opened, and they are moved up or down the list automatically depending on how often they are used. When a computer is new and there are no items in this list, a program is added to it by opening it once. As programs continue to be opened and used, the list automatically displays the programs by how frequently they are used. If specific items on the list are not needed, they can be removed by right-clicking and choosing Remove From This List. In addition, all items can be removed and the frequently used programs can be disabled, cleared, or reconfigured from the Customize Start Menu dialog box by following these steps:
-
Right-click the Start button, and choose Properties.
-
In the Taskbar And Start Menu Properties dialog box, verify that Start Menu is selected, and click Customize.
-
In the Customize Start Menu dialog box, in the Programs section, click Clear List to clear all items from the frequently used programs area of the Start menu.
-
To increase or decrease the number of programs shown, change the value for Number Of Programs On Start Menu by using the arrows. Zero disables the Start menu. Figure 3-11 shows an example of the Start Menu dialog box. Click OK and click OK again to apply the changes.
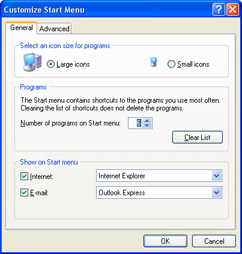
Figure 3-11: The Customize Start Menu dialog box offers many ways to personalize the Start menu.
You can pin or unpin an item on the Start menu by right-clicking the item in the Start menu or All Programs list and choosing Pin To Start Menu. Pinning an item to the Start menu places it in the upper left corner of the Start menu with other pinned items such as Internet and E-Mail, allowing for easier access. This option is also available for items in the frequently used items area.
Finally, if a user asks you to add or remove an operating system component, such as Favorites, Control Panel, Run, My Documents, or My Pictures to or from the Start menu or to configure how it is displayed, follow these steps:
-
Right-click Start, and choose Properties.
-
In the Taskbar And Start Menu Properties dialog box, verify that Start Menu is selected, and click Customize.
-
In the Customize Start Menu dialog box, click the Advanced tab.
-
In the Start Menu Items window, scroll through the options. Selecting an item will show it on the Start menu. Other choices for an item include the following:
-
Display As A Link The item will be displayed on the Start menu.
-
Display As A Menu The item will be displayed, and a menu will be available that contains the objects in that folder.
-
Don’t Display This Item The item will not be displayed.
-
-
In the Recent Documents area, click Clear List to clear the list of recently opened documents, or clear List My Most Recently Opened Documents to prevent items from being shown. Click OK twice to apply the changes and exit.
Note Remember, if the troubleshooting call goes beyond these basic configuration issues, visit the Knowledge Base for help.
Troubleshooting the Classic Start Menu
The Classic Start menu is another option for end users. If, after an upgrade, end users complain that the Start menu is too complicated or that they want it to look more like their old Microsoft Windows 98 or Windows 2000 computer did, this is the menu you pick. Troubleshooting the Classic Start menu is similar to troubleshooting the Start menu as detailed earlier except for the minor differences in the Customize dialog box. Figure 3-12 shows the Customize Classic Start Menu dialog box.
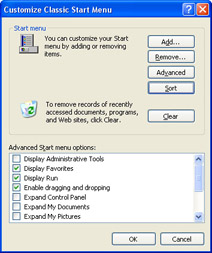
Figure 3-12: Customizing the Classic Start menu is also achieved through a dialog box.
In the Customize Classic Start Menu dialog box, you can do the following:
-
Click Add to add any item to the Start menu.
-
Click Remove to remove any item from the Start menu.
-
Click Advanced to start Windows Explorer to add or remove items from the Start menu.
-
Click Clear to remove records of recently accessed documents, programs, and websites.
-
Click any item in the Advanced Start Menu Options list to show that item.
Practice: Resolve Taskbar and Start Menu Issues
In this practice, you will configure an icon so that it is always hidden in the notification area, configure an application to start with Windows and then disable the automatic starting by using the msconfig command, add a shortcut to the Quick Launch toolbar, and then add the Network Connections folder to the Start menu.
Exercise 1: Configure the notification area
-
Log on to Windows XP.
-
Right-click the taskbar, and select Task Manager.
-
Minimize the Task Manager window.
-
Observe the CPU Usage icon in the notification area.
-
Right-click any empty spot on the taskbar or in the notification area, and select Properties.
-
In the Taskbar And Start Menu Properties dialog box, in the Notification Area section, click Customize.
-
In the Customize Notifications dialog box, select Current Items, and click Hide When Inactive to the right of CPU Usage, in the Behavior column.
-
From the Behavior drop-down list, select Always Hide, and click OK.
-
In the Taskbar And Start Menu Properties dialog box, click OK.
-
Notice that the Task Manager icon is no longer visible in the notification area.
-
To reset the default settings for the notification area, right-click any empty spot on the taskbar or in the notification area and select Properties.
-
In the Taskbar And Start Menu Properties dialog box, in the Notification section, click Customize.
-
In the Customize Notifications dialog box, click Restore Defaults, and click OK.
-
In the Taskbar And Start Menu Properties dialog box, click OK.
Exercise 2: Configure Startup Applications
-
Log on to Windows XP by using an account with Administrator permissions.
-
On the Start menu, choose All Programs, right-click the Startup folder, and choose Open All Users.
-
In the Startup folder, choose New on the File menu, and then choose Shortcut.
-
In the Create Shortcut dialog box, type calc.exe and click Next.
-
In the Select A Title For The Program dialog box, type Calculator and click Finish.
-
Log off Windows, and log back on. The calculator should run as soon as you log on because a shortcut for it is now in the Startup folder.
Exercise 3: Add a Shortcut to the Quick Launch Toolbar
-
Log on to Windows XP.
-
Right-click any open area on the taskbar, and choose Properties.
-
In the Taskbar And Start Menu Properties dialog box, in the Taskbar Appearance section, select the Show Quick Launch check box and click OK.
-
On the Start menu, point to All Programs, right-click the Accessories folder, and choose Open All Users.
-
Drag the Calculator icon from the Accessories window to a position on the Quick Launch toolbar.
-
Click the Calculator icon on the Quick Launch toolbar to open the Calculator. Close the Calculator when you are done.
-
To delete the Calculator icon from the Quick Launch toolbar, right-click the icon and choose Delete.
Exercise 4: Add the Network Connections Folder to the Start Menu
-
Right-click the Start menu, and choose Properties.
-
In the Taskbar And Start Menu Properties dialog box, on the Start Menu tab, click Customize.
-
In the Customize Start Menu dialog box, on the Advanced tab, in the Start Menu Items list, locate Network Connections and select Link To Network Connections Folder.
-
Click OK.
-
In the Taskbar And Start Menu Properties dialog box, click OK.
-
Verify that the item was successfully added to the Start menu.
Lesson Review
The following questions are intended to reinforce key information presented in this lesson. If you are unable to answer a question, review the lesson materials and try the question again. You can find answers to the questions in the “Questions and Answers” section at the end of this chapter.
-
Match the end-user request on the left with the solution on the right.
1. The Taskbar is always disappearing, and I’d like that to stop. I also want to be able to move the taskbar to another area of the screen.
a) Open the Taskbar And Start Menu Properties dialog box. On the Taskbar tab, select the Show Quick Launch check box. Then, on the Start menu, locate the program to display in the Quick Launch area, right-click it, and drag and drop it there. Select Copy Here.
2. John, my colleague down the hall, has an icon next to his Start menu that he uses to open our accounting program. I do not have any icons there. How do I create one of those so I do not always have to locate the program in the Start menu or place a shortcut on the desktop?
b) Open the Taskbar And Start Menu Properties dialog box. On the Taskbar tab, select the Group Similar Taskbar Buttons check box.
3. I do not have enough room on my taskbar to show all of my open programs, and I have to scroll to see the additional programs. Is there some way of grouping the programs?
c) Open the Taskbar And Start Menu Properties dialog box. On the Taskbar tab, clear the Auto-Hide The Taskbar check box. Then verify that the Lock The Taskbar check box is cleared. Instruct the user to move the taskbar by dragging.
4. Can I remove or hide the icons for my antivirus software, my pop-up stopper program, and other programs that run in the background? If I remove them, do they stop running?
d) Notification area icons can be removed by setting preferences in the program’s configuration choices. If you right-click an item in the notification area and its shortcut menu lets you choose Exit or Close, the program will stop running when you choose the appropriate option.
5. In my notification area are a lot of icons that I do not think I need. How can I get rid of those for good? I do not think they should be running in the background, and I do not even know what some of them are.
e) Open the Taskbar And Start Menu Properties dialog box. On the Start Menu tab, click Customize. In the Customize Start Menu (or Customize Classic Start Menu) dialog box, make the appropriate changes.
6. On my Start menu are lots of programs that I do not need and some that I need but are not there. Can you fix that for me?
f) Click Start, and click Run. At the Run line, type msconfig.exe and click OK. On the Startup tab, clear the check boxes for the items that you do not want to start when the computer boots.
7. I want to be able to open My Network Places, open Control Panel, and access System Administrative Tools from the Start Menu, but I do not want my recent documents to be listed. I also do not want to see My Music, My Pictures, or any of that other stuff that is not work- related.
g) Open the Taskbar And Start Menu Properties dialog box. On the Start Menu tab, select Classic Start Menu and click Customize. Use the Add and Remove buttons to customize the menu. Apply the changes. If desired, select Start Menu to return to the default Start Menu look.
-
You want to have as few items as possible on the taskbar. Which of the following items can you easily remove from the taskbar?
-
The Start button
-
The system clock
-
The notification area
-
Quick Launch items
-
Inactive icons in the notification area
-
Lesson Summary
-
To resolve problems involving the taskbar, use the Taskbar And Start Menu Properties dialog box. On the Taskbar tab, you can lock or hide the taskbar, group similar items, show Quick Launch, hide inactive icons, and keep the taskbar on top of other windows.
-
To resolve problems involving the Start menu, use the Taskbar And Start Menu Properties dialog box. On the Start menu tab, click Customize to define what should and should not appear on the taskbar, clear the taskbar of recently used programs or documents, and more.
EAN: N/A
Pages: 237