Windows Firewall
A firewall protects a computer from malicious attacks originating outside the computer (specifically, the Internet) by blocking all incoming network traffic except that which you specifically configure the firewall to allow through. Any computer connected directly to the Internet, whether it is a standalone computer or a computer that provides Internet Connection Sharing (ICS) services for other computers on a network should have a firewall enabled.
Previous versions of Windows XP include a software-based firewall named Internet Connection Firewall. After installing Windows XP Service Pack 2, this firewall is renamed to Windows Firewall. Windows Firewall is a stateful, host-based firewall that drops all incoming traffic that does not meet one of the following conditions:
-
Solicited traffic (valid traffic that is sent in response to a request by the computer) is allowed through the firewall.
-
Expected traffic (valid traffic that you have specifically configured the firewall to accept) is allowed through the firewall.
In addition to its new name, Windows Firewall also boasts a number of enhancements, including the following:
-
Enabled by default Windows Firewall is now enabled by default on all network connections. This includes local area network (LAN) (wired and wireless), dial-up, and virtual private network (VPN) connections that exist when Windows XP Service Pack 2 is installed. When a new connection is created, Windows Firewall is also enabled by default.
-
Global settings In Windows XP (prior to installing Windows XP Service Pack 2), ICF settings must be configured individually for each connection. After installing Windows XP Service Pack 2, Windows Firewall provides an interface for configuring global settings that apply to all the connections of the computer. When you change a global Windows Firewall setting, the change is applied to all the connections on which Windows Firewall is enabled. Of course, you can still apply configurations to individual connections, as well.
-
New interface In previous versions, ICF is enabled by selecting a single checkbox on the Advanced tab of the Properties dialog box for a connection. A Settings button opens a separate dialog box, in which you can configure services, logging, and Internet Control Message Protocol (ICMP) allowances. In Windows XP Service Pack 2, the check box on the Advanced tab has been replaced with a Settings button that launches the new Windows Firewall Control Panel applet, which consolidates global and connection-specific settings, service and ICMP allowances, and log settings in a single, updated interface.
-
Prevent Excepted Traffic In previous versions, ICF is either enabled or disabled. When enabled, solicited traffic and excepted traffic are allowed. When disabled, all traffic is allowed. In Windows XP Service Pack 2, Windows Firewall supports a new feature that lets you keep Windows Firewall enabled and also not allow any exceptions; only solicited traffic is allowed. This new feature is intended to create an even more secure environment when connecting to the Internet in a public, or other unsecured, location.
-
Startup Security In previous versions, ICF becomes active on connections only when the Internet Connection Firewall (ICF)/Internet Connection Sharing (ICS) service is started successfully. This means that when a computer is started, there is a delay between when the computer is active on the network and when the connections are protected with ICF. In Windows XP Service Pack 2, a startup Windows Firewall policy performs stateful packet filtering during startup, so that the computer can perform basic network tasks (such as contacting Dynamic Host Configuration Protocol [DHCP] and Domain Name System [DNS] servers) and still be protected.
-
Traffic Source Restrictions In previous versions, excepted traffic can originate from any IP address. In Windows XP Service Pack 2, you can configure Windows Firewall so that excepted traffic is restricted by IP address (or IP address range), meaning that only traffic from computers with valid IP addresses is allowed through the firewall.
-
Create Exceptions Using Application Filenames In previous versions, you configure excepted traffic by specifying the Transmission Control Protocol (TCP) and User Datagram Protocol (UDP) ports used by a service or application. In Windows XP Service Pack 2, you can also configure excepted traffic by specifying the filename of the application. When the application runs, Windows Firewall monitors the ports on which the application listens and automatically adds them to the list of allowed incoming traffic.
When preparing for the exam, you should be familiar with the following updated (or new) procedures available after the installation of Windows XP Service Pack 2.
Enable or Disable Windows Firewall for all Network Connections
The only users who can make changes to Windows Firewall settings are those who log on to the computer with a user account that is a member of the local Administrators group. To enable or disable Windows Firewall for a specific network connection, use these steps:
-
Click Start, and then select Control Panel.
-
In the Control Panel window, select Network And Internet Connections.
-
In the Network And Internet Connections window, select Windows Firewall.
-
On the General tab of the Windows Firewall dialog box, shown in Figure A-3, select the On (Recommended) option to enable the firewall for all connections. Select Off (Not Recommended) to disable the firewall for all connections.
-
Click OK.
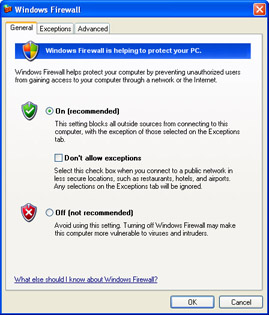
Figure A-3: Enabling and disabling Windows Firewall for all network connections.
Enable or Disable Windows Firewall for a Specific Network Connection
To enable or disable Windows Firewall for a specific network connection, use these steps:
-
Click Start, and then select Control Panel.
-
In the Control Panel window, select Network And Internet Connections.
-
In the Network And Internet Connections window, select Network Connections.
-
In the Network Connections window, right-click the connection for which you want to enable or disable Windows Firewall and choose Properties.
-
In the Properties dialog box of the network connection, select the Advanced tab.
-
On the Advanced tab, click Settings.
-
In the Windows Firewall dialog box, switch to the Advanced tab, shown in Figure A-4.

Figure A-4: Enabling and disabling Windows Firewall for specific network connections. -
To enable Windows Firewall for a connection, select the check box for that connection. To disable Windows Firewall for a connection, clear the check box for that connection.
-
Click OK to close the Windows Firewall dialog box.
-
Click OK to close the Properties dialog box for the network connection.
Enable Windows Firewall Logging
You can configure Windows Firewall to log network activity, including any dropped packets or successful connections to the computer. Security logging is not enabled by default for Windows Firewall. To enable security logging for Windows Firewall, use these steps:
-
Click Start, and then select Control Panel.
-
In the Control Panel window, select Network And Internet Connections.
-
In the Network And Internet Connections window, select Windows Firewall.
-
In the Windows Firewall dialog box, select the Advanced tab. In the Security Logging section, click Settings to open the Log Settings dialog box, shown in Figure A-5.
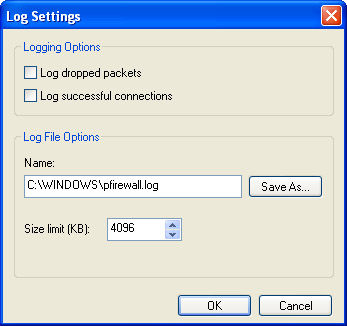
Figure A-5: Enabling security logging for Windows Firewall. -
In the Logging Options section, select one or both of the following check boxes:
-
Log Dropped Packets Logs all dropped packets originating from the local network or the Internet.
-
Log Successful Connections Logs all successful connections originating from the network or the Internet.
-
-
Note the location of the security log. By default, it is in the \Windows\pfirewall.log file. Click OK to close the Log Settings dialog box. Click OK again to close the Windows Firewall dialog box.
Access the Windows Firewall Log File
After you enable logging, you can access the log file by browsing to its location and opening the file. To locate and open the Windows Firewall log file, use these steps:
-
Click Start, and then select Control Panel.
-
In the Control Panel window, select Network And Internet Connections.
-
In the Network And Internet Connections window, select Windows Firewall.
-
In the Windows Firewall dialog box, choose the Advanced tab.
-
In the Security Logging section, click Settings.
-
In the Log Settings dialog box, under Log File Options section, click Save As.
-
In the Browse dialog box, right-click the pfirewall.txt file and choose Open. Notice that the text file has several headings, including Date, Time, Action, Protocol, and more.
-
After reviewing the firewall log, close the Notepad window, click OK to exit the Log Settings dialog box, and then click OK again to close the Windows Firewall dialog box.
Create an Exception for a Service or Application
By default, Windows Firewall blocks all unsolicited traffic. You can create exceptions so that particular types of unsolicited traffic are allowed through the firewall.
To create a global exception that applies to all network connections for which Windows Firewall is enabled, use these steps:
-
Click Start, and then select Control Panel.
-
In the Control Panel window, select Network And Internet Connections.
-
In the Network And Internet Connections window, select Windows Firewall.
-
In the Windows Firewall dialog box, select the Exceptions tab, shown in Figure A-6.
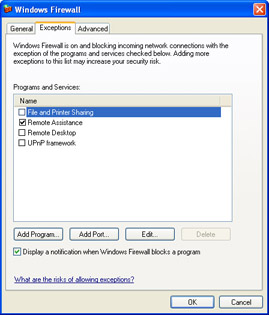
Figure A-6: Creating a global exception for all connections in Windows Firewall. -
On the Programs And Services list, select the check box for the service you want to allow.
-
Click OK to close the Windows Firewall dialog box.
To create an exception for a particular network connection for which Windows Firewall is enabled, use these steps:
-
Click Start, and then select Control Panel.
-
In the Control Panel window, select Network And Internet Connections.
-
In the Network And Internet Connections window, select Windows Firewall.
-
In the Windows Firewall dialog box, select the Advanced tab.
-
In the Network Connection Settings section, select the connection for which you want to configure an exception and click Settings.
-
On the Services tab of the Advanced Settings dialog box, shown in Figure A-7, select the check box for the service you want to allow.
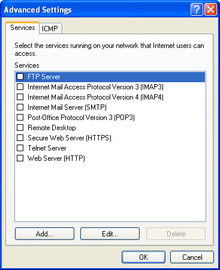
Figure A-7: Creating an exception for a particular network connection in Windows Firewall. -
Click OK to close the Advanced Settings dialog box. Click OK again to close the Windows Firewall dialog box.
Create a Custom Service Definition
In addition to the predefined services for which you can create an exception in Windows Firewall, you can also define a custom service and then configure it as an exception.
To create a global custom service exception that applies to all network connections for which Windows Firewall is enabled, use these steps.
-
Click Start, and then select Control Panel.
-
In the Control Panel window, select Network And Internet Connections.
-
In the Network And Internet Connections window, select Windows Firewall.
-
In the Windows Firewall dialog box, select the Exceptions tab.
-
To create a global exception, do one of the following:
-
Click Add Program to specify the executable file for a particular program installed on your computer. Windows Firewall will monitor the program and configure the proper TCP or UDP port information for you.
-
Click Add Port to create an exception based on a TCP or UDP port number. You must know the proper port number used by an application of service in order to use this option.
-
-
Once you have added an exception, it shows up in the Programs and Services list on the Exceptions tab of the Windows Firewall dialog box. Select the check box for the exception to enable it.
-
Click OK to close the Windows Firewall dialog box.
To create a service exception for a particular network connection for which Windows Firewall is enabled, use these steps.
-
Click Start, and then select Control Panel.
-
In the Control Panel window, select Network And Internet Connections.
-
In the Network And Internet Connections window, select Windows Firewall.
-
In the Windows Firewall dialog box, select the Advanced tab.
-
In the Network Connection Settings section, select the connection for which you want to configure an exception and click Settings.
-
On the Services tab of the Advanced Settings dialog box, click Add.
-
In the Service Settings dialog box, type a description of the service and the IP address of the computer on the network that hosts the service, and configure the port information for the service.
-
Click OK to close the Service Settings dialog box. Click OK to close the Advanced Settings dialog box. Click OK again to close the Windows Firewall dialog box.
Configure ICMP Exceptions for a Network Connection
Desktop technicians and network administrators use ICMP requests to troubleshoot network connectivity. Generally, you enable the ICMP options when you need them, and then disable them after you have completed troubleshooting. You cannot set global ICMP exceptions; you must create an exception for a particular network connection.
To create an ICMP exception for a network connection, use these steps:
-
Click Start, and then select Control Panel.
-
In the Control Panel window, select Network And Internet Connections.
-
In the Network And Internet Connections window, select Windows Firewall.
-
In the Windows Firewall dialog box, select the Advanced tab.
-
In the Network Connection Settings section, select the connection for which you want to configure an exception and click Settings.
-
In the Advanced Settings dialog box, select the ICMP tab, shown in Figure A-8.
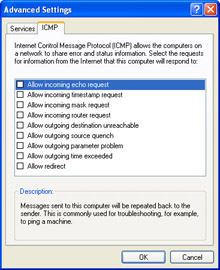
Figure A-8: Configuring an ICMP exception for a connection. -
Select the check box for the exception you want to create.
-
Click OK to close the Advanced Settings dialog box. Click OK again to close the Windows Firewall dialog box.
EAN: N/A
Pages: 237