Lesson 3: Troubleshooting Local Security Settings
Local security settings are configured on the local computer, and they affect everyone who logs on to it. In this lesson, you learn to work with two types of security settings— account policies and local policies.
After this lesson, you will be able to
-
Explain the types of local security settings.
-
Troubleshoot issues with account policies.
-
Troubleshoot issues with local security policies.
Estimated lesson time: 25 minutes
Understanding Local Security Settings
The local security settings that you will be concerned with as a DST are account policies and local security policies. Account policies control how people log on to the computer.
There are two kinds of account policies:
-
Password policies
-
Account lockout policies
There are three kinds of local security policies:
-
Audit policies
-
User rights assignments
-
Security options
Together these security policies define the rules for who can log on to the computer, what they can do once logged on, and more. These policies are configured to protect the computer and limit a user’s access. Local security policies are generally configured for computers that are in workgroups, especially in situations in which multiple users access the same computer. Local security policies are also applied to computers that are accessed by people in kiosks or other public places. Local policies can be applied to computers in domains, too, but the local security policy is overridden by any site policies, domain policies, and organizational unit policies (in that order) that are in place. If conflicts arise, the local security policy is ignored and the other policies in the hierarchy are applied. Therefore, local security policies in a domain are not very powerful. Local policies are set from the Local Security Policy administrative tool, available in Control Panel and shown in Figure 9-7.
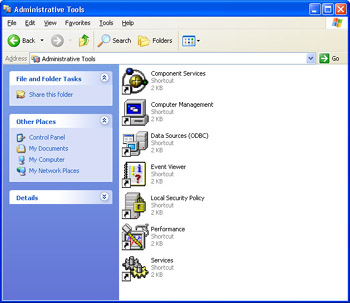
Figure 9-7: Local security policies protect the computer from harm.
Account Policies
There are two types of account policies, and in this section you will learn about each of them. It is important to understand the policies that can and might be set so that you can recognize and troubleshoot problems that occur because of policies that are put in place by administrators. For instance, one configurable account policy is to lock out a user when a specific number of failed logon attempts is met. This prevents someone from trying unlimited name and password combinations. Therefore, if a user reports that he forgot his password and he tried four different ones and is now locked out, you should be able to recognize that this has to do with a local security policy put in place by administrators and have a fair understanding of how to resolve the problem. With this in mind, we will look at the available options for account policies.
Password Policies
To view the available password policies, open Control Panel, open Performance And Maintenance, open Administrative Tools, open Local Security Policy, and expand Account Policies. Click Password Policy. Figure 9-8 shows the options that you can set.
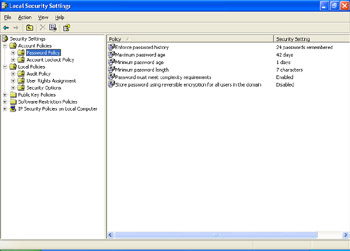
Figure 9-8: Password policies.
If password policies have been set by local security policy or another policy on the network, an end user’s password problem might be directly related to the policies configured. The policies shown in Figure 9-8 allow an administrator to enable or enforce the following actions:
-
Enforce Password History Determines the number of unique new passwords that a user must create before he or she can reuse an old password. This prevents a user from reusing the same two passwords over and over, thereby forcing the user to continually create new ones.
-
Maximum Password Age Determines the period of time (in days) that a user can use a password before the system requires the user to change it. This forces users to change their passwords every so often. If users do not change their passwords, they will not be able to log on and will need the assistance of a network administrator.
-
Minimum Password Age Determines the period of time (in days) that a user must use a password before he or she can change it. If a user reports that he or she cannot change a password, this might be the issue.
-
Minimum Password Length Determines the least number of characters that a password must contain.
-
Password Must Meet Complexity Requirements Requires passwords to contain at least six characters, not contain a part of the user’s name, and have three of the following four items: uppercase letters, lowercase letters, digits, and non- alphanumeric characters.
-
Store Password Using Reversible Encryption For All Users In The Domain Determines whether Microsoft Windows 2000 Server, Windows 2000 Professional, and Windows XP Professional store passwords by using reversible encryption.
If a user has a problem with one of these items, logging on might require the assistance of a workgroup or network administrator. This is detailed shortly.
Account Lockout Policies
If account lockout policies have been set by local security policy or another policy on the network, an end user’s logon problem might be directly related to the configured policies. The three account lockout policies allow an administrator to enable or enforce the following:
-
Account Lockout DurationDetermines the number of minutes a locked-out account remains locked before it automatically becomes unlocked. A user who has entered too many incorrect passwords might become locked out and either has to wait for the duration set here or ask an administrator for help.
-
Account Lockout ThresholdDetermines the number of failed logon attempts that causes an account to be locked out.
-
Reset Account Lockout Counter AfterDetermines the number of minutes that must elapse before the failed logon attempt counter is reset to 0.
If a user is locked out and you have administrator privileges on the computer, you can unlock the user’s account. This is detailed next.
Troubleshooting User Account Problems
If you are the administrator of a workgroup and need to unlock an account, reset a user’s password because he or she has forgotten it, force the user to change his or her password for security reasons, or perform similar tasks, you do that from the Administrative Tools option, Computer Management.
Unlock a user account
To unlock an account, follow these steps:
-
Log on to the computer by using your Administrator account.
-
Open Control Panel, open Performance And Maintenance, open Administrative Tools, and open Computer Management.
-
In the Computer Management window, expand System Tools, and expand Local Users And Groups. Select Users.
-
In the right pane, locate the user whose account needs unlocking, right-click on that account, and choose Properties.
-
To unlock the account, clear the Account Is Locked Out check box. (If the account is disabled, clear the Account Is Disabled check box.) Click OK.
Reset a user’s password
To reset a user’s password because he or she has forgotten it, follow these steps:
-
Log on to the computer using your Administrator account.
-
Open Control Panel, open Performance And Maintenance, open Administrative Tools, and open Computer Management.
-
In the Computer Management window, expand System Tools, and expand Local Users And Groups. Select Users.
-
In the right pane, locate the user whose account needs the password to be reset. Right-click on that account, and choose Set Password.
-
Read the information in the Set Password dialog box. If a password reset disk is available, use it as suggested. If a password reset disk is not available, click Proceed.
-
In the Set Password dialog box, type the new password and confirm it. Click OK. The Set Password dialog box is shown in Figure 9-9.
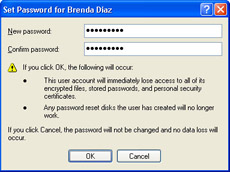
Figure 9-9: The Set Password dialog box allows an administrator to reset a user’s password if he or she has forgotten it. -
Click OK to confirm that the password has been set.
Force a user to change a password at next logon
To force the user to change his or her password at the next logon, follow these steps:
-
Log on to the computer using your Administrator account.
-
Open Control Panel, open Performance And Maintenance, open Administrative Tools, and open Computer Management.
-
In the Computer Management window, expand System Tools, and expand Local Users And Groups. Select Users.
-
In the right pane, locate the user whose password needs to be changed, right-click on that account, and choose Properties.
-
Select the User Must Change Password At Next Logon check box. Figure 9-10 shows an example. Click OK.
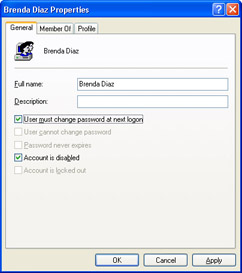
Figure 9-10: Reset an account from Computer Management.
Local Security Policies
You can configure three types of local security policies, and in this section you will learn about each of them. You should understand the policies that can and might be set so that you can recognize and troubleshoot problems that occur because of policies put in place by administrators. For instance, one configurable security policy prevents the installation of unsigned device drivers. Therefore, if a user reports that on her own computer she can install unsigned device drivers but on the computer in the lobby she cannot, you should be able to recognize that the computer in the lobby has a stricter local security policy than the user’s computer does. With that in mind, we will look at the three available configurable local security policy options.
Audit Policies
Administrators can set audit policies to log the success or failure of various events. This auditing helps an administrator determine whether there are too many logon failures (implying that someone might be trying to hack into the system), whether someone has successfully changed a user rights assignment policy or audit policy, or a number of other events. As a tier 1 DST, you will not be in charge of setting audit policies. However, because they are a configurable local security policy option, they bear a brief introduction.
To view the available audit policies and learn the purpose of setting each, follow these steps:
-
Open Control Panel, open Performance And Maintenance, open Administrative Tools, and open Local Security Policy.
-
Expand Local Policies if necessary, and select Audit Policies. Double-click any audit policy to change its properties and to enable or disable auditing.
-
To learn more about audit policies, click Help, and click Help Topics. In the Microsoft Management Console help files, expand Local Security Policy, expand Concepts, expand Understanding Local Security Policy, and click Account And Local Policies. In the right pane, select Audit Policy.
User Rights Assignment
User rights assignment options are likely to be set on shared computers, computers in kiosks and public places, and workgroup computers. Setting a user rights assignment is the same as setting an audit policy: Open Local Security Settings, expand Local Policies, select User Rights Assignment, and double-click the policy to change or set. Some user rights assignment policies that might be set on a computer include who or what might or might not be able to do the following:
-
Access the computer from the network
-
Add workstations to a domain
-
Back up files and directories
-
Change the system time
-
Create permanent shared objects
-
Load and unload device drivers
-
Log on locally
-
Manage auditing and the security log
-
Remove a computer from a docking station
-
Shut down the system
-
Take ownership of objects
Therefore, if a user reports that he or she cannot perform a required function, such as change the system time, shut down the system, or another task listed here, you might need to check the local security policy (and the user’s group membership).
Security Options
Finally, security options are likely to be set by administrators on computers in a domain, although you sometimes find them set on workgroups. Setting a security option is the same as setting any policy: Open Local Security Settings, expand Local Policies, select Security Options, and double-click the policy to change or set. Some security options that might be set on a computer include the following, and these can be enabled or disabled:
-
Administrator account status
-
Guest account status
-
Renaming the Administrator or Guest account
-
Shutting down the system if security audits cannot be logged
-
Preventing users from installing printer drivers
-
Unsigned device driver installation behavior
-
Displaying the last user name
-
Requiring Ctrl+Alt+Del when logging on
-
If message text is to appear when users log on
-
If logoff is forced when users’ logon hours expire
-
If the virtual memory pagefile should be cleared when the computer is shut down
Because of the number of options that are available, it is important to view and understand what each option does or does not allow. This way, when a user reports an obscure problem, asks that you disable Ctrl+Alt+Del for logon, asks that you rename the Guest account, or wants you to configure message text that users must read when logging on, you know exactly where to look and how to configure the changes.
Practice: Configure Local Security Settings
In this practice, you will set password and account lockout policies, assign user rights, and configure security options.
Exercise 1: Set Password Policies
-
Log on to Windows XP using an account with administrator privileges.
-
From the Start menu, select Control Panel.
-
In Control Panel, select Performance And Maintenance.
-
In the Performance And Maintenance window, select Administrative Tools.
-
In the Administrative Tools window, double-click Local Security Policy.
-
In the Local Security Settings console, expand Account Policies, and select Password Policy.
-
In the right-hand pane, double-click Maximum Password Age.
-
In the Maximum Password Age Properties dialog box, in the Password Will Expire In text box, enter 90. Click OK.
-
In the Suggested Value Changes dialog box, click OK.
Exercise 2: Set Account Lockout Policies
-
Log on to Windows XP using an account with administrator privileges.
-
From the Start menu, select Control Panel.
-
In Control Panel, select Performance And Maintenance.
-
In the Performance And Maintenance window, select Administrative Tools.
-
In the Administrative Tools window, double-click Local Security Policy.
-
In the Local Security Settings console, expand Account Policies, and select Account Lockout Policy.
-
In the details pane, double-click Account Lockout Threshold.
-
In the Account Lockout Threshold Properties dialog box, in the Account Will Not Lock Out text box, enter 5. Click OK.
-
In the Suggested Value Changes dialog box, click OK.
Exercise 3: Assign User Rights
-
Log on to Windows XP using an account with administrator privileges.
-
From the Start menu, select Control Panel.
-
In Control Panel, select Performance And Maintenance.
-
In the Performance And Maintenance window, select Administrative Tools.
-
In the Administrative Tools window, double-click Local Security Policy.
-
In the Local Security Settings console, expand Local Policies, and select User Rights Assignment.
-
In the right-hand pane, right-click Change The System Time, and select Properties.
-
In the Change The System Time Properties dialog box, click Add User Or Group.
-
In the Select Users Or Groups dialog box, in the Enter The Object Names To Select (Examples) text box, type ksanchez. Click Check Names, and then click OK.
-
In the Change The System Time Properties dialog box, click OK.
Exercise 4: Configure Security Options
-
Log on to Windows XP using an account with administrator privileges.
-
From the Start menu, select Control Panel.
-
In Control Panel, select Performance And Maintenance.
-
In the Performance And Maintenance window, select Administrative Tools.
-
In the Administrative Tools window, double-click Local Security Policy.
-
In the Local Security Settings console, expand Local Policies, and select Security Options.
-
In the right-hand pane, right-click Interactive Logon: Do Not Require CTRL+ALT+DEL, and select Properties.
-
In the Interactive Logon: Do Not Require CTRL+ALT+DEL Properties dialog box, select Enable, and click OK.
Lesson Review
The following question is intended to reinforce key information presented in this lesson. If you are unable to answer this question, review the lesson materials and try the question again. You can find answers to the question in the “Questions and Answers” section at the end of this chapter.
-
In the following table, match the policy on the left with the appropriate security setting folder on the right.
Policy
Local Security Setting Folder
1. Audit Logon Events
A. Local Policies, User Rights Assignment
2. Maximum Password Age
B. Group Policy, User Configuration, Administrative Templates, Control Panel
3. Interactive Logon: Do Not Require Ctrl+Alt+Del
C. Local Policies, Security Options
4. Shut Down The System
D. Account Policies, Account Lockout Policy
5. Account Lockout Threshold
E. Local Policies, Audit Policy
6. Hide Specific Control Panel Tools
F. Account Policies, Password Policy
Lesson Summary
-
Account policies include password policies, which govern how passwords are configured and controlled, and account lockout policies, which control what happens when a user tries to log on using an invalid password.
-
Local policies include audit policies, user rights assignments, and security options.
EAN: N/A
Pages: 237