Lesson 2: Configuring and Troubleshooting IO Devices
Lesson 2: Configuring and Troubleshooting I/O Devices
I/O devices extend the capabilities of the basic PC computer. Standard input devices associated with personal computers include the keyboard and mouse, although other devices exist. Standard output devices include monitors and printers. In addition, users routinely add many other types of peripheral equipment to their computers. As long as a computer has open expansion slots or other standard I/O connectors available, you can add compatible devices to the computer.
After this lesson, you will be able to
-
Configure general I/O devices in Windows XP.
-
Troubleshoot I/O devices.
-
Troubleshoot additional devices, including PC cards, modems, universal serial bus (USB) devices, and infrared devices.
Estimated lesson time: 45 minutes
Configuring I/O Devices
You are providing telephone support at a help desk when a caller contacts you wanting to add several pieces of new hardware to her computer. While talking to the user, you determine that some of the hardware is completely new to the computer, and other pieces are upgrades to what she currently has installed. What can you do to help her get the hardware installed?
As a DST, you must be familiar with the operation of various types of I/O devices and the procedures used to troubleshoot them when they fail. Often, Windows XP identifies a class of hardware and installs generic drivers, which make only basic features available to the user. To take advantage of the advanced features that may be available with many devices, you must install the proper hardware drivers (and sometimes software applications bundled with the hardware).
Supporting Printers
You usually install printers directly by using the Add Printer Wizard, but you can also install them by using the Add Hardware Wizard. The installation and management of printers is discussed fully in Chapter 9, “Managing Local and Network Print Devices in Windows XP.”
Supporting Scanners and Cameras
Windows XP detects most scanners and cameras automatically during the installation of Windows, if the hardware devices are connected to the computer. Windows usually detects and installs Plug and Play devices automatically when you connect them to the computer. If Windows does not detect and install an imaging device automatically, you must use the Add Hardware Wizard or the Scanners And Cameras tool in Control Panel to perform the installation. If a device does not support Plug and Play, the user must log on to Windows XP using an account with administrator privileges to complete the installation of the device.
You use the Scanners And Cameras tool in Control Panel to manage imaging devices. Configuration options vary depending on the device that is connected, but at a minimum you will be able to test the device to verify that it is functioning, set the rate at which data is transferred from the camera or scanner to the computer, and control color profiles. It is important to not set the data transfer rate higher than what the device supports. If the transfer rate is set too high, image transfer may fail.
| Note | Windows XP Professional supports Infrared Picture Transfer (IrTran-P), which is an image-transfer protocol that is used to send images by using infrared technology. Both the imaging device and the computer must support infrared data transfer for this option to be available. |
Supporting Mice
Mice are generally Plug and Play devices and are recognized when they are connected to the computer or, at the least, when Windows starts up. In some cases, though, you must install a mouse using the Add Hardware Wizard. Mice connect to computers through a mouse (PS/2) port, serial port, or USB port. Wireless mice are also available, although they usually communicate with a receiver that connects to the computer using a USB port.
The Mouse tool in Control Panel lets you configure mouse properties and other pointing device settings. You can update mouse drivers on the Hardware tab of the Mouse Properties dialog box, as well as through Device Manager.
The Buttons tab of the mouse properties, shown in Figure 7-3, lets you configure properties such as button configuration, double-click speed, and ClickLock functionality. Be careful not to set the double-click speed too fast for the user. If users cannot double- click at the selected speed, they will have difficulty navigating the operating system.
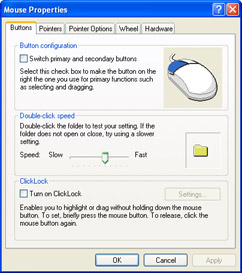
Figure 7-3: Configuring mouse settings with the Mouse tool.
The Pointers tab of the Mouse Properties dialog box, shown in Figure 7-4, allows you to customize the pointer scheme to reflect your preferences. Microsoft provides several pointer schemes with Windows XP, such as Hands, Dinosaur, Conductor, and Magnified. You can customize and save existing schemes under another name. You also can click Browse and point the computer to a pointer scheme configuration file to add schemes.
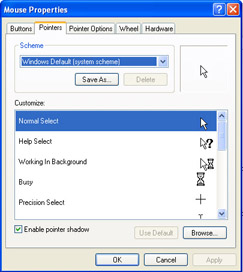
Figure 7-4: Use the Pointers tab to customize the pointer appearance.
The Pointer Options tab of the Mouse Properties dialog box, shown in Figure 7-5, lets you configure how fast the pointer on the screen moves in relation to movements of the mouse on the mouse pad. Selecting the Snap To option causes Windows to automatically place the pointer over the default button (such as OK or Apply) of new windows or dialog boxes. Although some users find that this feature increases productivity, many users who are not accustomed to the feature may experience undesirable results because it unexpectedly changes where the pointer is on the screen. This can be especially frustrating to users of portable computers, on which the pointer is sometimes hard to locate.
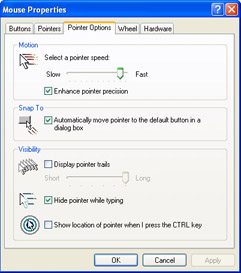
Figure 7-5: Use the Pointer Options tab to control the way the pointer behaves in different situations.
| Note | Windows XP Professional supports the use of multiple pointing devices simultaneously (such as a portable computer with an add-on mouse and a built-in touch pad). |
Erratic mouse behavior is a fairly common hardware problem. If a user experiences mouse problems, use the following troubleshooting techniques:
-
Verify that the mouse is securely connected to the computer.
-
Clean the mouse ball and contacts.
-
Replace the mouse driver because it may have become corrupted.
-
Substitute a different mouse to see if the problem is eliminated. If so, replace the mouse.
Supporting Keyboards
Like mice, keyboards are generally Plug and Play devices. Keyboards are usually connected to the computer through a (PS/2) keyboard port or a USB port. Wireless keyboards are also available, although (like wireless mice) they typically communicate with a receiver that connects to the computer using a USB port.
You use the Keyboard tool in Control Panel to configure keyboard properties. You can manage device drivers through the Hardware tab of the keyboard properties and through Device Manager.
The Speed tab of the keyboard properties, shown in Figure 7-6, lets you configure the following options:
-
Repeat Delay Controls how long a user can hold a key down before Windows begins repeating the key press. For users who have difficulty using the keyboard, consider suggesting a longer repeat delay.
-
Repeat Rate Controls how fast Windows repeats a key press. Use the Click Here And Hold Down A Key To Test Repeat Rate text box to test the repeat delay and repeat rate settings.
-
Cursor Blink Rate Controls how fast the cursor blinks. The cursor is the blinking vertical line that indicates where you are typing text. In many word processing programs, the cursor is also referred to as the insertion point.
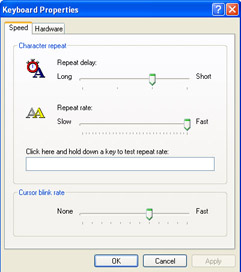
Figure 7-6: Configuring keyboard properties with the Keyboard tool.
Supporting Smart Card Readers
Smart cards are small, credit card-sized devices that are used to store information. Smart cards are generally used to store authentication credentials, such as public and private keys, and other forms of personal information. They are highly portable, allowing users to easily carry their credentials and other personal information with them.
A computer must have a smart card reader to access a smart card. The reader is generally a PS/2, USB, or Personal Computer Memory Card International Association (PCMCIA) device. Windows XP supports Plug and Play smart card readers that follow the Personal Computer/Smart Card (PC/SC) standards. A manufacturer may provide a device driver for its legacy smart card device, but Microsoft recommends using only Plug and Play smart card readers.
In addition to installing drivers for a smart card reader, you must enable the Smart Card service for Windows XP Professional to read smart cards. After you have installed and configured the smart card reader, make sure that the Smart Card service is started by using the Services tool in Computer Management.
Supporting Modems
Analog modems connect a computer to a remote device by using the Public Switched Telephone Network (PSTN). Modems are used to connect to the Internet through an Internet service provider (ISP) or to connect to a remote private network, such as a corporate network.
A modem can be either an internal or an external device. Internal modems connect to one of the computer’s internal expansion slots. External modems connect to one of the computer’s serial or USB ports.
You can manage modems through the Phone And Modem Options tool in Control Panel and through Device Manager. In Control Panel, select Printers And Other Hardware, then select Phone And Modem Options. In the Phone and Modem Options dialog box, on the Modems tab, double-click a modem to open a modem’s Properties dialog box, as shown in Figure 7-7. The Properties dialog box allows you to control speaker volume for the modem or disable modem sound entirely. This is actually a common request from users who do not like hearing the modem sounds every time they connect to the Internet.
The Maximum Port Speed controls how quickly communications programs are permitted to send information to the modem. This is not the same as the modem’s connection speed, which is negotiated when the modem dials out and establishes a connection. The maximum port speed is generally configured during installation and does not need to be reconfigured to match the modem’s connection speed.
The Wait For Dial Tone Before Dialing check box is enabled by default. The telephone systems of some countries do not use a dial tone, in which case this option must be disabled or the modem will never dial.
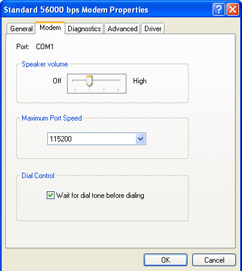
Figure 7-7: Configure general modem properties on the Modem tab.
The Diagnostics tab of the modem’s Properties dialog box, shown in Figure 7-8, lets you query the modem to see if it can respond to standard modem commands. When you are troubleshooting, this is a useful way to determine whether the modem is initializing and functioning correctly.
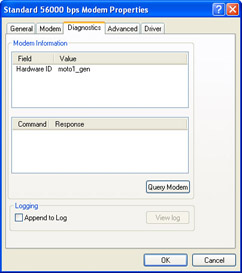
Figure 7-8: Troubleshoot modems using the Diagnostics tab of a modem’s Properties dialog box.
During installation, Windows XP often installs a standard modem driver rather than the specific driver for the modem. This happens in cases where Windows cannot find a device-specific driver. The standard modem driver provides basic functionality, but does not support advanced modem features. You can use this driver temporarily until you obtain the appropriate driver from the manufacturer.
USB Devices
Universal serial bus (USB) is a type of connection developed to provide a fast flexible method of attaching up to 127 peripheral devices to a computer. USB provides a connection format designed to replace the computer’s traditional serial-port and parallel-port connections. The term “universal” indicates that many kinds of devices can take advantage of USB. USB is fully Plug and Play–compliant.
The USB system comprises a single USB host and USB devices. The host is at the top of the USB hierarchy. In a Windows XP environment, the operating system and the hardware work together to form the USB host. Devices include hubs, which are connection points for other USB devices and nodes. Nodes are end devices such as printers, scanners, mice, keyboards, and so on. Some nodes also function as hubs, allowing additional USB devices to be connected to them.
You can connect USB peripherals together by using connection hubs that allow the bus to branch out through additional port connections. A practical USB desktop connection scheme is presented in Figure 7-9. In this example, some of the peripheral devices are simply devices, whereas others serve as both devices and connection hubs. The computer provides a USB host connection that serves as the main USB connection.
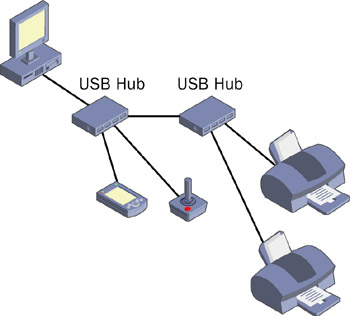
Figure 7-9: You can chain USB hubs and devices together to support up to 127 nodes.
A special hub, called the root hub, is an integral part of the host system (typically built into the motherboard) and provides one or more attachment points for USB devices (the ports available on the computer). The built-in USB ports on computers function as the root hub. USB provides for a total of up to five levels of devices. The root hub is at the first level. Regular hubs can form up to three additional levels, and nodes can function as the last level.
You can add or remove most USB devices from a computer while the computer is turned on. This practice is often referred to as hot-plugging the device. Plug and Play detects the presence (or absence) of the device and configures it for operation.
The USB interface provides power to the peripheral that is attached to it. The root hub provides power directly from the host computer to directly connected devices. Hubs also supply power to connected devices. Even if the interface supplies power to the USB devices, USB devices also can have their own power sources if necessary. Many devices, such as digital cameras and scanners, draw more power than a USB hub can provide.
| Exam Tip | Some USB hubs are self-powered, and some are not. Hubs that are not self- powered draw power from the hub to which they are connected or from the computer itself. If you find that a USB device that is connected to an unpowered USB hub is not working as expected, try replacing the unpowered USB hub with a self-powered hub. |
Because you can add nearly any type of peripheral device to the PC through the USB port, the range of symptoms that are associated with USB devices include all the symptoms that are listed for peripheral devices in this chapter. Problems that are associated specifically with the USB technology occur in the following general areas:
-
USB hardware device
-
USB controller
-
USB drivers
The first step in troubleshooting USB problems is to check the complementary metal oxide semiconductor (CMOS) setup screens to make sure that the USB function is enabled for the computer. If USB functionality is enabled in the basic input/output system (BIOS), check Device Manager next to make sure that the USB controller appears there. In Windows XP, the USB controller should be listed under the Universal Serial Bus Controllers entry (using the default Devices By Type view in Device Manager).
If the controller does not appear in Device Manager, or if a yellow warning icon appears next to the controller, the computer’s BIOS may be outdated. Contact the BIOS manufacturer for an updated copy of the BIOS.
If the controller is present in Device Manager, right-click the USB controller and then select Properties. If there are any problems, a message should appear in the Device Status section on the General tab of the controller’s Properties dialog box.
If the BIOS and controller settings appear to be correct, check the USB port drivers next. USB ports are listed in Device Manager as USB Root Hubs. Right-click a USB Root Hub entry and then select Properties. Use the Driver tab of the USB Root Hub Properties dialog box to update or roll back drivers if necessary.
When troubleshooting USB devices, you must be aware that the problem could be a result of general USB issues or be a problem with the device itself. Usually, but not always, general USB issues affect more than one device. If you suspect a problem with a specific device, uninstall the device by using Device Manager, disconnect the device from the computer, and then restart the computer. After the computer restarts, reconnect the device and let Plug and Play detect, install, and configure it again. If the device still does not function correctly, investigate the possibility that the device is damaged in some way or that you need to obtain updated drivers from Microsoft or the device manufacturer.
FireWire Port
Many newer media centers and high-end computers now come with FireWire ports (often called IEEE 1394 ports after the Institute of Electrical and Electronics Engineers standard that defines the technology). FireWire can transfer data at a rate of 400 or 800 Mbps. Firewire is used mainly for video transfer from digital movie cameras, but it will soon become a popular option for newer PDAs and handhelds, including cradles, chargers, and synchronizers.
When troubleshooting a device that connects by using a FireWire port, you can verify that the port is functional by plugging in another device (such as a digital camera). You should also ensure that the connection to and from the peripheral and the computer is solid, and verify that the cable that connects the two is not worn or damaged.
Handheld Devices
Most handheld devices support either Infrared Data Association (IrDA) standards or connect to the computer through a serial or USB port. For handheld devices that use a port, some connect directly to the port, and some connect to a cradle, which in turn is connected to the port.
You will need to install software so that Windows XP can communicate correctly with the handheld device. For example, Palm-based personal digital assistants (PDAs) require you to install the Palm desktop software to allow the PDA to transfer data to and from a Windows-based PC. Handheld devices running Windows Mobile software, such as the Pocket PC, require that you install a program named ActiveSync on the computer.
| See Also | For more information on supporting handheld devices running Windows Mobile software, visit the Windows Mobile website at http://www.microsoft.com/windowsmobile/default.mspx. |
Lesson Review
The following questions are intended to reinforce key information presented in this lesson. If you are unable to answer a question, review the lesson materials and try the question again. You can find answers to the questions in the “Questions and Answers” section at the end of this chapter.
-
What is the first step associated with troubleshooting USB problems?
-
You receive a call from a user who is having trouble installing a scanner on her computer running Windows XP. She disconnected her printer from the computer’s parallel port and connected the scanner in its place. She then turned the scanner on and ran the Add Hardware Wizard. She thinks that Windows XP did detect the scanner, but she received a number of error messages and was unable to complete the installation. She downloaded the most recent drivers for the scanner from the manufacturer’s website that claimed that they support Windows XP, and tried the Add Hardware Wizard again, but got the same results. What is the likely problem?
-
She must log on to the computer with administrator privileges to install hardware devices that are not Plug and Play.
-
The scanner is not compatible with Windows XP.
-
The parallel cable is damaged.
-
The scanner is not working.
-
Lesson Summary
-
I/O devices extend the capabilities of the basic PC. Standard input devices associated with personal computers included the keyboard and mouse, although other devices exist. Standard output devices include monitors and printers.
-
Windows detects and installs most Plug and Play devices automatically. If a device does not support Plug and Play, a user must log on to Windows XP using an account with administrator privileges in order to complete the installation of the device.
-
Mice and keyboards are generally Plug and Play devices and are recognized when they are connected to the computer or, at the least, when Windows starts up. In some cases, though, you must install a mouse or keyboard using the Add Hardware Wizard. Mice typically connect to computers through a mouse (PS/2) port, serial port, or USB port on the computer or on the keyboard. Keyboards connect using a keyboard or USB port.
-
USB is an external serial bus developed to provide a fast, flexible method of attaching up to 127 peripheral devices to a computer. USB provides a connection format designed to replace the computer’s traditional serial port and parallel port connections.
-
FireWire ports (often called IEEE 1394 ports) can transfer data at a rate of 400 or 800 Mbps.
EAN: N/A
Pages: 195