Creating and Managing Routing Groups
As you’ve seen, an administrative group is a collection of objects that are grouped together to allow you to assign administrative tasks to groups of administrators conveniently. By contrast, a routing group is a collection of servers that enjoy permanent, high-bandwidth connectivity. The links between routing groups are assumed to be either slow or unreliable. Connectors are used to connect routing groups over these slow wide area network (WAN) links. Thus, while administrative groups are logical in nature, routing groups are determined by the physical topology of your network.
Routing groups allow you to specify the routes that messages will take to get from the sender to the recipient within your organization. By implementing costs on the connectors, you can channel the physical path you want messaging to take in your organization. For more information about the architecture of routing groups, refer to Chapter 3, “Understanding Exchange Server Routing Architecture.”
Creating a Routing Group
You will need to create routing groups if you have two or more servers that are connected over a slow or unreliable WAN link. You can create routing groups in either mixed mode or native mode. Although routing groups do not need to be mapped to administrative group boundaries in native mode, they cannot span administrative groups in mixed mode. This limitation is imposed by the way in which Exchange 5.5 interoperates with Exchange Server 2003. As long as Exchange Server 2003 is in mixed mode, it retains its ability to interoperate with Exchange 5.5. And since you cannot move servers between sites in Exchange 5.5, you cannot move them between routing groups or administrative groups in Exchange Server 2003 in mixed mode.
You’ll create your routing groups inside the Routing Groups container. If your situation warrants it, you can create new Routing Groups containers in other administrative groups. You can create only one Routing Groups container per administrative group, but you can create multiple routing groups in each Routing Groups container.
To create a routing group, simply right-click the Routing Groups container, point to New, and then select Routing Group. Enter the name of the new routing group on the General tab, and click OK.
Your new routing group will consist of two child objects, Connectors and Members (Figure 12-18). The Connectors container is where you will create your Routing Group Connectors (for details, see Chapter 13, “Connecting Routing Groups”), and the Members container is where you will place the server objects that are members of the routing group.
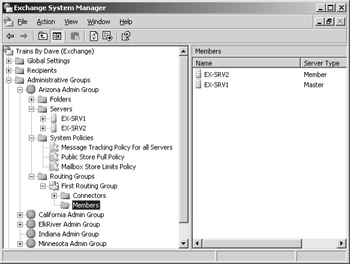
Figure 12-18: Objects in a new routing group.
If you need to connect to a foreign e-mail system, you can do so by installing either an X.400 Connector or an SMTP Connector, most likely the former. (See Chapter 21, “Connecting to Other Messaging Systems with X.400,” for information about how to connect to a foreign system.) These connectors can also be used to connect routing groups within your organization, but it is best to use the Routing Group Connector for this purpose. The Routing Group Connector can be used only inside your organization to connect your routing groups. It cannot be used to connect to a foreign e-mail system.
Managing a Routing Group
Two of the primary tasks in managing a routing group are to create new routing groups and to add one or more servers to a routing group. When you add a server to a routing group, you are, in effect, telling Exchange Server 2003 that the server being added has high-speed, permanent connectivity to the other servers in the group. Although no minimum bandwidth floor is hard-coded into the Exchange operating system, the suggested absolute minimum is a 64-Kbps connection that is available at all times.
| Note | Be sure to test your WAN links before implementing Exchange Server 2003. A leased line of 64 Kbps might offer more permanent bandwidth than a T1 that is often saturated with non-Exchange traffic. A prudent approach is to account for all other traffic on your WAN links and then use the amount of bandwidth left over to determine whether you have permanent, high-bandwidth connectivity. |
To add a server to a routing group, navigate to and select the Members container for the routing group to which the server currently belongs (by default, the First Routing Group). Drag the server into the Members container of the destination routing group.
| Note | When you remove a server from a routing group, you are actually removing the SMTP virtual server or the X.400 service through which that server communicates and having the service re-created in the new routing group. |
By default, all the servers created in your organization belong to the first routing group, which is the default routing group that is created when Exchange Server 2003 is initially installed. However, you might well need additional routing groups based on your physical topology.
To rename a routing group object, simply right-click the routing group, choose Rename, and enter the new name. To delete a routing group, you must first move all the servers that are members of the doomed routing group to other routing groups. You cannot delete a routing group that has server objects residing in the Members container. After you move all the servers, right-click the routing group and choose Delete. Click Yes to confirm the routing group deletion.
EAN: 2147483647
Pages: 254