Installing and Configuring Instant Messaging
To deploy Instant Messaging, you'll first need to have Exchange 2000 Server running on Windows 2000, along with IIS 5.Typically, Instant Messaging is installed on a member server, but it can also be deployed on a domain controller.
Instant Messaging has two server components: a home server and a routing server. These are really two types of virtual servers. The home server hosts IM user accounts and is the server through which users send and receive instant messages. It is also the server that communicates presence information. The routing server forwards or redirects messages and presence information to home servers on the network. Hence, when an IM routing server receives an instant message addressed to a user, it locates the user in Active Directory and uses the IM settings in the user account to forward the message to the user's home server.
In a single-server environment, an IM routing server is not necessary. In fact, home servers can route messages just as routing servers do. As your organization grows, however, your need for a routing server will increase as well. Best practice suggests that if you create two or more home servers, you should create at least one IM routing server.
To configure and manage Instant Messaging, you need high-level permissions. To manage IM users, you must be a member of the Domain Admins security group for the domain that hosts the users. To manage the global IM settings in the Exchange System snap-in, you must also be a member of the Exchange Admins security group. Global settings include the firewall topology, the proxy server configuration, and the configuration of the IM home and routing servers.
Client Requirements
IM users can run the instant messaging client under Windows 95 or later, Windows NT 4, or Windows 2000.The following software must be installed to use Instant Messaging:
- Internet Explorer 5 or later, which can be downloaded from
- The Microsoft proxy client if you communicate outside of your Exchange organization
- Exchange Instant Messenging Service, which can be found in the \Instmsg\I386\Client directory on the Exchange 2000 Server CD-ROM
You can deploy IM in a configuration that is similar to a front end/back end (FE/BE) deployment of Exchange 2000 Server. This configuration involves having a bank of IM routing servers at the front end to act as the primary point of contact for IM services. These servers redirect clients to the appropriate home server for the IM user receiving a message. This type of "bridgehead" server configuration allows one or more front end servers to provide a unified view of the IM topology by having all incoming messages sent to im.domainname.com and all internal messages sent to username@domainname.com.
Internet users can contact an IM bridgehead server through a public URL. When an instant message comes into the IM bridgehead (routing) server, the server performs a lookup in Active Directory and maps the public URL to the private URL, which contains the name of the home server of the IM user. The bridgehead server then passes back to the Internet client the name of the home server, and the Internet client creates a communications link to the home server.
NOTE
Future versions of Instant Messaging will allow the bridgehead servers to relay messages on behalf of the client to hide the internal IM topology.
The IM service depends on Active Directory to locate the home server for an IM user. The home server need not be the same physical or virtual server as the mailbox server for the user. The IM service creates additional demand on the network subsystem of a server, so it is probably best in most scenarios for the IM server to be a dedicated server. Each IM server is capable of hosting up to 200 transactions per second. It is estimated that an IM server, under normal load conditions, should be able to host 15,000 users simultaneously.
Working with Firewalls
If you are deploying IM on a LAN that sits behind a firewall, you'll need to configure the Firewall Topology tab in the Instant Messaging Settings Property Sheet.
NOTE
When considering the use of Instant Messaging across company boundaries, be aware that the RVP protocol is built on WebDAV and thus, by default, transmits over port 80.Since most firewalls already allow this type of traffic, a reconfiguration of the firewall is rarely needed. Using IM over port 80 does not create additional security considerations in a company's security model.
To identify which IP addresses are protected by your corporate firewall, expand the Global Settings object, right-click Instant Messaging Settings and choose Properties. On the Firewall Topology tab (Figure 19-6), you can enable Instant Messaging to work through a firewall by selecting the This Network Is Protected By A Firewall check box. Selecting this check box will enable the IP Address Ranges Protected By This Firewall settings, and you'll be able to enter the internal IP address range that is behind the firewall.
In addition, to route outgoing IM messages through a proxy server, you need to enter its IP address in the HTTP Proxy Server area of the tab. Select the Use A Proxy Server For Outbound Requests check box, and specify the IP address of the proxy server and an open port number (usually port 80, since this is going over HTTP).

Figure 19-6. Firewall Topology tab of the Instant Message Settings property sheet.
Installing the Instant Messaging Service
As an overview, here are the steps for setting up Instant Messaging. The sections that follow cover each of these steps in detail:
- Create at least one home server.
- If you are creating more than one home server, you must also create at least one IM routing server.
- If you're going to use HTTP Digest authentication, set the appropriate password policy on the domain controller.
- Give users access to the service.
- Distribute the instant messaging client to your users.
Creating a Home Server
To create a home server, in the Exchange System snap-in, navigate to the server you want to establish as a home server, and right-click the RVP container, found under the Protocols container. Point to New, and then choose Instant Messaging Virtual Server. The New Instant Messaging Virtual Server Wizard starts.
The wizard is short, consisting of only six screens. The first screen is a welcome screen, and the second asks you to enter the display name of the new server (Figure 19-7). The name you assign should identify whether the server is a home server or a routing server. The third screen asks which Web site you want to associate with this IM server. When Instant Messaging is installed, it will create a virtual directory under the Web site that you have chosen and will name it Instmsg. It is through this virtual directory that messages will be routed.
NOTE
The choice of which Web site to associate with an IM server is an important one. You must have one IIS Web site for each IM home server that you create. If you plan on installing multiple IM virtual servers on one machine, you must first create a new IIS Web site for each IM virtual server.
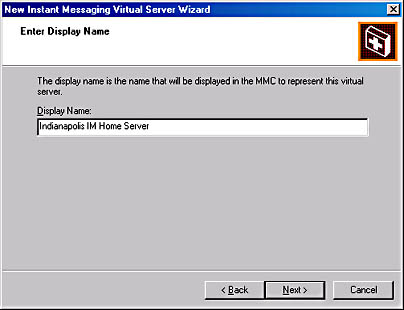
Figure 19-7. Naming a new home server in the New Instant Messaging Virtual Server Wizard.
The fourth screen asks you to indicate the domain name to which the server will respond. Even though it asks for the DNS domain name, you must enter only the server's host name, without a period—for example, "minneapolis" instead of "minneapolis." If you place a period in the name in this screen, Instant Messaging will try to use a proxy server, even if none exists.
The fifth screen asks whether you want to allow this server to host user accounts. If you do, select the check box; if you do not, clear the check box. When this check box is selected, you are indicating that this server should be an IM home server. When it is not selected, you are creating a routing server. The last screen is the Finish screen.
Creating an Instant Message Routing Server
Remember, before you can create the IM routing server,you'll need an IIS Web site to host it. You can set one up as a virtual directory under the IIS default Web site.
To create the IM routing server, start the New Instant Messaging Virtual Server Wizard, as described in the previous section, and step through its screens. The DNS domain name you specify on the fourth screen will identify the IM router on the network. The form of the name should be server_name.domain_name.com. Placing periods in this name will not point the users to a proxy server because the virtual server is not hosting user accounts. Figure 19-8 shows the property sheet for the Tucson IM routing server.

Figure 19-8. Property sheet for an IM routing server.
Accept the rest of the defaults in the wizard, and then check your DNS to ensure that you have the necessary DNS resource records for the IM router. Each router must have an A record in DNS.For information on how to configure DNS for Instant Messaging, refer to the section "Configuring DNS for Instant Messaging," earlier in this chapter.
Setting a Password Policy
By default, Instant Messaging uses Windows Integrated Authentication (WIA). Incorporating WIA into your IM deployment will allow users to use Instant Messaging without entering an additional user name and password.
However, if you need to authenticate through a proxy server or if you're running an instant messaging client on a different operating system, such as UNIX, you'll want to use the Digest authentication method instead. When using this method, IM must be able to retrieve unencrypted user passwords from Active Directory. Hence, you'll need to change the password policy on the domain controller to store the passwords in a reversible, encrypted format. To change the password policy, follow these steps:
- Start Active Directory Users and Computers.
- Right-click the domain organizational unit, and then choose Properties.
- On the Group Policy tab, select Default Domain Policy, and then click Edit.
- Open Computer Configuration.
- Expand Windows Settings, then Security Settings, and then Account Policies.
- Select Password Policy.
- Double-click Store Password Using Reversible Encryption For All Users In The Domain.
- Select the Define This Policy Setting check box and the Enable radio button, and then click OK.
Giving Users Access to Instant Messaging
To give a user access to Instant Messaging, you assign the user to an IM home server. You make this assignment on the property sheet for the user's account in the Active Directory Users and Computers snap-in, as follows.
Open the organizational unit in which the user account resides, right-click the user's account, and choose Exchange Tasks from the shortcut menu. The Exchange Task Wizard starts. On the second screen of the wizard (Figure 19-9), select Enable Instant Messaging and click Next. On the next screen, you're asked to select an IM home server as well as the domain name to be used if the DNS SRV lookup fails. The wizard then associates the user account with the selected home server; you'll see the results on the Completing the Exchange Task Wizard screen (Figure 19-10). You will also see the user's logon and private and public URLs.
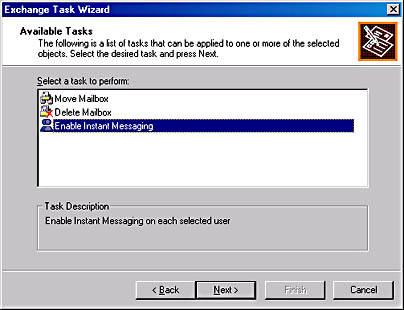
Figure 19-9. Enabling Instant Messaging for a user account.
NOTE
If you need to enable IM on multiple user accounts, you can select them in Active Directory Users and Computers and then perform this operation only once. Hold down the Ctrl key and click on the users you want to configure. Then right-click the group and proceed with the Exchange Tasks Wizard. To enable IM for all of your user accounts at one time, select the entire list by highlighting the first user account, and then holding down the Shift key and clicking the last user in your list. Once the users are selected, you can enable IM for all of them with the Exchange Tasks Wizard.
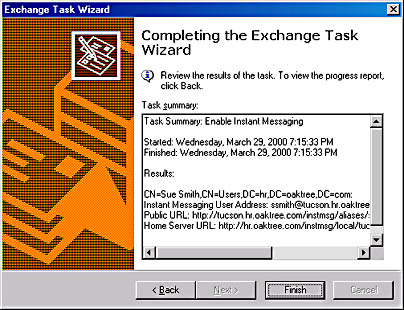
Figure 19-10. Completing the Exchange Task Wizard screen.
Distributing the Instant Messaging Client Software to Your Users
To distribute MSN Messenger (the instant messaging client software that ships with Exchange 2000 Server CD-ROM) to your users, you must copy Mmssetup.exe from the \Instmsg\I386\Client\Usa directory on the Exchange 2000 Server CD-ROM to a distribution point on your network (assuming that you want the USA version; see the CD-ROM for other versions available). It then must be installed on your users' workstations, like any other application. The installation is easy, and the space used is minimal.
MORE INFO
For information on how to deploy software to multiple users' workstations without having to touch each workstation, consult the Microsoft Systems Management Server Resource Guide (Microsoft Press, 1999) or the Microsoft Windows 2000 Server Resource Kit (Microsoft Press, 2000).
EAN: N/A
Pages: 193