Simple Mail Transfer Protocol
Because it is impossible to provide an in-depth analysis of SMTP in this book, this section concentrates on the parts of SMTP that are most relevant to administering and troubleshooting Exchange 2000 Server.
Simple Mail Transfer Protocol (SMTP) has its roots in the File Transfer Protocol (FTP). Before SMTP was originally defined in RFC 561, it was customary to copy messages to their destination as simple files, using FTP. The problem with this technique was that it was sometimes difficult to discern who had sent the file and who the file was being sent to, due to the lack of identifying information. What was needed was the ability to pass information between two hosts while identifying who the sender and recipient were.
In 1973, the beginnings of such a message structure was defined, containing some header fields and the body of the text. Further refinements came in RFCs 680, 724, and 733 before the current standard in RFC 822 was issued. Now each header line consists of a field name terminated by a colon and followed by a field body. For a message to be valid, the creation time, source, and destination fields must be filled in. Other optional fields, such as received, subject, reply-to, and return-path, can be filled in as well. As the message passes from one Message Transfer Agent (MTA) to the next, these required fields are enumerated and then added to the message header, allowing the recipient to see how the message was transferred through the mail system.
MORE INFO
For more information on the standards for transferring messages, refer to "F.400/X.400 Standard: Data Networks and Open System Communication Message Handling Systems," from the International Telecommunication Union at http://www.itu.org.
The SMTP design is based on a communication model that follows these basic steps:
- The user makes a mail request to a sender-SMTP.
- The sender-SMTP establishes a two-way transmission channel to a receiver-SMTP.
- The sender-SMTP generates SMTP commands and sends them to the receiver-SMTP.
- The receiver-SMTP sends response commands to the sender-SMTP.
For example, if User1 would like to send mail to User2 over SMTP, the sequence of events would be as follows (assuming that both users are running the SMTP service on their computers):
- User1 contacts User2 and establishes a two-way transmission channel over TCP port 25, using the HELO command.
- User1 sends a MAIL command indicating the sender of the mail. This is how we know who sent the e-mail.
- User2 sends an OK reply.
- User1 sends a RCPT command identifying the recipient of the mail. This is how we know who the recipient of the e-mail is.
- User2 sends an OK reply.
- User1 sends the mail.
- User2 sends an OK reply.
- User1 sends the QUIT command.
- User2 sends an OK reply and then terminates the connection.
The commands from the sender and receiver are always sent one at a time, and one reply is sent for each command. SMTP does not support multiple commands sent as a batch to another SMTP host. Table 17-1 lists the more common SMTP commands and their purpose.
Table 17-1. Summary of SMTP commands
| Command | Description |
|---|---|
| HELO | Identifies the sender-SMTP to the receiver-SMTP based on host names. |
| Initiates mail transfer with indication of originator (reverse path argument). If routed through a relay agent, the first host in the list is the most recent relay agent. Nondelivery reports generated by the receiver-SMTP are sent back using this command. | |
| RCPT | Identifies one of the recipients (forward path argument). Multiple recipients are specified by multiple use of this command. The forward path can optionally include a list of relay hosts, but it must include the final destination mailbox. |
| DATA | Indicates that message data is ready to be sent in 128-ASCII-character codes. |
| RSET | Resets mail transfer. Received mail data is discarded. |
| VRFY | Asks the receiver-SMTP to verify that the mail address identifies a user. |
| EXPN | Asks the receiver-SMTP to confirm the identity of a mailing list and return the membership of that list. |
| HELP | Requests help on a command. |
| NOOP | Requests the receiver-SMTP to send an OK. |
| TURN | Reverses roles of sender and receiver. |
| QUIT | Requests termination of connection. The receiver-SMTP must send an OK and then close the transmission channel. |
7-Bit ASCII Character Set
SMTP commands are sent in the American Standard Code for Information Interchange (ASCII) 7-bit character set. This fact is important because the TCP architecture assumes an 8-bits-per-byte transmission channel.
E-mail started in the United States and at first was used to send text only. Because the entire English alphabet and standard English punctuation marks can fit into the 128 (27) possible combinations of 7 bits, the 8th bit was used as a parity bit, giving some extra redundancy in error checking.
The first 128 characters in the ASCII character set define the 26 letters of the English alphabet in both lowercase and uppercase and the more common punctuation marks that might be used in everyday messaging. Messages that use only these characters are said to be 7-bit ASCII.
Extended ASCII Character Set
Because there are many more than 128 characters in the international alphabets, the extended ASCII character set defines 256 characters, accommodating most European alphabets. Defining this many characters means using the 8th bit for character generation instead of for parity. The problem with doing so is that SMTP doesn't permit the use of the 8th bit. Thus, even if you could find an SMTP MTA that would pass all 8 bits, the 8th one would be lost because the protocol itself works only with 7 bits. The solution to this problem has been to fit 8 bits into 7 bits at the sending end and then extract them at the receiving end. Since bits don't compress very well, we add some extra bytes so that the bit combination is cleanly divisible by 7.
We accomplish this task by taking 7 bytes, each with its underlying 8 bits, lining them up sequentially at the bit level, repackaging the bits so that 7 bits equals 1 byte, and then sending the bytes across the line. For instance, if you have 7 bytes, each with 8 bits, you could line up the bits and create 8 bytes of 7 bits each. At the receiving end, the bits are repackaged into 7 bytes of 8 bits each.
Uuencode is a UNIX-based utility that repackages a file with 8-bit data into another file with 7-bit data so that it can be ported across SMTP. The recipient invokes uudecode to convert the data back to an 8-bit standard.
MIME Format
In today's world, we aren't just sending text back and forth. Instead, we are sending files from a wide variety of PC applications and languages. This level of complexity is where Multipurpose Internet Mail Extension (MIME) comes in. MIME provides a way to send more than just text across the Internet. It is a standard that allows multiple files of various content types to be encapsulated into one message. RFCs 2045 through 2049 currently define MIME and are considered to be one single standard.
MIME works by concatenating all of the attachments, placing separators between them. Each body part specifies a content type that indicates the kind of file it represents, and it also indicates how the file is encoded for transfer through the mail system.
Each content type consists of both a top-level media type and a corresponding subtype. It is possible to define additional types other than those specified in the RFCs to accommodate proprietary formats. Table 17-2 lists the more common top-level types and their corresponding subtypes. Each of the five discrete types corresponds to a single file. The composite types can encapsulate discrete or other composite contents.
Table 17-2. Top-level media types
| Media Type | Subtypes | |
|---|---|---|
| Discrete | Text Image Audio Video Application | Plain, rich text, enriched Jpeg, gif Basic Mpeg Octet-stream, Postscript |
| Composite | Multipart Message | Mixed RFC 822 |
Exchange Server 5.5 is based on the X.400 protocol, which is considered to be a closed backbone message transfer system. By this we mean that in an X.400 backbone, you need to explicitly define all of the peer MTAs on the network or over the Internet. SMTP, on the other hand, is considered to be an open message transfer system because any computer running SMTP will generally accept connections from any other computer running SMTP, and these peer connections do not need to be specified in advance. Because Exchange 2000 Server's default transport protocol is SMTP, it has greater interoperability with foreign e-mail systems than Exchange Server 5.5 does.
Each SMTP server acts as its own MTA, routing messages to the next SMTP server based on the mail exchanger (MX) records it finds in the DNS. SMTP transfers messages over a TCP port 25 connection.
SMTP Service Extensions
In November 1995, RFC 1869 was published, containing several extensions to the SMTP command structure. These extensions are registered with the Internet Assigned Number Authority (IANA), and they allow the receiver-SMTP to inform the sender-SMTP of the service extensions it supports. The purpose of this revision in the SMTP standard was to make SMTP adaptable in the coming years. When SMTP is extended, it is referred to as ESMTP.
When working with extensions, the sender-SMTP sends an EHLO command in place of the HELO command. The receiver-SMTP can respond by indicating which extensions it supports. If it does not support any extensions, it sends an error response.
Exchange 2000 Server takes advantage of these extensions by using the ETRN command, which is the extended version of the TURN command. This command asks the computers not only to reverse roles but also to verify the remote host name so that hosts other than the one for which the messages are intended cannot retrieve the messages. Because of the host name verification, which includes the domain name, ETRN is used to trigger mail delivery for a specific domain rather than a specific host.
Exchange 2000 Server and the SMTP Service
SMTP is really the heart of Exchange 2000 transport services. When you install Microsoft Windows 2000, a base SMTP service is automatically installed as part of Internet Information Services (IIS) 5. The base SMTP service supports many of the ESMTP commands. Although there is only one SMTP service, you can configure multiple virtual SMTP servers on each Exchange 2000 server. Each virtual server can be started, stopped, or paused independently of other virtual servers. However, stopping or pausing the SMTP service itself will affect all of the virtual servers. (See the next section, "SMTP Virtual Servers," for more information.)
When the SMTP service is running, new connections can be accepted from users. When it is stopped, all users' connections are severed. When the SMTP service is paused, each virtual server continues to service currently connected users but will not accept new users.
When you install Exchange 2000 Server, it extends the base SMTP service to add functionality, including the following:
- Commands to support link state information (X-LINK2STATE)
- The advanced queuing engine
- The enhanced message categorization agent
- The Installable File System (IFS) store driver
Figure 17-1 shows a sample log file for the SMTP service as it records the sending of a message from the local server to a remote server. Notice that some of the commands, such as X-LINK2STATE and XEXCH50, are unique to Exchange 2000 Server and are considered ESMTP commands. You can see how the log file allows you to use the SMTP commands to troubleshoot SMTP services. (The log file is discussed further in the section "Configuring and Administering a Virtual Server," later in this chapter.)
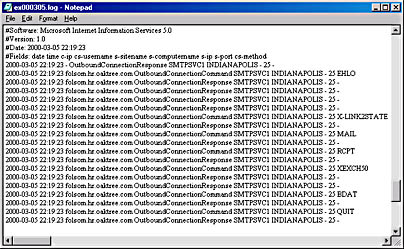
Figure 17-1. Sample log file.
SMTP Virtual Servers
As we mentioned earlier, in Exchange 2000 Server, you can create multiple SMTP virtual servers on the same physical server to provide separate configurations for different messaging services. In most cases, additional virtual servers are not needed. However, if you are hosting multiple domains or want to have more than one default domain name, you can create multiple virtual servers to meet your needs. From the end user's perspective, each virtual server appears as a separate SMTP server.
Another reason to create multiple virtual servers is to satisfy different authentication requirements for different groups of users. You can create as many virtual servers as you need to handle the different configurations. Every virtual server on any one single physical server must belong to the same routing group. Multiple virtual servers won't increase your thoughput, but they are very handy if you need to configure different options for different sets of users.
Each virtual server has its own distinct configuration, including IP address, port number, and authentication settings. Each Exchange 2000 server has at least one virtual server that listens on port 25 on all IP addresses.
To create a new virtual sever, launch the Exchange System snap-in and, under the server object, navigate to and expand the Protocols container. Right-click the SMTP container, point to New, and then choose New SMTP Virtual Server. The New SMTP Virtual Server Wizard starts (Figure 17-2) and asks you to enter the name of the virtual server. Choose a descriptive name, since this is the name the object will have within Exchange System.
The next screen of the wizard asks you to select an IP address for this new virtual server (Figure 17-3). Be sure to select an address that is different from the IP address of the default SMTP server. Each virtual server requires its own unique IP/port number combination. Once you've made your selection, click Finish to create the new virtual server.
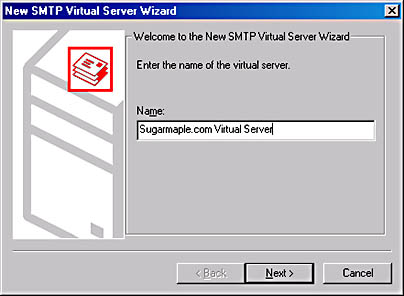
Figure 17-2. First screen of the New SMTP Virtual Server Wizard.
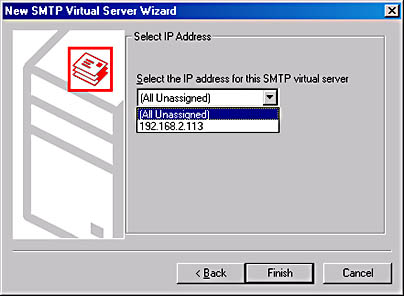
Figure 17-3. Selecting an IP address for the new virtual server.
TIP
The IP address you specify will need to have been bound to the server before you attempt to create the virtual server. Also, be sure to add an address (A) record and an MX record in DNS for this virtual server.
Configuring and Administering a Virtual Server
Once you've created the virtual server, you can configure its property sheet by right-clicking the virtual server and choosing Properties. On the General tab (Figure 17-4), you can enable logging on this virtual server so that you can track user connections. Four formats are available for log files:
- W3C Extended Log File Format The default log file format for IIS and SMTP. Information is written to an ASCII text file. Unlike other formats, you can choose what is written into the log and can limit the size of the log file itself. There are usually multiple entries for a single transmission.
- Microsoft IIS Log File Format Information is written to a comma-delimited ASCII text file. Once the data is written it cannot be changed, and the log format is not customizable. There are usually multiple records for a single transmission.
- NCSA Common Log File Format Information is written to an ASCII text file in the National Center for Computing Applications (NCSA) format. Once the data is written, it cannot be changed, and the log format is not customizable. There are usually multiple records for a single transmission.
- ODBC Logging Information is written to an open database connectivity (ODBC) compliant database.
On the General tab, you can also limit the number of users who connect to this virtual server by selecting the Limit Number Of Connections To check box and then entering the desired limit. You can also limit idle connections to a certain number of minutes to conserve system resources.
Finally, the General tab allows you to change the IP address to which the virtual server is bound without creating a new virtual server. If you need to change the port number, click the Advanced button, and then make your changes in the Advanced dialog box (Figure 17-5). Note that you can also assign multiple combinations of IP address and port number to the same virtual server, which gives you maximum administrative flexibility. Selecting All Unassigned allows the virtual server to respond to any requests that are not handled by other services.
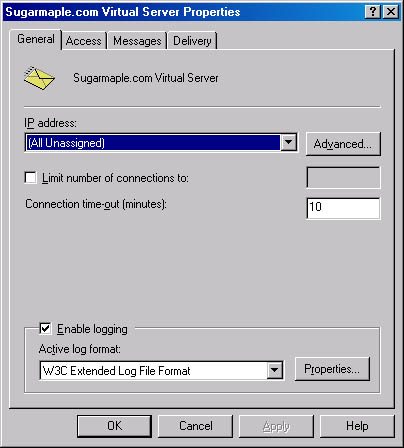
Figure 17-4. General tab of the property sheet for a virtual server.
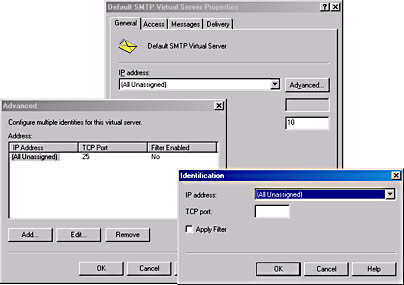
Figure 17-5. Changing the port number of a virtual server.
Enabling Message Filtering The Filter Enabled column in the Advanced dialog box indicates whether message filtering is enabled. You can enable filtering by selecting the Apply Filter option in the Identification dialog box (Figure 17-5), which you display by clicking either Add or Edit in the Advanced dialog box. When message filtering is enabled on an SMTP virtual server, the server will not accept e-mail from any domain on the message filtering list. Message filtering is defined globally but is enabled for individual IP addresses. Before you can enable message filtering, you must first create a message filter list.
To create a message filter list, open the Exchange System snap-in, and select the Global Settings container. Right-click Message Delivery, and choose Properties. On the Filtering tab, click Add to display the Add Sender dialog box (Figure 17-6). You must include the @ symbol at the beginning of the domain name. This dialog box will not accept IP addresses or bare domain names.
On the Filtering tab, you can also choose to archive the filtered messages for later review, filter any messages with a blank sender, and specify that senders should not be notified that their messages are being filtered.
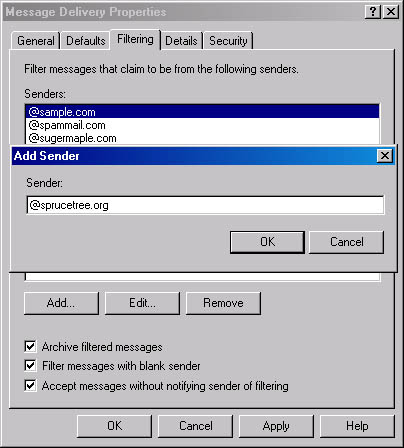
Figure 17-6. Adding a domain name to the message filter list.
NOTE
Any changes you make to a virtual server will not take effect for a few minutes because the metabase update service needs time to replicate the changes to the IIS metabase. This service replicates changes made in Active Directory to the IIS metabase, allowing you to make changes to a virtual server without a permanent connection to each system involved in the update.
Configuring Access Properties On the Access tab (Figure 17-7) of the virtual server's property sheet, you'll find a number of important configuration options. Clicking the Authentication button displays a dialog box that allows you to choose Basic Authentication, Anonymous access, and Integrated Windows Authentication or a combination of these options. You can also specify here that Transport Layer Security (TLS) encryption be enforced based on the domain name, which you'll need to enter.
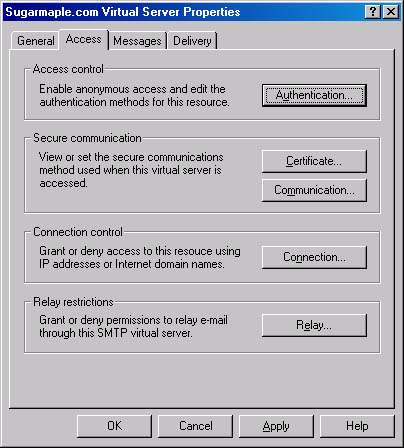
Figure 17-7. Access tab of a virtual server's property sheet.
NOTE
Integrated Windows Authentication (IWA) requires a valid Windows 2000 user name and password. It authenticates users by relaying their information directly to the domain controller. Once users are authenticated, they access objects in their security context. IWA was called Windows NT Challenge/Response in IIS 4.
The Secure Communication area of the Access tab has two buttons: Certificate and Communication. If a certificate is not yet installed on this server, you can create a default one, using a wizard that you start by clicking the Certificate button. Once a valid certificate is installed, you can require that communication take place over a secure channel. You do so by clicking the Communication button. In the Security dialog box (Figure 17-8), you can require both secure channel communication and 128-bit encryption. If external users who need high security are sending e-mails to this virtual server, consider using both encryption and certificates.
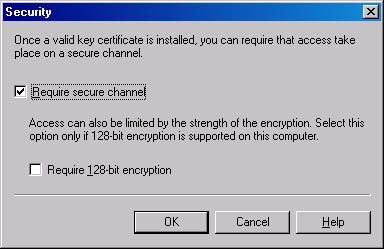
Figure 17-8. Security dialog box.
By clicking the Connection button in the Connection Control area of the Access tab, you can specify the domain name or IP address of computers to be given access to or excluded from the virtual server (Figure 17-9).
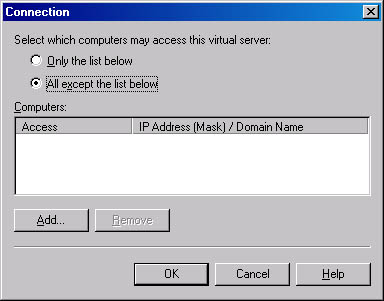
Figure 17-9. Connection dialog box.
Finally, clicking the Relay button in the Relay Restrictions area of the Access tab allows you to indicate which SMTP servers can relay messages through this virtual server (Figure 17-10). You can specify the servers by domain name or IP address. You can also establish an exception to these restrictions by selecting the Allow All Computers Which Successfully Authenticate To Relay, Regardless Of The List Above check box. This option could be used to allow vendors outside your company (each with their own SMTP domain name) to use your Exchange server as their messaging relay to the Internet once they authenticate to prove they have permission to do so.
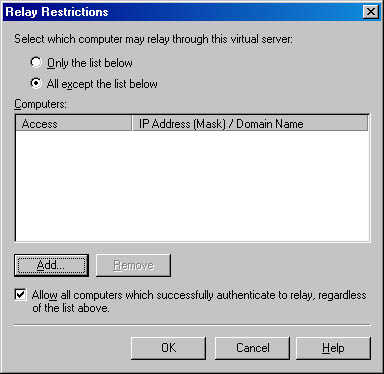
Figure 17-10. Relay Restrictions dialog box.
You can restrict relay abilities based on a single IP address, a range of IP addresses, or a domain name (Figure 17-11). You must choose one method per entry in the restrictions list, so if you want to restrict message relay based on both IP address and domain name, you'll need to make two entries.
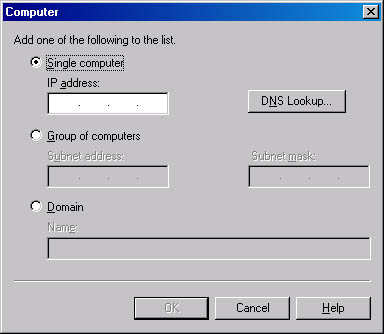
Figure 17-11. Adding a computer to the relay restrictions list.
Configuring Messaging Limits and Badmail Behavior The Messages tab of the property sheet for a virtual server holds configuration choices governing message size limits and badmail behavior (Figure 17-12). Badmail is defined as mail that cannot be delivered or returned. The default directory for badmail is \Exchsrvr\mailroot\vsi #\badmail (where vsi # is the specific virtual server; for instance, vsi 1 is the default SMTP virtual server). You can change the location of the badmail directory only by configuring the metabase properties directly. You cannot change the default directory through Exchange System. Usually, when a message is undeliverable, the sender receives a nondelivery report (NDR). You can also designate that a copy of all NDRs be sent to the e-mail address of your choice.
CAUTION
Be sure that you don't select the M: drive for your badmail directory. Doing so will cause conflicts with Exchange administration and transport services and will cause messages to stop flowing.
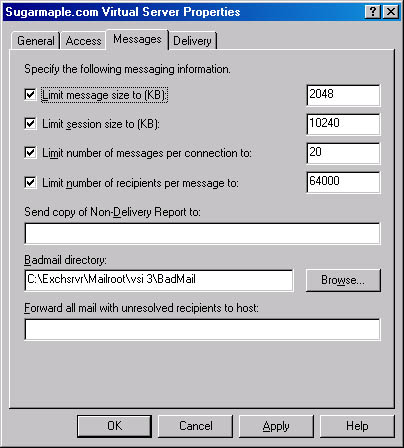
Figure 17-12. Messages tab of a virtual server's property sheet.
If you have another mail server, such as a UNIX-based server, in your organization that handles the same domain as your SMTP virtual server, type the host name for that server under Forward All Mail With Unresolved Recipients To Host. When your Exchange server receives e-mail for a user that it can't resolve, it will forward the e-mail to this host. For example, if the SMTP virtual server and a UNIX e-mail server both serve the oaktree.com domain, Exchange Server may receive e-mail intended for UNIX users. When Exchange Server can't find these users, it will know to forward these messages to the designated host in the other system.
Configuring Delivery Information The Delivery tab of the virtual server's property sheet lets you configure outbound e-mail retry and expiration values as well as outbound connection values and security information. If this virtual server will be connecting to another virtual server, be sure to make the outbound security settings match the inbound security settings on the other virtual server.
The Advanced Delivery dialog box (Figure 17-13), displayed by clicking Advanced on the Delivery tab, has several interesting options. The Masquerade Domain option allows you to indicate a different domain name to be placed in both the Mail From and From fields of all outgoing messages. The Mail From field is found within the SMTP message header and denotes the domain the message came from, while the From field is found in the body of the message and denotes who the message is from. When a message's Mail From field is modified, the modification remains through delivery.
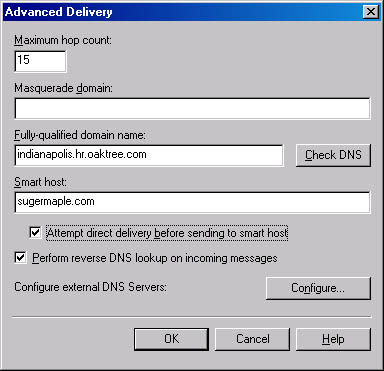
Figure 17-13. Advanced Delivery dialog box.
For instance, if your server is hosting the sales.hr.oaktree.com domain inside of the oaktree.com domain, the default entry in the Mail From field would be sales.hr.oaktree.com. If you would like to change this to oaktree.com, type that information in the Masquerade Domain field. All outgoing messages will then appear to come from the oaktree.com domain, and any NDRs will be sent back to the oaktree.com domain.
In contrast, the From field, which the Masquerade Domain field also modifies to denote (in our example) the alternate domain of oaktree.com, applies only to the first hop. This means that if the message has to pass through a number of messaging systems to reach its destination, it will revert to its original domain name after the first hop. The Maximum Hop Count option, which sets the maximum number of Received header lines that an SMTP server will accept on incoming messages before returning an NDR to the message originator, is configured here too.
Selecting the Attempt Direct Delivery Before Sending To Smart Host option directs Exchange 2000 Server to attempt to deliver messages directly to the destination SMTP server. Should this attempt fail, the messages are forwarded to the smart host for delivery. Selecting the Perform Reverse DNS Lookup On Incoming Messages option causes Exchange 2000 Server to attempt to verify that the client's IP address matches the domain name submitted by the client in the HELO/EHLO command. If the reverse DNS lookup is successful, the Received header is not changed. If it is unsuccessful, the Received header indicates "unverified" after the IP address. If reverse DNS lookups are affecting performance, consider clearing this check box. This feature is disabled by default.
Troubleshooting SMTP
There are really only two ways to troubleshoot problems with SMTP. First, make sure that the virtual server settings are correct. For instance, be sure that the IP address and port number assignments do not conflict with those of other virtual servers. Second, enable logging on the SMTP server, and then read the log files to see if an error code or error reply has been recorded. This information can help you pinpoint the cause of your problem.
EAN: N/A
Pages: 193