Section 10.9. Advanced Topics
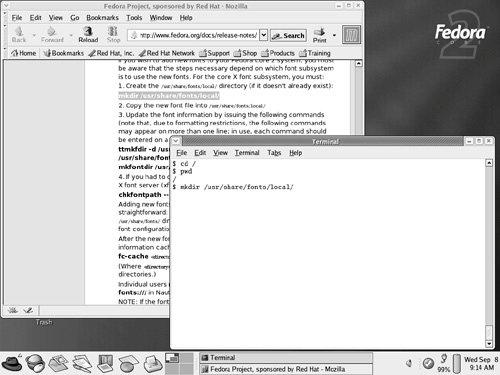
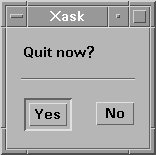
10.9. Advanced TopicsSome of the topics we want to examine here fall into one or more of the previous sections, but you needed a good foundation before we discussed these more complex capabilities of the X Window System. 10.9.1. Copy-and-PasteThe copy-and-paste function is one of the more useful features of the X Window System. The ability to select text in one window and copy it to another window without having to retype it is a great timesaver. I am discussing it outside the range of the window manager because, even though it "feels" like the window manager provides the capability, it is actually provided by the X server itself. You can prove this by using it even when no window manager is running. To copy text into the copy-and-paste text buffer, you simply click and hold down the left mouse button with the pointer set at one end of the text you wish to select and drag it to the other end (you can do this either forward or backward). When you release the mouse button, the highlighted text has been copied to the buffer (unlike a PC, where you have to tell it to copy the highlighted text to the buffer). You can also click in one location and then click again while holding the Shift key down, and the text in between the two locations will be highlighted and copied. You then go to the window where you want to paste the text and click the middle mouse button (or both mouse buttons at once on a system that only has two buttons) and the text is inserted. Some applications will insert the text at the current cursor position, others will insert it at the point where you click the middle mouse button. This is application specific. In the example in Figure 10-12, I found a command on a web page that I wanted to type in another window. I selected the beginning of the command and dragged the cursor to the end before letting up on the mouse button to highlight it. Then, to paste it into the other window, I simply clicked the middle button into the terminal window where I wanted to execute the command, and the text was entered into my terminal window. All that is left to do is hit the Return key. Figure 10-12. A copy-and-paste example. 10.9.2. Networking CapabilitiesI mentioned earlier that the X Window System is a networked windowing system and that it is possible to display information from an X client running on one computer on an X server running on another. This capability is fundamental in the X design and is quite simple to use from any X client by specifying the -display argument. This is used to tell the X client which X server to contact to display its widgets. By default, the display is the local machine where the client is running. To start an xterm on the host "savoy," use an xterm command like this: $ xterm -display savoy:0.0The specification of ":0.0" is a method of uniquely identifying a display and X server running on the computer. While it is possible to run multiple X servers as well as to have multiple monitors connected to a single computer, in general usage each computer will have only one monitor and be running only one X server, so this value will almost always be ":0.0" to denote this (though some X servers use only ":0"). The default display name for the local system would be ":0.0" without a hostname. If I type the command: $ xterm -display bluenote:0.0and if the user on bluenote has used the xhost command to allow access to the machine where I typed this command, then the X terminal window that is created will be displayed on bluenote. You can also set the DISPLAY environment variable to a hostname specification, and all your X applications will use it for their display. For example, the equivalent behavior to the previous command will be seen with: $ export DISPLAY="bluenote:0.0" $ xterm This is useful when you are working on a remote server (via telnet or rlogin) and need to display all your X applications on your local desktop. 10.9.3. Application ResourcesApplication resources are a Pandora's Box of detail as well as one of the most revolutionary aspects of the X Window System. X resources allow users to customize the look and feel of their desktop and the applications they run to a degree that no other window system provides. Here we will take a quick look at the basics of using X resources. I would strongly urge you to read the chapter "Setting Resources" in [Quercia, 1993] for exhaustive details. 10.9.3.1. How Resources WorkEvery application, including the window manager itself, can take advantage of X resources. An X resource is a text string, like a variable name, and a value, which is set as part of the X server. The value of a resource is tied to a specific widget. When the X server draws a specific widget, it looks up the value(s) associated with the widget in its list of resources and sets the described attribute appropriately. For example, consider the hypothetical application called xask. This application is simply a dialog box containing a text message (a question) and two buttons: Yes and No. It might be defined with (at least) the following resources: xask.Button.yes.text xask.Button.no.text The application may have default values in case these resources are not set. With no resources set, when you run xask, you might see a window like the one in Figure 10-13. Figure 10-13. The mythical xask application. |
Utility: xrdb [-query|-load|-merge|-remove] [filename] |
The xrdb command provides access to the X resource database for the X server. Used with the -query argument, xrdb prints the resources defined in the X server. The -load argument causes new resource information to be loaded into the resource database, replacing the previous information. If a filename is specified, the resource information is loaded from that file, otherwise the Standard Input channel is read to find the resource information. The -merge argument loads new resource information, similar to the -load argument, except that existing information is not removed (information about duplicate resources is overwritten). Finally, the -remove argument clears out the X server's resource database. |
You can add or remove individual or groups of resources anytime you wish.
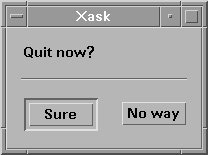
Manually adding and removing X resources gets tedious very quickly. What we really want is a way to specify a resource that will apply every time we run a given application. We do this by setting up a default resource file called .Xdefaults. This file is an initialization file recognized by the X server program when run by the user. Upon startup, the X server loads all resources listed in this file. For example, if we always want our xask program to use the more casual text in the response buttons as in our earlier example, we can enter those resources into our .Xdefaults file, and the next time we start the X server these resources will be set. Note that we could also run xrdb on our .Xdefaults file itself to load or reload these resources at any time.
EAN: 2147483647
Pages: 339

