| Photoshop 7 makes tremendous improvements to its painting and custom brush capabilities. Photoshop 7 provides the capability to create custom brushes that feature advanced texture and color control, random stroke variation, pressure sensitivity controls, and much more. These options are controlled through the Brushes palette. In the Brushes palette, brush presets are displayed on the right, above the Master Diameter slider. The full list of settings options appears on the left. Create a New Scratchpad File Select File, New to create a new file. Set the background to white and set the parameters as desired in the dialog box that appears. You will use this file to test the results as you build your custom brush. 
Open the Brushes Palette By default, Photoshop places the Brushes palette in the palette well. Click the Brushes tab to open the palette, or select Window, Brushes. 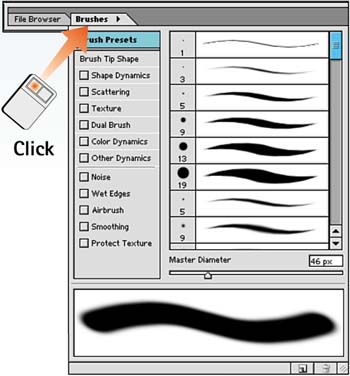
Set the Brush Shape Select the Brush Tip Shape option in the left column to load the brush shape options. Adjust the Diameter slider to specify the overall brush size in pixels. Specify Angle, Roundness, and Hardness settings as desired, evaluating the results in the preview field at the bottom of the palette. You can also set brush angle and roundness by dragging components of the crosshairs icon. Click and drag the black dots to set the roundness; click and drag the arrowhead to set the angle. Paint in the sample file to fine-tune your results. 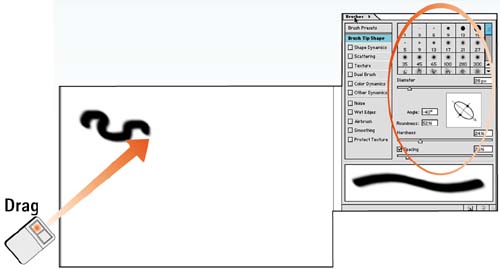
Set Shape Dynamics Back in the Brushes palette, choose Shape Dynamics from the list on the left to load the shape dynamics options. Shape dynamics provide control over variations within brushstrokes, which are referred to as jitter. You can set Size, Angle, and Roundness variations using the associated sliders. The Control menu below each slider allows you to set the method for controlling the variation, such as a tablet or stroke fade. You can also specify the brush's minimum diameter and roundness percentage. Paint in the sample file to fine-tune your results. 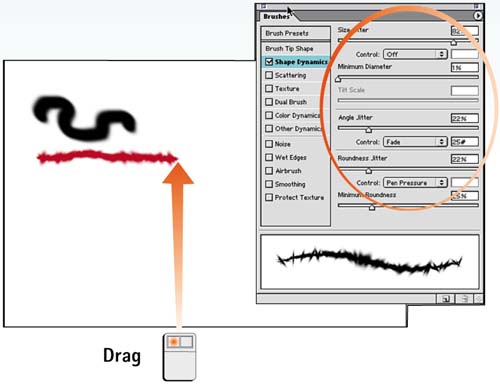
Set Scatter Select the Scattering option in the Brushes palette to load the scatter options. Scatter refers to the way the brush stroke spreads out from the line drawn by the mouse or pen. By default, the main Scatter slider sets a vertical percentage variation; enable the Both Axis check box to set both vertical and horizontal variation. The Count slider controls the density or flow of the marks, and the Count Jitter slider controls variations within the flow. Use the Control menus below the sliders to set the controlling method. Paint in the sample file to fine-tune your results. 
Set Texture Capabilities Select the Texture option in the Brushes palette to load the texture options. Click the swatch to select a texture from the Pattern Picker that opens. You can also set the size, blending mode, depth, and depth variation. Paint in the sample file to fine-tune your results. 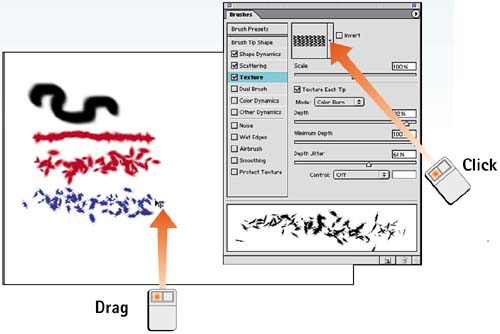
Set Dual Brush Capabilities Select the Dual Brush option in the Brushes palette to create a brush with multiple brush tips in the same stroke. First set the mode and brush shape for the second brush tip using the Blend Mode menu and the Shapes Preset palette. Then modify diameter, spacing, scatter, and count to complete the effect. Remember that these settings affect only the second brush tip shape. Photoshop combines these options with the current settings for the first brush. Paint in the sample file to fine-tune your results. 
Set Color Dynamics Select the Color Dynamics option in the Brushes palette to control color variation within the brush stroke. Settings allow you to blend the foreground and background colors within the stroke and to set variation in hue, saturation, brightness, and color purity. Paint in the sample file to fine-tune your results. 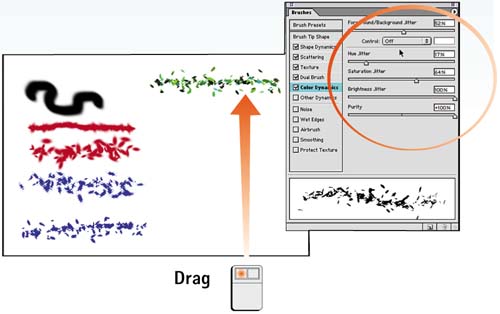
Set Other Dynamics Select the Other Dynamics option in the Brushes palette to control the opacity and flow of the brush stroke. Adjust the sliders as needed, and paint in the sample file to fine-tune your results. 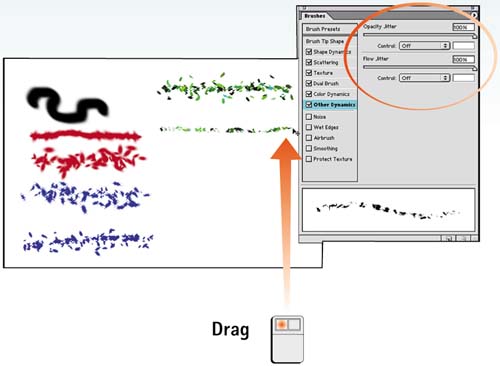
Set Paint Characteristics The paint characteristics check boxes at the bottom of the list of options on the left side of the Brushes palette allow you to enable or disable Noise, Wet Edges, Airbrush, Smoothing, and Protect Texture features. 
Use the Brush Close the Brushes palette and use the customized brush in your work. If you want to save the custom brush for later use, you can save the custom brush as a tool preset. How-To Hints Setting Up for Pressure-Sensitive Drawing Tablets Remember to set the associated Control menus to Pen Pressure, Tilt, or Thumbwheel if you're using an input device that supports these features. Using Custom Brushes with Tool Presets Remember to save specific settings as a brush preset (refer to Part 2, Task 6, "How to Create Custom Tool Presets"). Also, keep in mind that certain brush settings and options may vary depending on the paint tool that is currently selected. |
|