Test 2: Broadcast Unicast Load
Test #2: Broadcast Unicast Load
A stream is the same whether it comes from a file or a broadcast source, so you can gather most server performance data by using on-demand content. However, there are some differences in how the streams are delivered and used that you should be aware of. For example, streaming a live broadcast is easier on the server computer because the hard drive is not used. Even if you are broadcasting a file or a playlist of files, disk access is low compared to streaming on-demand content. Therefore, you will probably not see late reads with a broadcast. The client cannot seek and broadcasts often have a longer duration, so there is usually less client interaction. On the other hand, a unicast broadcast can have more concurrent connections, because all users must tune in at the same time. Therefore, you are more likely to see an increase in bandwidth usage and CPU time.
With multicast, of course, an increase in the number of clients does not increase the connections or the load on the computer. As far as bench testing, it is a good idea to set up and run a unicast broadcast, so you can see how the system works and so you know what to expect when the server is online, even if, as in the Fabrikam scenario, most of your clients will receive broadcasts using multicast streaming.
The main point of this test is educational. You will see the process of creating a broadcast to better learn how broadcast publishing points and live encoding work. We will see how the Fabrikam technicians run Windows Media Load Simulator on the broadcast publishing point to measure the difference in load between on-demand and live streaming. We can also see what happens when they run a simulation that includes a mix of live and on-demand streaming, different bit rates, and an MBR stream.
Encoding a Live Stream
The Fabrikam technicians start by configuring the encoder to capture and encode a live stream, and then they start the stream. The technicians follow these steps to complete the process:
-
Connect a live video source to the video capture card. Then check for connectivity and make sure the audio level is adjusted correctly.
-
Open Windows Media Encoder 9 Series.
-
Run the New Session wizard as in test #1. This time, however, select the Broadcast a live event wizard. Enter the following information:
-
Select the video and audio capture devices.
-
Select the Pull from encoder option. With this option, the publishing point will initiate the connection to the encoder.
-
Type a port number, such as 9090, or click Find Free Port to have the encoder choose one.
-
In Encoding options, select Multiple bit rates (CBR) for video and audio.
-
In Bit rate, select the 125 Kbps check box for the live stream. Make sure the other bit rates are not selected.
-
Enter information to be displayed in Windows Media Player. Note that, if you later choose to add metadata to the announcement file, the information in the announcement file will supercede the information added here.
-
-
Start encoding.
Configuring the Server
Now the Fabrikam technicians test the live stream from the encoder, and configure a broadcast publishing point on the server.
A technician starts by checking the stream from the encoder. He does this by opening Windows Media Player on the client computer and entering the encoder URL, which consists of the HTTP protocol, the name of the encoding computer, and the port number (such as http://encoder:9090).
By default, up to five clients can connect directly to the encoder. You can change the default value to accommodate up to 50 clients by editing a key in the system registry. However, maintaining connections adds to the load on the encoding computer. Typically, you will direct clients to connect to a Windows Media server which can handle many more connections.
After confirming that the encoder is streaming, the technician creates a publishing point on the server to host the stream.
-
On the encoding computer, open the Windows Media Services MMC snap-in and import the configuration file that includes the cluster group.
-
In the console tree on the left, expand each server and its publishing points.
-
On the first server, right-click Publishing Points, and click Add Publishing Point Wizard. In test #1, the Fabrikam technicians used a predefined on-demand publishing point. In this test, they will create a new broadcast publishing point. For more information about publishing points, see chapter 3.
-
Enter the following information in the wizard:
-
For Publishing Point Name, enter LiveTest.
-
For Content Type, select the source of the publishing point. In this case, the source is an encoder.
-
For Publishing Point Type, select Broadcast publishing point.
-
For Delivery Options, select Unicast streaming.
-
For Encoder URL, enter the location and port number of the source (for example, http://encoder:9090).
-
Select the check box for unicast logging. Client usage logs will be created for the publishing point.
-
To complete the wizard, select Create an announcement file (.asx) or Web page (.htm), and do not choose to start the publishing point when the wizard finishes. The Unicast Announcement Wizard starts.
-
-
The Unicast Announcement Wizard helps quickly create an announcement file for the publishing point. For more information about announcement files, see chapter 3. Enter the following information in the wizard:
-
For URL to content, enter the URL that will be contained in the announcement file. Windows Media Player will use this information to locate the content. The URL uses the MMS protocol, and contains the name of the server followed by the publishing point. Change the URL to point to the cluster, such as mms://WMCluster/LiveTest.
-
Enter a path and name for the announcement file, which has an .asx file extension. Save the file in a folder in the IIS root of the first server, such as \\LAN01\Inetpub\wwwroot\ASX. In the test, the Player will access the file from IIS on one of the servers. When the server goes online, announcement files will be hosted on the Fabrikam intranet Web server farm.
-
Enter a title, such as LiveTest.
-
Do not choose to test the file when the wizard finishes.
The publishing point is set up and the announcement file that points to it is created. And the encoder has been started.
-
-
Repeat steps 3, 4, and 5 for the remaining servers. You can skip step 5 if you want, and merely copy the announcement file to the same location on the other servers.
-
Click the Start publishing point button on each of the servers. The broadcast publishing points start after successfully connecting to the encoder. However, the encoder does not need to be encoding for the publishing point to start; it just needs to be open and configured. If a client connects to a running publishing point that hosts an encoder that is not encoding, the client will go into “waiting” mode until the stream from the encoder begins.
The announcement file is a plain text file that contains information used by Windows Media Player to locate the content. It also contains metadata information that defines text and graphics that display on the Player, as well as multicast logging information. As you become more familiar with using Windows Media Services 9 Series, you may find that it is easier to simply write your own announcement files in a program such as Microsoft Notepad. The following is an example of an announcement file:
<asx version = "3.0"> <entry> <ref href = "mms://WMCluster/LiveTest"/> <Title>LiveTest</Title> <Author></Author> <Copyright></Copyright> <Banner></Banner> </entry> <Title>LiveTest</Title> <Author></Author> <Copyright></Copyright> <Banner></Banner> <LogURL href = ""/> </asx>
Notice that the only metadata used here is for the title. Other metadata, such as author and copyright, are empty. An announcement file can also be a client-side playlist file simply by adding more <entry> elements containing content.
Playing the Live Stream
At this point, the Fabrikam technician opens Windows Media Player on the client computer and enters the URL of the announcement file (for example, http://WMCluster/ASX/LiveTest.asx). The Player opens the .asx file, interprets the script, and then opens the stream using the URL contained in the file (mms://WMCluster/LiveTest). The Player also displays any metadata contained in the file or stream.
You can access Windows Media-based content in the Player directly with the MMS or RTSP protocols, or you can access it through an announcement file. Announcement files are primarily used to provide a redirection function because content URLs are most often passed to the client on a Web page, and many browser MIME types are not set up to handle audio and video content. For more information about announcement files and client-side playlist files, see chapter 3.
Running Load Simulator and Analyzing Results
The same process is used for setting up Windows Media Load Simulator as for testing on-demand streaming, except the technicians point Windows Media Load Simulator to the broadcast publishing point. For example, the Streaming Content Sources page might look like figure 17.7.
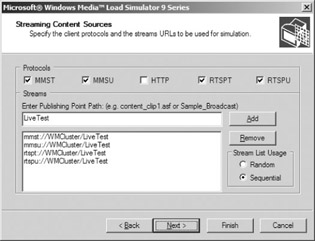
Figure 17.7: Using Windows Media Load Simulator on a broadcast publishing point.
You can use the same types of client profiles as were used for testing on-demand streaming. Keep in mind that clients cannot seek within content during a broadcast, and long-play clients will stay connected as long as the stream runs. As you run a simulation, notice the difference in activity between the on-demand and broadcast tests. In general, content usage is also very different. With on-demand content, there is often more client activity because users have more control over playback. With a broadcast, clients may stay connected longer, so the load on the server is lighter, even though more clients may be connected.
Try different profiles and compare the two types of streaming. Add on-demand files to the mix of content sources and see how the server performs. Try adding another bit rate to the encoder, so it streams multiple bit rates (for example 100 and 45 Kbps). The added processing load should be very noticeable on the encoder, but should have little effect on server processing.
In summary, the server typically has to work less to deliver 100 broadcast streams than it does for the same number of on-demand streams. The server does not have to access a hard drive, so processing time and hard drive usage are not issues. The processor also works less because there is less client interaction. However, all of this is offset by the fact that there are often more concurrent connections, which add to server load and require more RAM. The added connections also require more network bandwidth.
EAN: 2147483647
Pages: 258