Playing a Slide Show
| Playing and stopping a slide show are simple. Just choose Slide Show, View Show or press F5. PowerPoint automatically jumps to the first slide in the show, and you're off and running. To end a show, play the show to the end or press Esc to stop immediately at any point in the show.
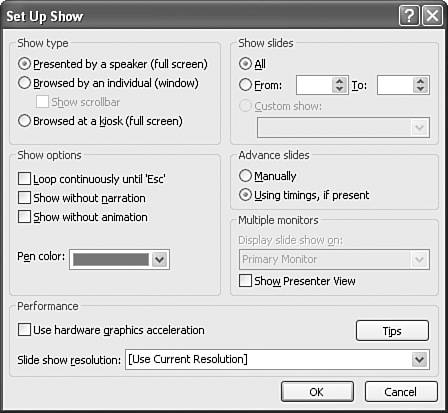
If you're making a presentation in which you know there won't be any interruptions, this may be all you need to know. But PowerPoint also provides lots of options to accommodate many different presentation styles and needs. Setting Up a Slide ShowYou can select from among several slide show options by using the Set Up Show feature. Choose Slide Show, Set Up Show to display the Set Up Show dialog box (see Figure 14.1). Figure 14.1. You use the Set Up Show dialog box to customize how you play a slide show. The default show setup assumes that you (or another speaker) will make the presentation using a full-screen display, that you'll play all the slides, and that you'll use a slide's timings, if it has any. The basic show types include the following:
Other options in the Set Up Show dialog box include the following:
After you choose setup options, click OK to apply them and to return to the PowerPoint screen. Navigating a Slide ShowAfter you begin a slide show, your objective is to move smoothly through the show until you reach the end. If you have no interruptions, make no mistakes, and have a relatively sequential presentation, this shouldn't be too hard. Unfortunately, sometimes you accidentally advance a slide or an animation before you want to, or someone asks a question about the slide you just left behind. Knowing how to back up or go directly to another location can be extremely useful. An easy way to access navigation options during a slide show is to move the mouse until a mouse pointer appears. PowerPoint can be frustratingly slow at this, especially when you want to back up quickly. But have patience. The mouse pointer eventually appears, along with a semitransparent toolbar at the lower-left corner of the screen (see Figure 14.3). Figure 14.3. You use the onscreen toolbar to navigate a slide show. To back up, simply click the Go Back button on the toolbar. Backing up does not always mean that you'll return to the previous slide. If you have animations on the slide, going back steps through those animations one at a time. If you don't want to wait for the mouse, or if you'd prefer not to have the audience watch as you click to navigate, you can use the keyboard to back up. Press Page Up to back up and Page Down to advance. Quick and easy, clean and simple. Other types of navigation are a little more involved than backing up and moving forward. If you anticipate the need to jump to a slide out of sequence, consider preparing action settings or links to get there.
You can navigate to nearly anywhere by clicking the Navigation Options button on the toolbar or by right-clicking the slide. In either case, PowerPoint displays a menu of navigation choices (see Figure 14.4). The options on this menu include the following: Figure 14.4. The navigation menu helps you go directly to anyplace in a slide show.
Navigating by using the mouse is not too complicated. But you can also benefit from learning to use the keyboard, which can be quicker, easier, and less apparent to viewers. For more information on this, see the section "Using Easy Keyboard Shortcuts," later in this chapter. Using Screen and Pointer OptionsIf you've ever had to stare into the bright light of a projector while pointing at something onscreen, you'll appreciate PowerPoint's pen and pointer options. To access the pointer options, click the Pointer options button on the toolbar or right-click and choose Pointer Options. PowerPoint displays a pointer options menu (see Figure 14.6). Figure 14.6. You can change the pointer type and how it works by using the pointer options menu. One thing you might want to do, especially if you'll be using a lot of pointing or navigation options, is to choose Arrow Options from the pointer options menu (see Figure 14.7). By default, the mouse pointer disappears automatically after a few seconds of inactivity. Unfortunately, it also takes a few seconds of moving the mouse to make the pointer or the toolbar appear again. If you select Visible, the pointer and the toolbar remain onscreen. Hidden means the pointer never appears, although clicking the mouse still advances slides or transitions. However, if you have an action setting or link to click, you can't see the mouse pointer to do so. Figure 14.7. By default, the arrow disappears after a few seconds of inactivity. By default, the mouse pointer is simply an arrow. You can use the arrow to point at things onscreen to help the audience see what you're talking about. This is usually better than walking in front of the screen to point with your hand. You can also change the pointer to a pen, marker, or highlighter, and you can then draw directly on the slide. To draw on a slide, follow these steps:
If you plan to use the pen frequently, you can leave the pen setting turned on and advance the slides by using the Navigation Options button on the toolbar or by using the keyboard. Drawings onscreen remain there until you erase or clear them, even if you advance to another slide. To erase a drawing, follow these steps:
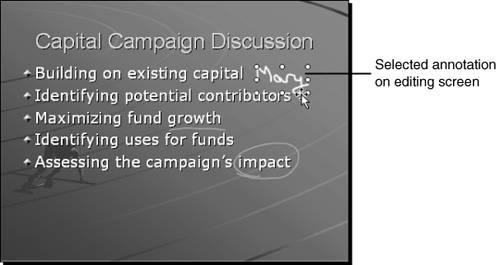
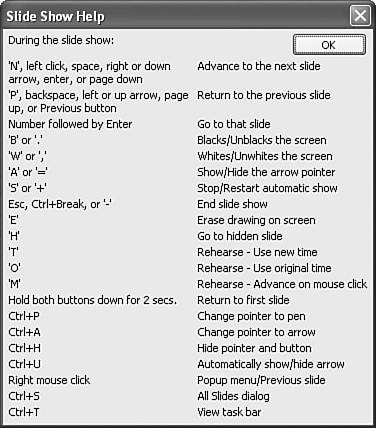
To clear all the drawings on a slide, from the Pointer Options menu, choose Erase All Ink on Slide. You can choose the pen's ink color so that it contrasts well with the slide's background. From the Pointer Options menu, choose Ink Color and then choose Automatic or a color from a basic palette of colors. Finally, when you exit the slide show, PowerPoint asks if you want to keep your annotations so that you can refer to them when editing your slides. If you choose Keep the Annotations, PowerPoint displays them on the slide editing screen (see Figure 14.9). These annotations act exactly like AutoShapes in that you can select, move, or delete them. You can also print them if you choose that option when printing. However, they are different from AutoShapes in that they do not display if you play the slide again in a slide show. They're there strictly for your reference so that you can make changes to the slide. When you're through with them, you can select them and delete them. Figure 14.9. Annotations and drawings can remain on a slide and be printed. Using Easy Keyboard ShortcutsUsing a mouse while creating and testing a slide show makes sense: You're seated in front of the computer, and you're used to the amount and direction of movement required to accurately move the mouse. When you're standing, giving a presentation, it's harder to use the mouse, especially with any kind of precision. Using the keyboard can be an easier way to make things happen during a slide show, and indeed there are dozens of keyboard alternatives for mouse and menu options. For example, which is the largest key on the keyboard? Correct. The spacebar is easy to find, easy to hit, and, as luck would have it, it's a key that's used to advance to the next slide or animation. I find it extremely easy to wander over to my laptop while talking, press the spacebar for the next slide and wander away from the laptop, never missing a beat. To learn about keystroke alternatives, as well as a few unusual mouse click options, you can press F1 in the Slide Show view. You can also right-click a slide and from the context menu choose Help. PowerPoint displays the Slide Show Help dialog box, which provides a long list of options (see Figure 14.10). Figure 14.10. Using keyboard shortcuts can be quicker and less obvious to the audience than using the mouse. You might even want to print this screen. Simply press Alt+PrtSc to copy the window, paste it onto a blank slide or into a Word document, and print the resulting slide or page. The following are some of my favorite and most useful keyboard shortcuts:
Not all keystrokes are useful to you because you use them relatively infrequently. But for actions that you use all the time, learn and practice using keystroke alternatives to save time, or at the very least, to have options as you advance through a slide show. |


EAN: 2147483647
Pages: 154
- Chapter III Two Models of Online Patronage: Why Do Consumers Shop on the Internet?
- Chapter VII Objective and Perceived Complexity and Their Impacts on Internet Communication
- Chapter VIII Personalization Systems and Their Deployment as Web Site Interface Design Decisions
- Chapter XI User Satisfaction with Web Portals: An Empirical Study
- Chapter XVI Turning Web Surfers into Loyal Customers: Cognitive Lock-In Through Interface Design and Web Site Usability