Importing Tables from Word or Excel

If you're familiar with tables in Word or spreadsheets in Excel, you have probably noticed some of the limitations of tables in PowerPoint. For example, you can't perform mathematical calculations in PowerPoint tables as you can in Excel spreadsheets. And you can't use a table in PowerPoint to contain and organize graphic images as you can in a Word table.

Fortunately, you have the option of creating Word tables or Excel spreadsheets inside a PowerPoint slide show.

To create a Word table in PowerPoint, follow these steps:

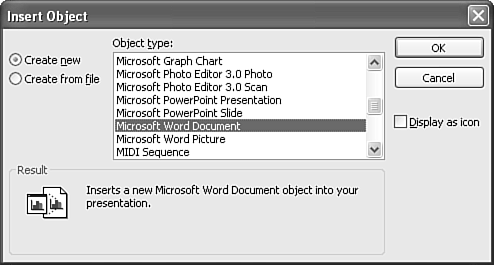
  1. Choose Insert, Object. PowerPoint displays the Insert Object dialog box (see Figure 8.17).

    Figure 8.17. You can insert Word tables by using the Insert Object dialog box.

    graphics/08fig17.gif

  2. Leave the Create New button selected, and from the Object Type list, select Microsoft Word Document.

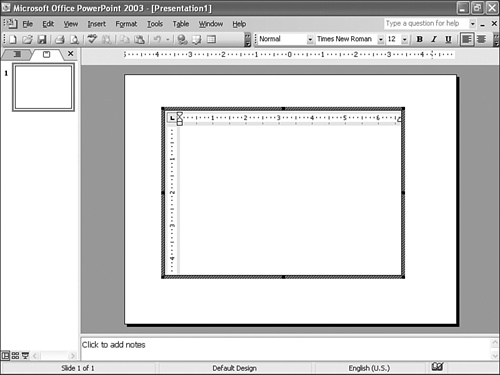
  3. Click OK. PowerPoint opens a window on the PowerPoint slide, but it displays menus and toolbars for Word (see Figure 8.18, which also shows a Word table already created).

    Figure 8.18. When you're working with Word table objects, menus and toolbars change so that you can use Word features.

    graphics/08fig18.gif

  4. Create a Word table, including text or graphic images, and then click outside the table box to return to PowerPoint.

At this point you can move, size, or format the Word object by adding a border, adding a fill background, and so on, although some changes to the table itself might be better done in Word.

To create an Excel spreadsheet in PowerPoint, you follow these steps:

1. Choose Insert, Object. PowerPoint displays the Insert Object dialog box (refer to Figure 8.17).

2. Leave the Create New button selected, and from the Object Type list, select Microsoft Excel Worksheet.

3. Click OK. PowerPoint opens a window on the PowerPoint slide, but it displays menus and toolbars for Excel.

4. Create a spreadsheet that includes numbers, labels, or formulas.

5. Click and drag the lower-right corner of the Excel worksheet box to trim the cells you're not using.

6. Click outside the worksheet box to return to PowerPoint.

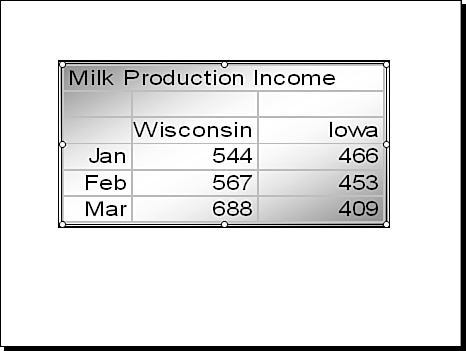
At this point you can move, size, or format the Excel object by adding a border, adding a fill background, and so on (see Figure 8.19).

Figure 8.19. You can add attractive formatting to an Excel worksheet object in PowerPoint.

graphics/08fig19.gif

Finally, you can import existing Word documents or Excel spreadsheets. However, doing so inserts the entire document, not just a table or part of a spreadsheet. Instead of importing entire Word or Excel documents, it's probably better to create PowerPoint-sized bits of information for example, a small table or spreadsheet instead of large documents.

Caution

graphics/cman.gif

It's tempting to take advantage of Word or Excel to create detailed tables or worksheets. Remember, however, that in a PowerPoint slide, you need to keep the amount of information to a manageable minimum. At the very least, audience members from the back row have to be able to read the table or worksheet text.


The Absolute Minimum

Using tables is a great way to organize textual information in ways that the audience members can quickly understand. In this chapter, you did the following:

  • You learned how to create simple tables.

  • You found out how to move around in a table and add text and other information.

  • You learned to adjust and insert columns and rows.

  • You explored the use of lines, borders, and fills to enhance table data.

  • You created tables by using the Draw Table tool.

  • You learned to create Word tables and Excel spreadsheets from within PowerPoint.

Chapter 9, "Presenting Numbers by Using Data Charts," focuses on how to present numeric information by using data charts.


Absolute Beginner's Guide to Microsoft Office PowerPoint 2003
Absolute Beginners Guide to Microsoft Office PowerPoint 2003
ISBN: 0789729695
EAN: 2147483647
Year: 2003
Pages: 154
Authors: Read Gilgen

flylib.com © 2008-2017.
If you may any questions please contact us: flylib@qtcs.net