Adding Lines, Closed Shapes, and AutoShapes

On with the show. What you really came here for was to learn how to add your own graphic creations. The Draw program helps you create two basic types of images:

  • Lines These include straight lines, multisegment lines, and lines with arrowheads.

  • Closed shapes The rectangle and circle shapes are the two most commonly used closed shapes, and PowerPoint also provides a bevy of preformatted shapes, such as buttons, banners, flowchart symbols, and more.

Let's start by experimenting with closed shapes.

Adding Rectangles and Ovals

To create a closed shape, such as a rectangle, follow these steps:

  1. graphics/rectangle.gif Click the Rectangle button. PowerPoint seems to do nothing, but it's really waiting for you to take the next step.

  2. Move the mouse pointer to the slide area. The pointer appears as a crosshairs.

  3. Position the pointer at one corner of the rectangle you are about to create (for example, the upper-left corner).

  4. Click and drag the pointer to the opposite corner (for example, the lower-right corner).

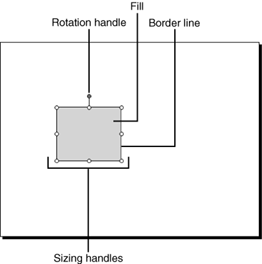
  5. Release the mouse button. PowerPoint inserts a rectangle, complete with a thin-line border and filled with a color that automatically matches the design template you're using (see Figure 7.2).

    Figure 7.2. Click and drag to create closed shapes.

    graphics/07fig02.gif

Note that the image displays sizing and rotation handles, just like other PowerPoint objects.

graphics/oval.gif You can add ovals by using the same steps. Just click the Oval button and then drag the oval or circle shape on the slide.

The following tricks work with most closed drawing objects:

  • If you want to draw a perfectly proportioned object (for example, a square or circle), hold down the Shift key while dragging the shape. PowerPoint forces the shape to an equally proportioned height and width.

  • If you want to start at the center of the shape and expand it outward, press Ctrl as you draw. PowerPoint expands the shape from the center point as you drag away from that center point.

  • To start from the center and make the shape perfectly proportional, press both Ctrl and Shift while dragging the shape.

Cool, eh? Now you can impress your geometrically challenged friends with your perfect squares and circles!

Adding Lines and Arrows

Adding lines and line-type arrows is as simple as adding closed shapes. Follow these steps:

  1. graphics/line.gif Click the Line button.

  2. Move to the slide and drag from one end of the line to the other.

  3. Release the mouse button to insert the line (refer to Figure 7.2).

Notice that the line object displays sizing handles, but no rotation handle. You can adjust the length and orientation of a line by dragging a sizing handle. You can also essentially rotate the line by using the opposite end of the line as the rotation axis.

If you want to rotate a line on its center axis, choose Draw, Rotate or Flip, Free Rotate. PowerPoint changes the sizing handles to green rotation handles. Drag the rotation handles to rotate the line.

Adding line-type arrows is similar to adding lines, but you have to remember which direction the arrow points when you drag the arrow. Follow these steps:

  1. graphics/arrow.gif Click the Arrow button.

  2. Move to the slide and drag from one end to the arrowhead end.

  3. Adjust or rotate the arrow the same way you do a line.

To select a line or an arrow, just move the pointer to the line until the pointer turns to a four-way arrow. Click once to select the line or drag to move it.

Adding AutoShapes

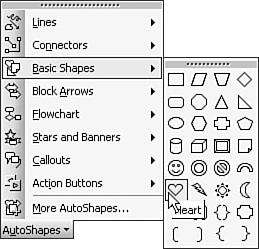
graphics/autoshape.gif AutoShapes are fancier, predesigned closed or line shapes. To get an idea of what AutoShapes are available to you, click the AutoShapes button. PowerPoint displays the AutoShapes menu, and as you hover the mouse pointer over each menu item, PowerPoint displays palettes of AutoShape choices (see Figure 7.3).

Figure 7.3. AutoShapes are predesigned lines and closed shapes that save you the trouble of creating your own shapes.

graphics/07fig03.gif

Let's try a few different shapes to learn how AutoShapes work, which sometimes is different from the rectangles or lines you're already familiar with.

To create and modify a smiley face, for example, follow these steps:

  1. Choose AutoShapes, Basic Shapes and click the smiley face icon.

  2. Move to the slide and drag the size face you want. Don't forget to press Shift if you want a perfect circle.

  3. Release the mouse button to draw the face. PowerPoint displays the object with sizing and rotation handles, as well as a yellow diamond-shaped glyph, which is used to change the shape or size of only a part of the object (refer to Figure 7.2).

  4. Drag the glyph as desired. For example, you could drag the smile upward, turning it into a frown.

Try several other closed shapes, dragging glyphs when present, and also sizing, rotating, and moving the objects. You'll soon find just how powerful AutoShapes can be. With relatively little artistic talent, you can create shapes that look and do what you want them to.

Other types of AutoShapes are lines and connectors. To create a multisegment line, for example, follow these steps:

  1. Choose AutoShapes, Lines and click the Freeform line icon.

  2. Move to the slide and click (but don't drag) at the point where you want the line to start.

  3. Move the mouse pointer to where you want the line to stop and turn in a different direction and then click again.

  4. Continue clicking at each turn until you arrive at the end of the line.

  5. To complete the line, double-click. PowerPoint inserts a multisegment line (refer to Figure 7.2).

If you join the beginning and the end of the line, when you double-click, PowerPoint creates a closed object and adds a colored fill (refer to Figure 7.2).

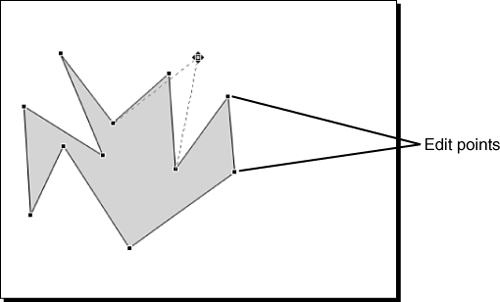
The sizing and rotation handles shown in Figure 7.3 don't allow you to edit the shapes of the individual lines. Instead, you must right-click the object and select Edit Points. PowerPoint displays the object with edit points (see Figure 7.4). Drag the edit points to create exactly the shape you need.

Figure 7.4. By using edit points, you can change individual parts of a multisegment drawing.

graphics/07fig04.gif

Other line options include double-ended arrows, scribble (like drawing with a pencil), and curve, which is similar to a multisegment line, but as you turn the corner, instead of taking a sharp angle, the line curves gently. This option is particularly useful when you're drawing maps.

Connector lines are semi-automatic multisegment lines. You can draw connector lines by themselves, but as their name implies, they're really designed to help you draw perfect lines or arrows between two objects.

Adding Text to AutoShapes

Certain AutoShapes automatically prompt you to add text to them (for example, callout shapes). Callouts are the speech or thought bubbles you often see in cartoons. To add a callout to a slide, follow these steps:

  1. Choose AutoShapes, Callouts and select a callout shape.

  2. Move to the slide and click and drag the approximate size of the callout, just as you do when you create a rectangle or an oval.

  3. When you release the mouse button, PowerPoint displays the callout and also a text box and a blinking insertion point.

  4. Type the text of the callout. You can also format the text just as you do with any text box.

  5. Click the edge of the callout box to select it and to display the callout pointer glyph.

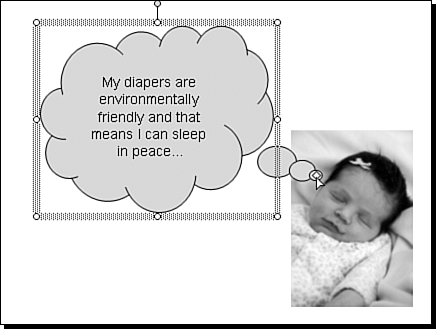
  6. Drag the pointer glyph so that it points to the object doing the speaking (see Figure 7.5).

    Figure 7.5. You can add text directly to a callout and you can drag the callout pointer to the source of the callout's content.

    graphics/07fig05.gif

You can also add text to any other closed object. Simply right-click the object, and from the context menu choose Add Text. PowerPoint displays a text box and an insertion point.

Adding Action Buttons

One type of AutoShape that has a specific purpose is the action button. You create action buttons the same way you do any closed object, but when you release the mouse button to create the button, PowerPoint displays the Action Settings dialog box. We'll talk about linking objects later; for now, just click Cancel. Adjust the button size and shape and then drag the glyph to change the three-dimensional height of the button (see Figure 7.6).

Figure 7.6. Action buttons are shapes that also link to an action when clicked during a slide show.

graphics/07fig06.gif


Absolute Beginner's Guide to Microsoft Office PowerPoint 2003
Absolute Beginners Guide to Microsoft Office PowerPoint 2003
ISBN: 0789729695
EAN: 2147483647
Year: 2003
Pages: 154
Authors: Read Gilgen

flylib.com © 2008-2017.
If you may any questions please contact us: flylib@qtcs.net