6.7 Create and Use Flexible AutoNumber Fields
10.4 Send Messages to Other Users Without Using Email
10.4.1 Problem
When you have multiple users logged into your application, you want them to be able to communicate quickly and easily with one another. You need a simple interface for sending notes back and forth so users can check whether anyone else is editing a particular entry, compare notes on workflow, and so on. How can you implement this in Access?
10.4.2 Solution
You can keep your notes in a table in a shared database to which all users have access. Whenever someone writes a note to another user, that note is added as another record in this table. By using a form that makes use of the Timer event, you can monitor the status of this table from any Access application and notify users when new messages have arrived.
This solution employs two files, 10-04fe.mdb and 10-04be.mdb. Before you can try it, you'll need to link the data tables from 10-04be.mdb (the "backend" or data database) to 10-04fe.mdb (the "frontend" or application database). Linking a data table allows you to use a table from one Access database within another Access database. Start Access and load 10-04fe.mdb. Choose File ![]() Get External Data
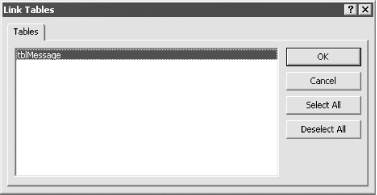
Get External Data ![]() Link Tables, and select 10-04be.mdb as the Access link database. At the Link Tables dialog, select tblMessage and click OK, as shown in Figure 10-16.
Link Tables, and select 10-04be.mdb as the Access link database. At the Link Tables dialog, select tblMessage and click OK, as shown in Figure 10-16.
Figure 10-16. Linking a data table
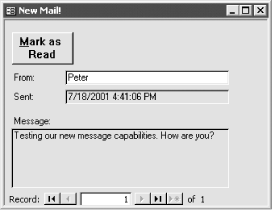
Now you can test-drive this solution by sending a message to yourself. Open both frmSendMail and frmReceiveMail. Minimize the Receive Mail form. Select your username from the To combo box. If you haven't altered the default Access security settings, your username will be Admin, which should be confirmed in the From text box. Enter any message and click the Send Message button. In Figure 10-17, Peter has used frmSendMail to compose a message to Jean.
Figure 10-17. Using frmSendMail to send a message

The Send Mail form will clear as soon as the message is sent. Within 10 seconds, the Receive Mail form will pop up with the message. Figure 10-18 shows how Jean would see the message from Peter. Click on the Mark as Read button to clear the Receive Mail form. If more than one message is waiting, you can navigate through them.
Figure 10-18. Using frmReceiveMail to receive a message
To use this technique in your own applications, follow these steps:
-
Identify the shared database you'll be using to hold the messages. This can be an existing shared database or a new one designed expressly for this purpose. Create a new table with the fields shown in Table 10-5. Make MessageID the primary key of this table, and save it as tblMessage.
Table 10-5. Fields in tblMessage
Field name
Data type
MessageID
AutoNumber
From
Text
To
Text
DateSent
Date/Time
DateReceived
Date/Time
Message
Memo
-
Close the shared database and open the database with which you want to send and receive messages. This is the database where you'll create the remaining objects. Import basMail and basFillUsers from 10-04fe.mdb to this database.
-
Create a new form with the properties shown in Table 10-6.
Table 10-6. Properties for frmSendMail
Property
Value
Caption
Send Mail
DefaultView
Single Form
ScrollBars
Neither
RecordSelectors
No
NavigationButtons
No
-
Add two unbound text box controls and an unbound combo box control to the form, as shown in Figure 10-17. Name the first text box txtFrom. Set its ControlSource property to:
=CurrentUser( )
Name the second text box txtMessage and size it to hold the text of your message. Set the EnterKeyBehavior property for txtMessage to New Line in Field.
-
Name the combo box cboTo and size it the same as txtFrom. Set its combo box-specific properties to match those in Table 10-7.
Table 10-7. Properties for the cboTo combo box
Property
Value
RowSourceType
acbFillUserList
RowSource
ColumnCount
1
ColumnHeads
No
ColumnWidths
BoundColumn
1
ListRows
8
ListWidth
Auto
-
Add a command button to the form, with the properties shown in Table 10-8. The &Send Message caption makes the button respond to the Alt-S accelerator key shortcut.
Table 10-8. Properties for cmdSend
Property
Value
Name
cmdSend
Caption
&Send Message
OnClick
=acbSendMail( )
-
Save this form as frmSendMail.
-
Select File
 Get External Data Link Tables and link the tblMessage table you created in your shared database to this frontend database.
 -
Create a new query based on tblMessage. Drag all the fields from the field list to the query grid. Set the query criteria as shown in Table 10-9. Save this query as qryNewMail.
Table 10-9. Criteria for qryNewMail
Field
Criteria
To
CurrentUser( )
DateReceived
Is Null
-
Create another new form, with the properties shown in Table 10-10.
Table 10-10. Properties for frmReceiveMail
Property
Value
RecordSource
qryNewMail
Caption
No mail
DefaultView
Single Form
AllowAdditions
No
ScrollBars
Neither
RecordSelectors
No
NavigationButtons
Yes
OnLoad
=acbCheckMail( )
OnTimer
=acbCheckMail( )
TimerInterval
10000
-
Add three bound text box controls to the form. Name the first one txtFrom, set the ControlSource to From, and size it to hold the sender's address. Name the second one txtSent, set the ControlSource to DateSent, and size it to hold the date and time the message was sent. Name the third one txtMessage, set the ControlSource to Message, and size it to hold the message text.
-
Add a watermark picture to the form using the additional form properties found in Table 10-11.
Table 10-11. Additional properties for frmReceiveMail
Property
Value
Picture
bitmap file
PictureType
Embedded
PictureSizeMode
Clip
PictureAlignment
Center
PictureTiling
No
In the sample database, we've used a simple bitmap created with the Windows 95 Paint program to display a message in the center of the form. This bitmap, NONEW.BMP, is included on the CD-ROM. (CD content is available online at http://examples.oreilly.com/accesscook.) You can add this bitmap to your form or create your own.
-
Place a Rectangle control with the same background color as the form's detail section behind all of the controls on the form. After you have positioned it and sized it to take up the entire detail section, you can move it behind the other controls by selecting Format
Send to Back. -
Add a command button to the form, with the properties shown in Table 10-12.
Table 10-12. Properties for cmdReceive
Property
Value
Name
cmdReceive
Caption
&Mark as Read
OnClick
=acbReceiveMail( )
-
Save this form as frmSendMail.
10.4.3 Discussion
This technique works by passing messages back and forth through tblMessage. The sending form is unbound, because when you send a message, you don't want to have to flip through all the previous messages. The acbSendMail function just takes whatever you type into the form and puts it into this table. It also uses the CurrentUser function to put your name into the From field of the table, and the Now function to time-stamp the message. The acbSendMail function is shown here:
Function acbSendMail( ) As Integer ' Take the message and user from the frmMailSend ' form and send it to the mail backend. On Error GoTo HandleErr Dim db As DAO.Database Dim rstMail As DAO.Recordset Dim frmMail As Form Set db = CurrentDb( ) Set rstMail = db.OpenRecordset("tblMessage", _ dbOpenDynaset, dbAppendOnly) Set frmMail = Forms![frmSendMail] With rstMail .AddNew ![From] = CurrentUser( ) ![To] = frmMail![cboTo] ![DateSent] = Now ![Message] = frmMail![txtMessage] .Update End With frmMail![cboTo] = Null frmMail![txtMessage] = Null rstMail.Close ExitHere: Exit Function HandleErr: MsgBox Err & ": " & Err.Description, , "acbSendMail( )" Resume ExitHere End Function Opening the recordset with the dbAppendOnly flag accelerates the process of adding a new record because it avoids reading in the existing records that the send function doesn't care about.
The cboTo combo box uses a list-filling function to fill the combo box with a list of current users in the workgroup. List-filling functions were discussed in Section 7.5.2. This particular function fills its list using security data access objects to iterate through the collection of users in the workgroup. We defer discussion of this topic to Section 10.5.2.
The Receive Mail form is based on a query that finds all messages directed to the current user that have nothing in their DateReceived fields. By default, new records added from elsewhere on a network do not show up on an already-opened form; you must explicitly requery the form for this to happen. The acbCheckMail function automatically performs this requery at load time and once every 10 seconds to check for new mail. The acbCheckMail function is shown here:
Function acbCheckMail( ) As Integer ' Check for new mail and, if there is any, ' restore the Receive Mail form. On Error GoTo HandleErr Dim rstClone As DAO.Recordset Dim frmMail As Form Set frmMail = Forms![frmReceiveMail] frmMail.Requery Set rstClone = frmMail.RecordsetClone rstClone.MoveFirst If Not rstClone.EOF Then frmMail.Caption = "New Mail!" If acb_apiIsIconic(frmMail.Hwnd) Then frmMail.SetFocus DoCmd.Restore End If Else frmMail.Caption = "No mail" End If rstClone.Close ExitHere: Exit Function HandleErr: Select Case Err.Number Case 3021 ' No current record; do nothing. Case Else MsgBox Err & ": " & Err.Description, , "acbCheckMail( )" End Select Resume ExitHere End Function
After the form is requeried, acbCheckMail checks for new mail by looking at the RecordsetClone property of the form. This property returns an exact duplicate of the form's underlying recordset. If there are any records to be shown, this RecordsetClone will not be at its EOF, so the function changes the form's caption and, if it is currently minimized, restores the form to its full size. The function calls the Windows API function IsIconic (aliased as acb_apiIsIconic and declared in the declarations section of basMail) to determine if the form is minimized.
We have used the form's Picture property, a rectangle, and the form's AllowAdditions property to add one more effect to the form: when the form's recordset is empty, all the controls on the form disappear and a bitmap reading "There are no new mail messages" appears on the form (see Figure 10-19).
Figure 10-19. frmReceiveMail displays a special message when there is no new mail
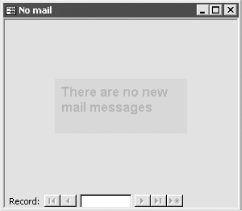
This trick is accomplished by setting the form's AllowAdditions property to No, adding a watermark picture to the form, and adding an opaque rectangle that hides the watermark when there are records in the form's recordset. When there are no records in a form's recordset and you have set AllowAdditions to No, Access hides all of the form's controls including the unbound Rectangle control and prominently displays the form's watermark, if there is one.
This method uses the Access username to track mail senders and recipients. To use it in production, you'll need to activate Access security (otherwise, everyone is signed on as the Admin user at all times). To activate security, simply use Security ![]() Change Password to assign a password to the Admin user. Then you can select Users from the Security menu and create as many new users as you like. Security was discussed in more detail in Section 10.1.2.
Change Password to assign a password to the Admin user. Then you can select Users from the Security menu and create as many new users as you like. Security was discussed in more detail in Section 10.1.2.
To test this solution with multiple users, you'll need to have several machines available on a network. Make a copy of 10-04fe.mdb for each computer, and use File ![]() Get External Data
Get External Data ![]() Link Tables to link the same copy of tblMessage to each one. Log in as a different user at each computer, and you'll be able to send messages back and forth.
Link Tables to link the same copy of tblMessage to each one. Log in as a different user at each computer, and you'll be able to send messages back and forth.
You can adjust the performance impact of this technique by changing the TimerInterval property of frmReceiveMail. This property measures the number of milliseconds between each execution of the OnTimer event. In the sample database, the TimerInterval property is set to 10000 milliseconds, or 10 seconds; its highest possible value is 65535, or just over a minute. If you want a longer delay, you can add a static integer variable to acbCheckMail and increment it more than once before you check for new mail.
EAN: 2147483647
Pages: 174