Recipe 3.15 Customize a Report s Grouping and Sorting at Runtime

Recipe 3.15 Customize a Report's Grouping and Sorting at Runtime

3.15.1 Problem

You have a report that has several different grouping and sorting fields that you need to rearrange every time you run the report. To do this, you've created five or six different versions of the same report, changing only the order of the fields and which fields are sorted or grouped. This is a maintenance nightmare, especially when you want to change some aspect of the report, which means having to change all the variants of this same report. Is there any easier way to do this in Access?

3.15.2 Solution

You can manipulate most aspects of a report's design using VBA code. This solution shows you how to programmatically open a report in design mode and manipulate several properties of controls and groups. Using this technique and a driving form, you can create a single report that can be customized using different sorting and grouping fields every time it is run.

Load 03-15.MDB and open frm_rptCompaniesSetup, which is shown in Figure 3-36.

Figure 3-36. The frm_rptCompaniesSetup form is used to set up the rptCompanies report
figs/acb2_0336.gif

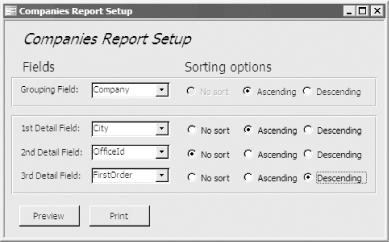
Select a grouping field and zero, one, two, or three other fields for the report (any or all of which can be sorted). When you're done, press the Preview or Print button and a report matching the chosen sorting/grouping fields will be previewed or printed for you. A sample report using the settings from Figure 3-36 is shown in Figure 3-37.

Figure 3-37. The rptCompanies report is customized every time it is run
figs/acb2_0337.gif

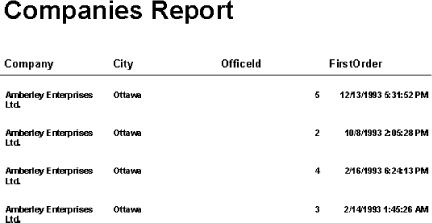
To create a customizable report of your own, follow these steps:

  1. Identify the table or query on which the report will be based. In our example, the report is based on the tblCompanies table. Decide which of the fields in this table or query you wish to allow to be selected, grouped, or sorted. In the sample database, we decided to use all of the fields from tblCompanies.

  2. Create a table with one field, ReportFieldName, with a data type of Text. Make this field the primary key of the table. Save the table in the example, we named it zstbl_rptCompaniesFields and switch to datasheet view, adding a record for each field identified in Step 1.

  3. Create a new unbound form. Add one unbound combo box for each field you want to be able to customize at runtime. For example, in the frm_rptCompaniesSetup form, we allow for one grouping field and up to three sorting fields (see Figure 3-36). The names of the combo box fields and their RowSource properties are listed in Table 3-13. All other properties are set to the default values.

    Change "zstbl_rptCompaniesFields" to the name of the table from Step 2. Change "frm_rptCompaniesSetup" to the name of your form. Create additional combo boxes as needed, following the pattern of Name and RowSource properties from Table 3-13.

Table 3-13. Combo box field settings on the sample form

Name

RowSource

cboField0

zstbl_rptCompaniesFields

cboField1

SELECT ReportFieldName FROM zstbl_rptCompaniesFields WHERE ReportFieldName <> Forms!frm_rptCompaniesSetup!cboField0;

cboField2

SELECT ReportFieldName FROM zstbl_rptCompaniesFields WHERE ReportFieldName <> Forms!frm_rptCompaniesSetup!cboField0 And ReportFieldName <> Forms!frm_rptCompaniesSetup!cboField1

cboField3

SELECT ReportFieldName FROM zstbl_rptCompaniesFields; WHERE ReportFieldName <> Forms!frm_rptCompaniesSetup!cboField0 And ReportFieldName <> Forms!frm_rptCompaniesSetup!cboField1 And ReportFieldName <> Forms!frm_rptCompaniesSetup!cboField2;

  1. For all but the last combo box created in Step 3, create an event procedure attached to the AfterUpdate event of the control containing code similar to the following:

    Private Sub cboField1_AfterUpdate( )     Me.cboField2.Requery     Call FixUpCombos(Me.cboField1) End Sub

    Replace "cboField1" with the name of the first combo box and "cboField2" with the name of the next combo box. Add the following code to the end of the first combo box's event procedure:

    ' Enable the buttons once you've chosen the group field. If Not IsNull(Me.cboField0) Then     Me.cmdPrint.Enabled = True     Me.cmdPreview.Enabled = True End If

    Don't create an AfterUpdate event procedure for the last combo box.

  2. Add one option group control alongside each combo box, as listed in Table 3-14. If you have more than four fields, add additional option groups, following the same naming pattern and assigning default values of 1 to each additional option group.

    For each option group, add three option buttons, as listed in Table 3-15. The names of the option buttons don't matter.

Table 3-14. Option groups for the sample form

Name

Default value

grpSort0

0

grpSort1

1

grpSort2

1

grpsort3

1

Table 3-15. Option buttons

Label

Option value

No sort

1

Ascending

0

Descending

-1

  1. Add a command button named cmdPreview with the caption "Preview" to the form. Attach the following code to its AfterUpdate event:

    Private Sub cmdPreview_Click( )     Call HandlePrinting(acbcReport, acPreview) End Sub
  2. Add a command button named cmdPrint with the caption "Print" to the form. Attach the following code to its AfterUpdate event:

    Private Sub cmdPrint_Click( )     Call HandlePrinting(acbcReport, acNormal) End Sub
  3. Edit the form's module (click on the Code button on the Report Design toolbar or choose the View Code menu option) and enter the following lines of code in the module's declarations section:

    Const acbcReport As String = "rptCompanies" Const acbcTemp As String = "rptTemp" Const acbcNoSort = 1 Const acbcMaxGroupFields = 1 Const acbcMaxSortFields = 3
  4. With the form's module still open, add the following two procedures to the module (or copy them into your form's module from the sample database):

    Private Sub FixUpCombos(ctlCalling As Control)     Dim intIndex As Integer     Dim intI As Integer          ' Grab the last character of the calling     ' control's name and convert to an integer     intIndex = CInt(Right(ctlCalling.Name, 1))          ' Enable the next control if and only if the     ' value of the calling control is non-null     If intIndex < acbcMaxSortFields Then         With Me("cboField" & intIndex + 1)             .Value = Null             .Enabled = (Not IsNull(ctlCalling))         End With         Me("grpSort" & intIndex + 1).Enabled = (Not IsNull(ctlCalling))     End If          ' Disable all controls after the next one     If intIndex < acbcMaxSortFields - 1 Then         For intI = intIndex + 2 To acbcMaxSortFields             With Me("cboField" & intI)                 .Value = Null                 .Enabled = False             End With             With Me("grpSort" & intI)                 .Value = acbcNoSort                 .Enabled = False             End With         Next intI     End If End Sub Public Sub HandlePrinting(strReport As String, ByVal intPrintOption As Integer)     Dim intI As Integer     Dim intFieldCnt As Integer     Dim avarFields(0 To acbcMaxSortFields) As Variant     Dim aintSorts(0 To acbcMaxSortFields) As Integer     Dim rpt As Report     Dim varGroupLevel As Variant              On Error GoTo HandleErr          DoCmd.Hourglass True          ' Count up the non-null grouping/sorting fields     ' and the sort property fields and store them in     ' two arrays     intFieldCnt = -1     For intI = 0 To acbcMaxSortFields         If Not IsNull(Me("cboField" & intI)) Then             intFieldCnt = intFieldCnt + 1             avarFields(intFieldCnt) = Me("cboField" & intI)             aintSorts(intFieldCnt) = Me("grpSort" & intI)         End If     Next intI          ' Delete old temp copy of report     On Error Resume Next     DoCmd.DeleteObject acReport, acbcTemp     On Error GoTo HandleErr     DoCmd.CopyObject , acbcTemp, acReport, strReport          ' Turn off screen updating and open the report in     ' design mode where it will be manipulated     Application.Echo False     DoCmd.OpenReport acbcTemp, View:=acDesign          ' Set up a report object to point to the report     Set rpt = Reports(acbcTemp)          ' Always have a single grouping field.     ' First set the properties of the group     rpt.GroupLevel(0).ControlSource = avarFields(0)     rpt.GroupLevel(0).SortOrder = aintSorts(0)     ' Set the first label and text box to match     ' the grouping properties     rpt("txtField0").ControlSource = avarFields(0)     rpt("lblField0").Caption = avarFields(0)     ' Already used GroupLevel(0) for the grouping field,     ' so now work through the remaining fields     For intI = 1 To intFieldCnt         ' Set the text box to be visible         ' and bind to the chosen field         With rpt("txtField" & intI)             .Visible = True             .ControlSource = avarFields(intI)         End With                  ' Set the label to be visible with its caption         ' equal to the name of the field         With rpt("lblField" & intI)             .Visible = True             .Caption = avarFields(intI)         End With                  ' Now create each sorting field group         If aintSorts(intI) <> acbcNoSort Then             varGroupLevel = CreateGroupLevel(rpt.Name, _              avarFields(intI), False, False)             rpt.GroupLevel(varGroupLevel).SortOrder = aintSorts(intI)         End If     Next intI          ' Make any unneeded fields invisible     For intI = intFieldCnt + 1 To acbcMaxSortFields         rpt("txtField" & intI).Visible = False         rpt("lblField" & intI).Visible = False     Next intI          ' Save changes to the new report, then open the temporary report:     DoCmd.Save acReport, acbcTemp     DoCmd.OpenReport acbcTemp, View:=intPrintOption      ExitHere:     DoCmd.Hourglass False     Application.Echo True     Exit Sub      HandleErr:     Resume ExitHere End Sub

    Save the form. The complete frm_rptCompaniesSetup sample form is shown, in design view, in Figure 3-38. Close the form.

Figure 3-38. The sample form in design view
figs/acb2_0338.gif
  1. Create a new report. Add one sorting/grouping field to the report. The actual field you choose doesn't matter because the code behind frm_rptCompaniesSetup will change the field name. What is important is that you set the GroupHeader and GroupFooter properties to Yes (which makes it a grouping field). Don't add any additional sorting fields.

  2. Add a label control for each combo box field from frm_rptCompaniesSetup to the group header section of the report. Make all the labels the same size and give them names in the following style: lblField0, lblField1, and so on.

  3. Add an unbound text box control for each combo box field from frm_rptCompaniesSetup to the detail section of the report. These fields should line up under the labels added in Step 13, should all be the same dimensions, and should have names like txtField0, txtField1, and so on.

  4. Add any page and report headers and footers. Save the report and close it. The completed sample report is shown in Figure 3-39 in design view.

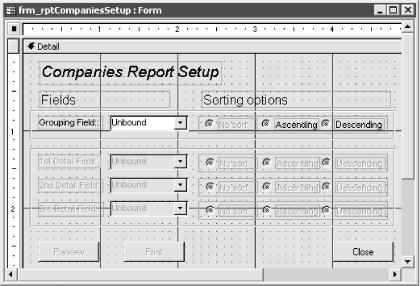
Figure 3-39. The rptCompanies report in design view
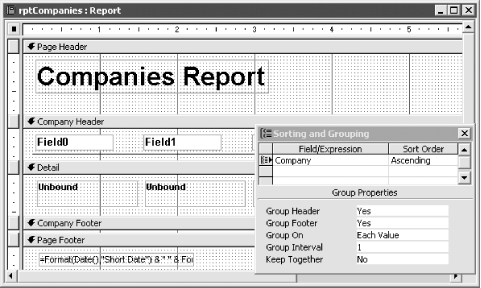
figs/acb2_0339.gif

3.15.3 Discussion

The zstbl_rptCompaniesFields table holds the names of all the possible fields in the report. This table supplies the row source for the combo boxes on the driving form. Each record in this table corresponds to one field that may be selected, sorted, or grouped. In the sample database, we used all five fields from tblCompanies.

Most of the work in this solution is done by the driving form. This form (frm_rptCompaniesSetup, in the sample database) drives the report-customization process. For the person running the report to be able to customize it, you must provide some user interface (UI) mechanism for picking and choosing fields. The combo boxes and option groups provide this mechanism.

Many of the solution steps (Steps 3 through 5 and the FixUpCombos subroutine in Step 9) are used to make the UI for the driving form as easy to use and as foolproof as possible. For example, we created RowSource properties (listed in Table 3-15) that make it difficult for the user to select the same grouping/sorting field twice by refining the combo box list for each field that eliminates any fields already chosen from the list.

The RowSource properties make it difficult to select the same field twice, but the code in the FixUpCombos procedure makes doing so next to impossible. When the form first opens, all of the controls except the first combo box and the first option group are disabled. After you have selected a field from a combo box, the code enables the next combo box/option group while keeping controls that come after that combo box/option group disabled. This takes care of forward movement. However, the user can always back up and change a combo box field out of order hence, in addition to disabling the controls, the code also nulls out any values that may have been entered into subsequent combo boxes.

When the cmdPrint or cmdPreview buttons are pressed, the HandlePrinting subroutine is called. This subroutine takes all the data entered on the form, opens the report in design mode, and customizes it prior to printing the form to the screen or printer.

HandlePrinting begins by counting up the non-null combo box controls on the form and storing their values and the values of the associated option groups into two arrays:

intFieldCnt = -1 For intI = 0 To acbcMaxSortFields     If Not IsNull(Me("cboField" & intI)) Then         intFieldCnt = intFieldCnt + 1         avarFields(intFieldCnt) = Me("cboField" & intI)         aintSorts(intFieldCnt) = Me("grpSort" & intI)     End If Next intI

Next, the code opens the report in design view (after suspending most, but not all, screen updating) and adjusts the properties of the first field, which makes up the one and only grouping field:

' Always have a single grouping field. First set the properties ' of the group. rpt.GroupLevel(0).ControlSource = avarFields(0) rpt.GroupLevel(0).SortOrder = aintSorts(0) ' Set the first label and text box to match the grouping properties. rpt("txtField0").ControlSource = avarFields(0) rpt("lblField0").Caption = avarFields(0)

The next stretch of code iterates through the remaining fields, which are all sorting (or nonsorting detail) fields. First, the unbound text box controls are made visible and their control sources are set to the names of the fields selected from the form. Next, the labels are made visible and their captions are set to match the text boxes. The CreateGroupLevel function is then called to create any and all sorting fields based on the selection from the option groups on the form. (The last two parameters of this function tell Access whether you want a header or a footer. Because this code is creating sorting fields only, both of these parameters are set to False.) This chunk of HandlePrinting is shown here:

For intI = 1 To intFieldCnt     ' Set the text box to be visible and bind it to the chosen field.     With rpt("txtField" & intI)         .Visible = True         .ControlSource = avarFields(intI)     End With          ' Set the label to be visible with its caption equal to     ' the name of the field.     With rpt("lblField" & intI)         .Visible = True         .Caption = avarFields(intI)     End With          ' Now create each sorting field group.     If aintSorts(intI) <> acbcNoSort Then         varGroupLevel = CreateGroupLevel(rpt.Name, _          avarFields(intI), False, False)         rpt.GroupLevel(varGroupLevel).SortOrder = aintSorts(intI)     End If Next intI

Next, any unneeded fields are made invisible:

For intI = intFieldCnt + 1 To acbcMaxSortFields     rpt("txtField" & intI).Visible = False     rpt("lblField" & intI).Visible = False Next intI

The code creates a temporary copy of the report, earlier in the procedure:

On Error Resume Next DoCmd.DeleteObject acReport, acbcTemp On Error GoTo HandleErr DoCmd.CopyObject , acbcTemp, acReport, strReport

This is necessary because the code makes design-time changes to the report. Making a copy eliminates the chance that the user will save the modified report over the original, which could mess things up the next time the report is run. The code completes its work by saving the new report and opening the report in the requested mode:

' Save changes to the new report, then open the temporary report: DoCmd.Save acReport, acbcTemp DoCmd.OpenReport acbcTemp, View:=intPrintOption

Making a temporary copy of the report eliminates the possibility of the original report being left in a state that makes it unusable the next time the report is run. This is important because there is no programmatic way to remove sort fields you can't make a report that has been saved with two sort fields into a report with one sort field. If the user is allowed to save a modified version of the report, this is exactly what might happen. Therefore, we made the decision to use a temporary copy of the report (but only after trying numerous other workarounds).

The sample report and accompanying code assume that you want only one grouping field. We did this to simplify the example, but you could extend it by including code to make additional grouping fields (just like the code that now makes the sorting fields). If you do this, you'll have to deal with creating controls and placing them in the headers of the groups. You can create controls using the CreateReportControl function, which is described in the Access online help.

Any technique that relies on programmatically making changes to a report (or a form) while it's open in design view won't work in an Access MDE or ADE, where design changes aren't permitted. In those cases, however, you can use a modified version of this solution. In a report's Open event, you can't add new grouping and sorting levels, but you can change the control sources of existing ones. So, as long as you have enough grouping and sorting levels in the saved report, you can modify them at runtime rather than at design time with code like this:

rpt.GroupLevel(0).ControlSource = avarFields(0)

If necessary, you can create "dummy" grouping levels in your report, using a control source like =1, to make it possible to avoid having to open the report in design view.


Access Cookbook
Access Data Analysis Cookbook (Cookbooks)
ISBN: 0596101228
EAN: 2147483647
Year: 2003
Pages: 232

flylib.com © 2008-2017.
If you may any questions please contact us: flylib@qtcs.net