| For decades, artists, photographers, and printers have used masks to isolate and modify specific areas of images. A mask sections off a portion of an image so you can manipulate it or the area surrounding it. Watercolor artists, for example, paint with frisket masks over their work to hold back or resist paint from being absorbed by the paper. Later, they can peel off the frisket and continue to work on their paintings. Graphic artists cut out a rubylith mask for a section of a photo they want to isolate or knock out from a background. Later they use the mask in combination with a halftone negative to burn a plate for printing. Using Photoshop's Layer Masks to isolate areas in an image, you can create masks that not only work exactly as frisket or rubylith, but can also be controlled in ways never imagined by those using traditional masking methods. We'll use masking techniques to create the image used on the program cover shown in Figure A.
Figure A. 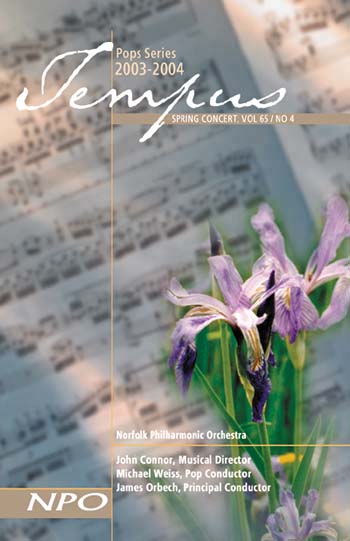
Select your subject The first thing we must do is find a photo we want to separate from its confusing background, as shown in Figure B on the next page.
Figure B. 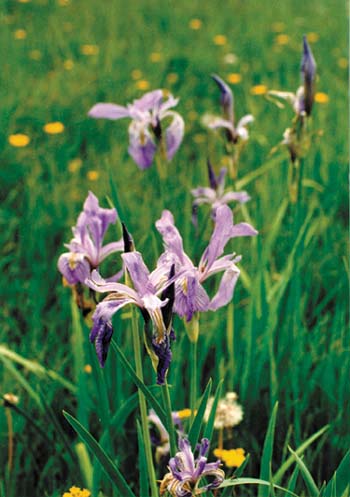
Create the layer mask 1. | Open your chosen image in Photoshop.
| 2. | Make a duplicate of it by selecting Duplicate Layer from the Layers palette's pop-up menu since it's best not to work on the Background layer.
| 3. | Enter Orchids in the As text box when the Duplicate Layer dialog box appears, and then click OK.
|
There are two types of masks you can create in Photoshop: Vector mask. A vector mask is a resolution-independent vector path, which you can create with the Pen and Shape tools. Layer mask. A layer mask is a resolution-dependent grayscale bitmap image, which you can create with the painting and selection tools.
Since we'll paint the mask on our image using the Brush tool, we'll create a layer mask. To create the mask: 1. | Make sure your duplicate layer is selected on the Layers palette and turn off the visibility of your Background layer by clicking on the Eye icon next to the layer.
| 2. | Click the Add Layer Mask button  located at the bottom of the palette. A layer mask thumbnail appears in the layer, as does a Layer Mask Link icon and a Layer Mask Selected icon, as shown in Figure C. located at the bottom of the palette. A layer mask thumbnail appears in the layer, as does a Layer Mask Link icon and a Layer Mask Selected icon, as shown in Figure C.
Figure C. 
|
When you add a layer mask to a layer, the bitmap mask created is a grayscale image stored in the alpha channel. Since it's an image, you can edit and move it like any other image. Normally, a mask is positioned concentric with the image area it masks. If you need to move it, you can unlink it by clicking on the Layer Mask Link icon to remove the link symbol. Change the layer mask options 1. | Select the areas you want to mask using the Brush tool  to paint, or edit, the layer mask. to paint, or edit, the layer mask.
| 2. | Click on the Edit In Quick Mask Mode icon in the Toolbox to display a rubylith overlay as you work on your image.
| 3. | Double-click on the layer mask thumbnail to adjust the rubylith display. The Layer Mask Display Options dialog box displays.
| 4. | Change the color of the overlay by double-clicking on the color swatch and selecting a new color in the Color Picker dialog box.
| 5. | Change the opacity of the overlay by entering a value in the Opacity text box, as shown in Figure D, or just keep the default value of 50%.
Figure D. 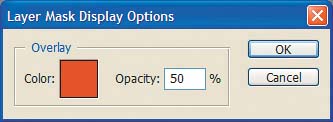
| 6. | Click OK when you're done. Since the overlay is only an indication of the mask and not the mask itself, making changes at any time to the overlay options doesn't affect the mask.
|
Edit the layer mask Now, let's begin to edit the layer mask. 1. | Select the Brush tool from the Toolbox. The first thing you'll notice is that the Set Foreground and Background Color Swatches in the Toolbox change to grayscale values. This is because, as previously mentioned, a layer mask is a grayscale bitmap image. You can edit the layer mask paint in the following ways:
- Black. The black grayscale value adds to the layer mask.
- White. The white grayscale value subtracts, or erases, from the layer mask.
- Gray. The gray grayscale values partially add to the layer mask and produce a semitransparent masking effect. The closer the gray value is to black, the less the transparency.
| 2. | Select the black swatch from the Swatches palette.
| 3. | Select a brush size that will work well with the areas of the image to be masked. On the tool options bar, click on the Brush Preset Picker and select a size, such as a Soft Round 35 px brush, from the dropdown list.
| 4. | Move your mouse pointer to your canvas and begin to paint, as shown in the example on the left in Figure E.
Figure E. 
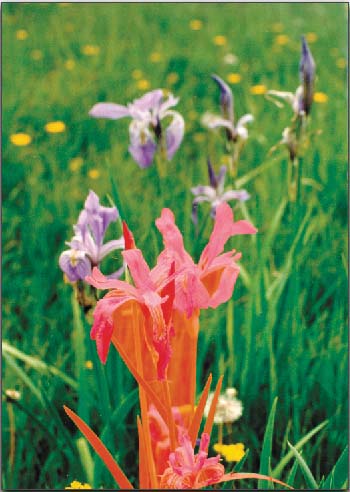
| 5. | Continue adding to the layer mask until you have completely masked the area you want in your image, as shown in the example on the right in Figure E.
|
As you go, you might have to clean up areas of the mask that have accidentally covered small sections of the image. To remove them: 1. | Click on the Set Foreground Color swatch in the Toolbox. The Color Picker dialog box appears.
| 2. | Set the R, G, and B values to 255, respectively, to change the swatch to white, and then erase unwanted masked areas with your mouse pointer.
|
Copy and paste the masked image Now that we've masked our image, we can select it and then copy and paste it onto a new layer. 1. | Select the Magic Wand tool  from the Toolbox. from the Toolbox.
| 2. | Set the Tolerance level to 10 on the tool options bar.
| 3. | Click on your mask and a selection border appears, as shown in Figure F.
Figure F. 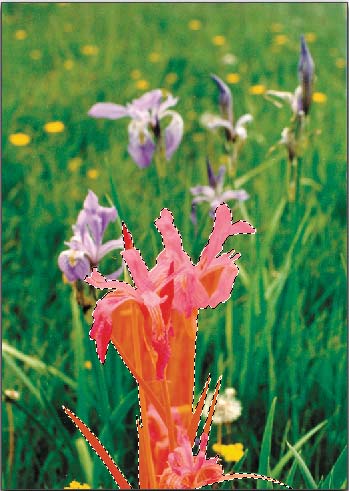
| 4. | Select the Background layer in the Layers palette and press [Ctrl]C ( C on the Mac) to copy your selection. C on the Mac) to copy your selection.
| 5. | Create a new layer by clicking the Create A New Layer button  on the Layers palette. on the Layers palette.
| 6. | Press [Ctrl]V (V on the Mac) to paste your selection onto a new layer, as shown in Figure G.
Figure G. 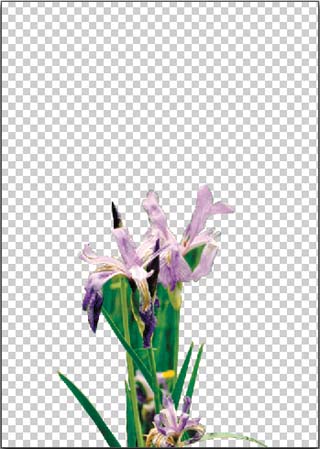
| 7. | Double-click on the new layer in the Layers palette, and enter a name in the Layer text box. We entered Orchid group. Your orchid group selection is ready to be included in your program brochure.
|
Save your work The final thing you must do is save your file so you can place it in a document such as our program brochure. If you save it as a PSD (Photoshop document) or a layered TIFF file, you can go back and make further changes. 1. | Choose File  Save, and when the Save As dialog box appears, enter a filename in the Save As text box. Save, and when the Save As dialog box appears, enter a filename in the Save As text box.
| 2. | Select Photoshop or TIFF from the Format dropdown list.
| 3. | Select a file storage destination from the Where dropdown list (Mac only).
| 4. | Select the Layers check box.
| 5. | Click Save, and your file is ready to be included in a publication.
|
Marvelous masks Masks are a terrific way to select areas within a layer that you can copy first and then further transform or manipulate. Since you paint layer masks with the Brush tool, you benefit from the control and precision derived from that painting tool. |