| When you need to create a design with multiple images, there are a number of ways you can integrate them into one piece. In this article, we'll show you how to fade one image into another, as we did in Figure A. As with many Photoshop techniques, there are several ways to do this, but our method gives you the most flexibility for making changes as your design progresses.
Figure A. 
Selecting suitable images To successfully fade images into one another, it's helpful if the images have common color schemes or a common theme. In Figure A, you'll notice that most of our images have quite a lot of greenery, which helps with blending the different images together. If you can, try to select images that have a common color theme. We didn't try to fade a densely treed image into an image with a lot of blue sky because those types of fades aren't usually as successful aesthetically. Setting up the images Before you jump into creating your design, you need to prepare your image file. To do so: 1. | Create a new document in Photoshop of the size and resolution you want your montage to be.
| 2. | Copy and paste all the images you want to work with into the new document.
| 3. | Select an image layer and choose Edit  Free Transform. Free Transform.
| 4. | Hold down the [Shift] key and use the Transform bounds to scale your image so it overlaps the one next to it by half an inch, and then press [Enter].
| 5. | Repeat these steps on all the images in your montage. Be sure to do all color correcting and sharpening at this stage as well. Once you arrange all of your images, you can move on to masking.
|
Creating the mask To make the montage, you first need to add a layer mask to each image. To do this: 1. | Select a layer and then [Ctrl]-click ( -click on the Mac) on the layer thumbnail to load the layer's selection. -click on the Mac) on the layer thumbnail to load the layer's selection.
| 2. | Choose Select Modify  Contract. Contract.
| 3. | Enter 20 in the Contract By text box in the resulting Contract Selection dialog box, and click OK. (Keep in mind that all pixel settings depend on the resolution at which you're working, so you may need to use different settings than the ones we've used for our 200-ppi image.) The selection shrinks.
| 4. | Click the Add Layer Mask button  at the bottom of the Layers palette. A mask generates based on your selection and your image is clipped. Repeat this process for all of your images. Now, we'll show you how to manipulate the layer masks for the desired effect. at the bottom of the Layers palette. A mask generates based on your selection and your image is clipped. Repeat this process for all of your images. Now, we'll show you how to manipulate the layer masks for the desired effect.
|
Modifying the mask At this point, your mask is a little smaller than your image, but it has hard edges. To soften the edges: 1. | Make sure that the mask thumbnail is selected on the layer, and then choose Filter Blur Gaussian Blur.
| 2. | Enter 40 in the Radius text box in the resulting dialog box, and then click OK. Your image should now fade out on all four sides.
| 3. | Repeat this process for each image. If you like how your image looks, then you're done. If not, you can easily modify the mask of each image in a number of ways. We'll show you how to adjust it using the Levels command and the Brush tool.
|
Using Levels One of the easiest ways to adjust the amount of fade is to use the Levels command. To adjust the fade: 1. | Select your mask and then choose Image Adjustments Levels.
| 2. | Slide the black triangle to the right in the resulting Levels dialog box to tighten up the amount of fade between the black and the white.
| 3. | Select the Preview check box to see how your Levels settings affect the masked image and its relationship with surrounding images. This is illustrated in Figure B. You won't actually see this while you're working though. You'll just see your image fade more or less into the surrounding images.
Figure B. 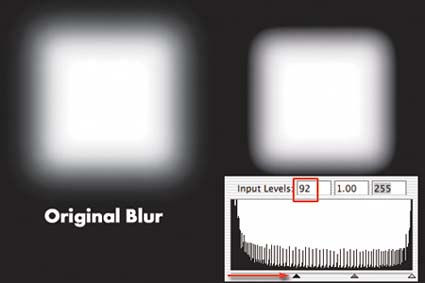
| 4. | Click OK once you find the right setting.
|
Making spot corrections The Levels command is a great general-purpose tool to use for adjusting your image. However, anytime you blend multiple images together, you'll usually need to adjust a few details as well. In our image in Figure A, we didn't want the angel's wing to fade out like the rest of the image, so we adjusted only that area of the mask. With layer masks, the easiest way to do this is with the Brush tool. When you click on a layer's mask, the foreground and background colors are set to black and white automatically. 1. | Select the Brush tool  and then select a feathered brush that's proportional to the area you want to work on. and then select a feathered brush that's proportional to the area you want to work on.
| 2. | Change the Set Foreground Color swatch to white to remove some unwanted fade. You can then paint directly onto the affected area.
| 3. | Open the Channels palette and click on the Eye icon next to the channel that says Layer X Mask if you want to view the mask as well as the image. Your mask appears red on top of the image.
| 4. | Start refining your mask in the Layers palette. You can see how we're removing any signs of redness on top of the wing in Figure C.
Figure C. 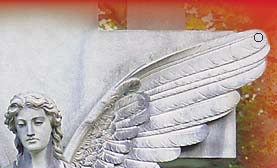
|
Keeping it editable We've shown you how to fade images into one another gracefully. Although you can achieve a similar effect by just using the Eraser tool, layer masks enable you to create the same effect and still preserve your original image, which is helpful should you decide to make any changes to your work. |