Optimize your images for use in Microsoft PowerPoint
| A few years ago, you could shoot away with your digital camera and insert those images directly into a PowerPoint presentation without too much worry. However, today's high-resolution cameras produce images that are simply too big for this format, which can cause system crashes, file corruption, and PowerPoint files that are slow and hard to edit. By optimizing your digital images to fit your presentation, you can ensure your pictures look great while your presentation runs smoothly. Prepping your imagesUsing your digital images successfully in PowerPoint starts with understanding your target image size. The default (and most popular) PowerPoint slide dimensions are 10 inches by 7.5 inches (Landscape orientation) at a screen resolution of 72 dpi. You can create a presentation of any size, but the vast majority of PowerPoint users stick to this default size as it best fills most displays. If this default size were translated into pixels, it would be 722.7 by 542 pixels at 72 dpi, giving you a target maximum dimension and resolution. Any dimension that's smaller is acceptable, but you'll need to stick with the 72 dpi resolution to make sure your images don't start to get either blurry or pixelated (or both). Always resize firstA 3.3-megapixel digital camera produces an image file of 2048 by 1536 pixels at 72 dpi for a file size of a whopping 9 MB. While higher resolution is better for printing, it's total overkill when displaying images onscreen. Since we have a good target to work with, we can resize the image and optimize it for this purpose.
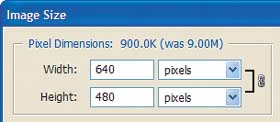
Note that our image is now only 900 KB, as previewed in the Image Size dialog box and shown in Figure B. This number decreases even more as we compress the file, so our images will be easy to work with and load quickly when inserted into PowerPoint. Figure B.
Save the image
Work with digital images in PowerPoint
By default, the image comes in at 100% and is centered on the slide. If we hadn't resized the image, the image file would have completely overrun the boundaries of the slide and we'd probably only be able to see a portion of the image. Plus, we'd have that hefty 9 MB file to deal with, so our efforts have certainly paid off. Adjusting images within PowerPointAs shown in Figure C, our image appears on our slide with the Picture toolbar at the top. If this toolbar doesn't automatically appear when you select your image, choose View Figure C.
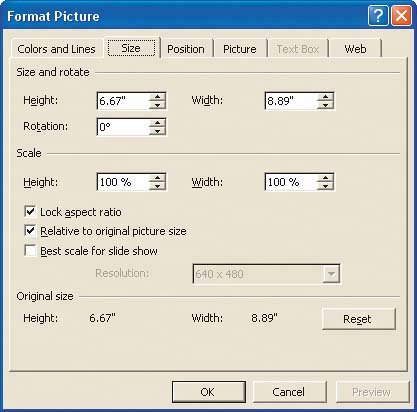
The big brother of the Picture toolbar is the Format Picture dialog box, which you can open by selecting Format picture button Figure D.
Creating a templateOne of the most common uses for digital images in PowerPoint is as a background for the slide. The best way to create a consistent template for your presentation using a digital image is to make a Slide Master.
Your image is part of the Master Slide now, so you can't edit it when in Normal view. To edit it, simply return to the Slide Master and make your changes. In the case of our example, its image dimensions are smaller than the size of the slide. If you want to bleed your images right to the edges, you'll have to resize to the pixel size of the slide (722.7 x 542) or slightly larger. Anything outside the boundaries of the slide won't display, so don't go overboard with the overlap. It just adds unnecessary file size to your presentation. Presenting … your images!PowerPoint is a great tool for creating presentations using your digital images or even setting up slide shows to display your work. By creating images files that are optimized to the screen, you can make your images look good while avoiding large file sizes and poor-performing presentations. |
 Image Size to display the Image Size dialog box, as shown in
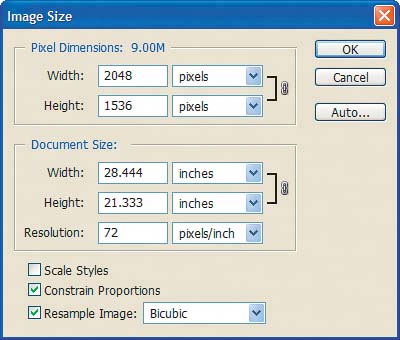
 Picture
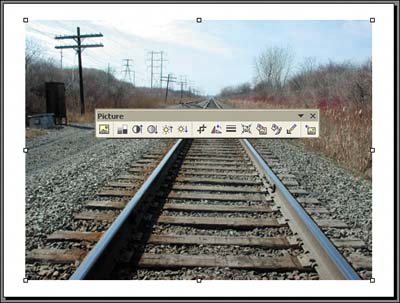
EAN: N/A
Pages: 105
- Chapter Six Defining Pain or Critical Business Issue
- Chapter Eleven Gaining Access to People with Power
- Chapter Twelve Controlling the Buying Process
- Chapter Fifteen Sales Management System: Managers Managing Pipelines and Salespeople
- Chapter Sixteen Creating and Sustaining High-Performance Sales Cultures