Problem : Solution Restore overexposed photos Problem: Loss of detail in an image's highlight areas due to overexposure. 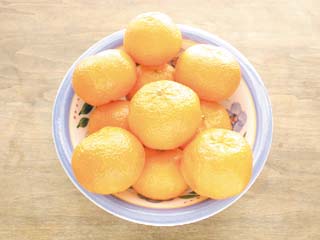
Solution: Use the Threshold command to restore washed-out images. 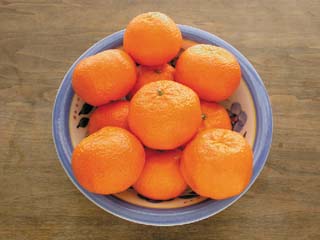
| If the highlight areas in an overexposed photo don't seem to contain much detail, then how does the Threshold command help to restore them? In the same way you can see a much wider tonal range, the tonal range of film or an image sensor is wider than your monitor. There's usually a certain amount of highlight detail present that your monitor just can't process. The Threshold command is able to isolate the highlight areas in your photo. Then, after you select, copy, and paste them into a new layer, you can adjust the highlight tonal level to add detail to the highlight areas in your photo. |
Correct for slight overexposure Let's correct a slightly overexposed photo. If you want to go through this technique with one of your images, make sure you're able to easily see the detail in the shadow areas of your image but not in the highlights. Duplicate the Background layer Because the Threshold command changes a color image into a high-contrast black-and-white image, we must first duplicate the Background layer so we can work on it. 1. | Choose Window  Layers to open the Layers palette. Layers to open the Layers palette.
| 2. | Click on the Layers palette's pop-up menu and choose Duplicate Layer.
| 3. | Enter Threshold in the As text box of the Duplicate Layer dialog box and then click OK.
|
Adjust the Threshold level 1. | Choose Image Adjustments  Threshold from the main menu, and the Threshold dialog box opens. Youll notice that the Threshold command has converted the Threshold layer into a high-contrast black-and-white image. The Threshold Level setting determines the tonal level breakpoint at which white areas become black. The higher the setting, the higher the breakpoint. Threshold from the main menu, and the Threshold dialog box opens. Youll notice that the Threshold command has converted the Threshold layer into a high-contrast black-and-white image. The Threshold Level setting determines the tonal level breakpoint at which white areas become black. The higher the setting, the higher the breakpoint.
| 2. | Move the slider to a higher value. (We used 205 for our example image.) As you do so, you'll notice that more and more of the image area becomes black. Move the slider until only the highlight areas remain white.
| 3. | Click OK.
|
Select the highlight areas 1. | Choose the Magic Wand tool  from the Toolbox to prepare to select the highlight areas in the Threshold layer. from the Toolbox to prepare to select the highlight areas in the Threshold layer.
| 2. | Enter a Tolerance of 15 to limit the area you select in the Tolerance text box found on the left side of the tool options bar.
| 3. | Select the Anti-aliased check box to keep the edges of your selection nice and smooth and deselect the Contiguous check box so the selection of values won't be restricted to just the area you click on.
| 4. | Select a white highlight area, and then choose Select Feather.
| 5. | Enter 2 in the Feather Radius text box when the Feather Selection dialog box opens.
| 6. | Click OK.
|
Copy and paste the highlights in the Background layer 1. | Click on the Eye icon  on the left side of the Threshold layer to deselect it, and then select the Background layer. on the left side of the Threshold layer to deselect it, and then select the Background layer.
| 2. | Press [Ctrl]C ( C on the Mac) to copy the highlight areas, and then press [Ctrl]V ( V on the Mac) to paste them into a new layer. C on the Mac) to copy the highlight areas, and then press [Ctrl]V ( V on the Mac) to paste them into a new layer.
| 3. | Double-click on the Layer 1 name in the Layers palette, and then enter Highlights in the Layer Name text box.
|
Adjust the Highlights layer tonal level 1. | Choose Image Adjustments Brightness/Contrast.
| 2. | Lower the Brightness tonal value by moving the Brightness slider to the left when the Brightness/Contrast dialog box opens. We used a value of -40 for our example.
| 3. | Click OK, and you've restored the detail in the highlight areas, as shown in the Solution image.
|
Highlight management Even if you can't avoid overexposed highlights, you can easily restore the image. The next time you're tempted to give up on an overexposed image, remember the Threshold command. |