21.3 Building a Content Management System
| Building a content management system is a programmer's favorite task. This is my personal impression when talking to IT experts all around the globe. Every company focusing on Web development has implemented some sort of content management system (CMS) to speed up application development. Many different approaches and concepts for building CMS systems have been developed, and even more products have been implemented. In this section you will take a look at a basic yet powerful and easy approach to content management. 21.3.1 How to Display DataUsually a CMS system consists of two important components. The first component is used to manage the data in the database. This part cannot be accessed by an ordinary user. The second part of a CMS system is responsible for displaying and formatting the data in the database. In this section we will focus on this particular part, and you will see how a system like that can be implemented easily. In addition, you will see how to build systems for displaying data flexibly. Let's get started and create a table that can be used to store simple messages. The goal of this example is to display the data in the database using HTML templates as well as configuration files. Here is the SQL code for generating the table in the database: CREATE TABLE message ( id serial, tstamp timestamp with time zone DEFAULT now(), who text, message text ); INSERT INTO message (who, message) VALUES ('John', 'check out www.postgresql.at'); INSERT INTO message (who, message) VALUES ('Paul', 'please recompile the kernel'); INSERT INTO message (who, message) VALUES ('Lisa', 'who wants to dance some Salsa (LA style)?'); As you can see the table contains four columns. In this example three records have been added to the table. Before going through the code of the application you can take a look at Table 21.2, which contains a list of the files involved in the process.
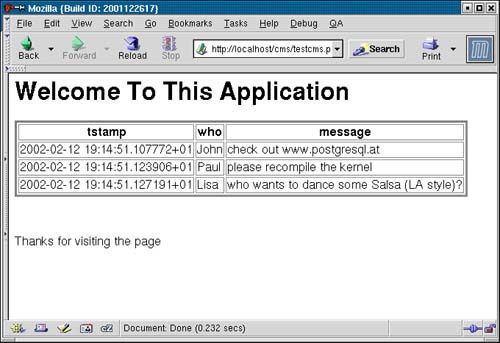
With just four files, it is possible to implement a useful and flexible tool for displaying data. The goal of the tool is to use an HTML template as well as configuration files. The HTML template contains keywords that are retrieved and substituted for data. In addition, it should be possible to retrieve data from the database and to generate tables out of it. Let's take a look at the configuration file called config.php: <?php # static values $stat['TITLE'] = "Welcome To This Application"; $stat['FILE'] = "next.php"; # SQL code $sql['SQL_LISTPRODUCT'] = "SELECT tstamp, who, message FROM message"; ?> Two arrays have been defined. The first one contains two fields that are used to store strings. The second array contains a SQL statement that queries the table you have added to the database before. This configuration file will be included by the CMS library you will see later in this section. Let's take a look at the HTML template we are going to use here. The file is called temp_list.html: <h1>{TITLE}</h1> <form action="{FILE}" method=post> {SQL_LISTPRODUCT} </form> <br><br> Thanks for visiting the page As you can see, it contains all three strings you have used to index the two arrays in the configuration file. The strings are marked using braces. The goal of the CMS system is to substitute the strings for real data. Let's take a look at the CMS library: <?php class content { var $template; var $conn; var $code; function content ($template, $cstr) { $this->conn = pg_connect($cstr); if (!$this->conn) { die ("cannot connect to database<br>\n"); } $this->code = implode('', @file($template)) or die("cannot work with $template<br>\n"); } function parsecontent($config) { include($config); # adding static variables to the content while (list ($key, $val) = each ($stat)) { $this->code = preg_replace("/\{$key\}/", $val, $this->code); } } function dynamiccontent($config) { include($config); # adding dynamic variables to the content while (list ($key, $val) = each ($sql)) { # checking if key is in the template if (preg_match("/\{$key\}/", $this->code)) { # retrieving data for the object $ret = pg_exec($this->conn, $val) or die ("cannot execute query ($sql)"); $rows = pg_numrows($ret); $fields = pg_numfields($ret); # displaying header of table $data .= "<table border=3><tr>\n"; for ($i = 0; $i < $fields; $i++) { $data .= "<th>". pg_fieldname($ret, $i)."</th>"; } $data .= "</tr>\n"; for ($i = 0; $i < $rows; $i++) { $data .= "<tr>"; $line = pg_fetch_row($ret, $i); for ($j = 0; $j < $fields; $j++) { $data .= "<td>"; $data .= $line[$j]; $data .= "</td>"; } $data .= "</tr>\n"; } $data .= "</table>\n"; # adding data to document $this->code = preg_replace("/\{$key\}/", $data, $this->code); } } } function display() { echo $this->code; } }; ?> The entire library consists of just one object. This object is built on four functions that do all the work for you. The constructor of the object connects to the database and loads the template file into memory. This is done with the help of the functions file and implode. file reads the data into an array and implode makes one string out of it. The string generated by implode can be processed easily. In the configuration file you saw that two arrays have been defined. The first one is used to define static variables and constant values. Just think of variables related to the language of a file or any other value that should be configured globally. The parsecontent function goes through all values of the array containing the static values and substitutes the strings in the templates for the data in the configuration file. The substitution is done with the help of a simple regular expression. After looking at the function processing the values defined in the configuration file, it is time to see how the SQL code is treated. Therefore you can take a look at the dynamiccontent function that has been implemented after the parsecontent function. It loads a configuration file as well. In this example the same configuration as in the parsecontent function is used. The entire array called $sql is processed and the system tries to find out if keys found in the array can be found in the string containing the HTML template as well. If a match is found, the SQL statement related to the key is executed, and the data retrieved from the database is formatted as table. For formatting the table, the number of rows and fields are returned. After that the header of the table is generated. As soon as the header is ready, PHP starts creating the body of the table. Therefore two loops are executed. Every line in the table is processed. The second loop generates the various columns of the table. After you have seen the library, you can take a look at the file called testcms.php, which contains the body of the application: <?php include("cms.php"); $page = new content("temp_list.html", "host=localhost dbname=phpbook user=hs"); $page->parsecontent("config.php"); $page->dynamiccontent("config.php"); $page->display(); ?> First the CMS library is included. In the next step an object is created. The name of the HTML template is passed to the constructor. In the next step the variables in the stat array are used by calling the parsecontent function. After this has been completed, it is time for the database to do some work. dynamiccontent is called. It performs a query and generates a table. Finally the data is sent to the browser. Figure 21.8 shows what the HTML code generated by the application looks like when viewing it with Mozilla. Figure 21.8. A simple table.
Now that you have seen what the page looks like, it is interesting to take a look at the HTML code displayed by the browser. The HTML makes clear what has happened inside the application: <h1>Welcome To This Application</h1> <form action="next.php" method=post> <table border=3><tr> <th>tstamp</th><th>who</th><th>message</th></tr> <tr><td>2002-02-12 19:14:51.107772+01</td><td>John</td><td>check out www.postgresql.at</td></tr> <tr><td>2002-02-12 19:14:51.123906+01</td><td>Paul</td><td>please recompile the kernel</td></tr> <tr><td>2002-02-12 19:14:51.127191+01</td><td>Lisa</td><td>who wants to dance some Salsa (LA style)?</td></tr> </table> </form> <br><br> Thanks for visiting the page The data has been inserted into the HTML code the way it has been returned by the database. Depending on the HTML template, the result will look the way you want it to. The advantage of a class like that is its flexibility. Just tell the person who is responsible for the layout where to place which strings, and your application will do the rest for you. Of course, additional features must be implemented to work with things like pull-down menus. However, the most important task, which is separating layout and objects, can be done easily. 21.3.2 Managing the Data in the DatabaseThe goal of a content management system is to manage the content of a database-driven Web site. In most cases managing the data is not the task of the user, so special screens for adding and removing data have to be built. This is exactly what you are going to deal with in this section. 21.3.2.1 Maintaining Data in TablesIn this section you will take a brief look at how to maintain data in tables. You will see a brief example that can be used to insert and to delete data from a set of tables. Because you have already seen how data can be passed from one script to another, we will use hidden fields to do the job so that you will get a deeper insight into the basic concepts of PHP programming. The first thing to do is to remove all old tables from the database. This can be done with the help of DROP TABLE. After all tables have been deleted, you can go on and create three new tables you will need in this section: CREATE TABLE message ( id int4, tstamp timestamp with time zone DEFAULT now(), who text, message text ); INSERT INTO message (id, who, message) VALUES (1, 'John', 'check out www.postgresql.at'); INSERT INTO message (id, who, message) VALUES (2, 'Paul', 'please recompile the kernel'); INSERT INTO message (id, who, message) VALUES (3, 'Lisa', 'who wants to dance some Salsa (LA style)?'); CREATE TABLE userinfo ( id int4, name text, grp text, password text ); CREATE TABLE groupinfo ( id int4, name text ); Some records have been added to the first table. The two other tables are still empty. When building content management systems, one query must be kept in mind because it is important for finding out which tables can be found in the system: phpbook=# SELECT relname FROM pg_class WHERE relname NOT LIKE 'pg_%' AND relkind = 'r'; relname ----------- message userinfo groupinfo (3 rows) As you can see, you can use the SELECT statement to retrieve the list of tables in the system that are not used by PostgreSQL itself. In other words, it retrieves all tables but PostgreSQL's system tables. The tool we are going to write will be able to modify all tables in the system, so this query will be essential. Before going through the source code, you can take a look at the files involved in the application:
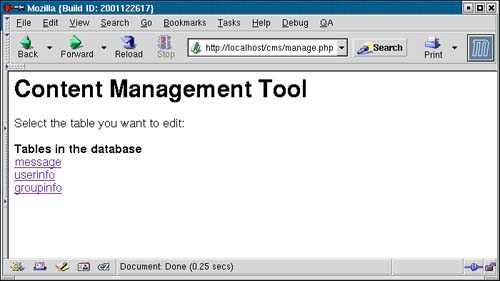
Let's get started with manage.php. Here is the code: <?php echo ' <html> <body> <h1>Content Management Tool</h1> Select the table you want to edit: <br> '; # connecting to the database $dbh = pg_connect("dbname=phpbook user=hs host=localhost"); if (!$dbh) { die ("cannot connect to database<br>\n"); } # retrieving a list of all tables in the database $res = @pg_exec($dbh, "SELECT relname FROM pg_class WHERE relname NOT LIKE 'pg_%' AND relkind = 'r' ") or die ("cannot retrieve list of tables"); # displaying list echo "<br><b>Tables in the database</b><br>\n"; $rows = pg_numrows($res); for ($i = 0; $i < $rows; $i++) { $line = pg_fetch_row($res, $i); echo '<a href="detail.php?tab='.$line[0]. "\">$line[0]</a><br>\n"; } echo "</body></html>"; ?> At the beginning of the script, some HTML code is displayed. After connecting to the database, you can retrieve the list of tables you want to modify. This is done with the help of the SQL statement you have seen before. After the query executes, a list of links is displayed. These links point to detail.php. Every table is assigned to exactly one link and the name of the table is added to the URL of the link. In other words, detail.php is called with a parameter. Figure 21.9 shows what the screen looks like. Figure 21.9. Select a table.
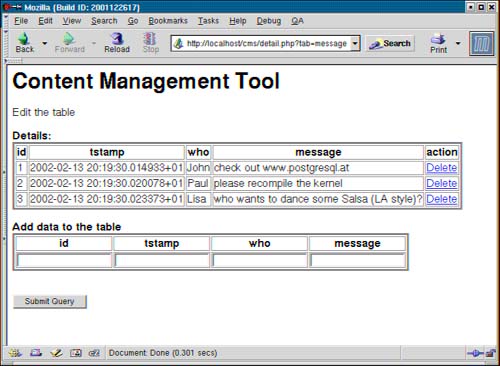
After a table has been selected, detail.php is started. The code of this script is shown in the next listing: <?php $data .= "<html> <body> <h1>Content Management Tool</h1> Edit the table <br>"; # connecting to the database $dbh = pg_connect("dbname=phpbook user=hs host=localhost"); if (!$dbh) { die ("cannot connect to database<br>\n"); } # checking for insert if ($number_of_fields) { $sql = "INSERT INTO $tab VALUES ("; for ($i = 1; $i < $number_of_fields - 1; $i++) { $sql .= "'${$i}', "; } $max = $number_of_fields - 1; $sql .= "'${$max}')"; $ret = pg_exec($dbh, $sql) or die ("cannot execute UPDATE operation<br>\n"); } # retrieving a list of all tables in the database $sql = "SELECT oid, * FROM $tab"; $res = @pg_exec($dbh, $sql) or die ("cannot retrieve list of tables"); # displaying list $data .= "<br><b>Details:</b><br>\n"; $rows = pg_numrows($res); $fields = pg_numfields($res); # displaying header of table $table .= "<table border=3><tr>\n"; for ($i = 1; $i < $fields; $i++) { $table .= "<th>". pg_fieldname($res, $i)."</th>"; } $data .= $table."<th>action</th>\n"; $data .= "</tr>\n"; # displaying data $data .= '<form action="detail.php" method="post">'; for ($i = 0; $i < $rows; $i++) { $data .= "<tr>"; $line = pg_fetch_row($res, $i); for ($j = 1; $j < $fields; $j++) { $data .= "<td>"; $data .= $line[$j]; $data .= "</td>"; } $data .= '<td><a href="action.php?act=delete&oid='. $line[0].'&tab='.$tab.'">Delete</a> </td> '; $data .= "</tr>\n"; } $data .= "</table>\n"; $data .= "<br><b>Add data to the table</b><br>\n"; # displaying HTML for inserting data $data .= $table; $data .= "<tr>"; for ($i = 1; $i < $fields; $i++) { $data .= "<td>". '<input type="text" name="'.$i.'"></td>'; } $data .= "</tr>\n"; $data .= "</table>\n"; $data .= '<input type="hidden" name="number_of_fields" '. "value=\"$fields\"><br><br>"; $data .= '<input type="hidden" name="tab" value="'.$tab.'">'; $data .= '<input type="submit" name="submit" >'; $data .= "</form>\n"; echo $data, $tail; ?> Before taking a closer look at the code, we recommend taking a look at the output of the script. Figure 21.10 shows what comes out when you select the table called message. Figure 21.10. Results of selecting a table.
In the figure you can see that the content of the table is displayed as a table. The last column of the table contains a link. The link points to action.php and contains the object id of the record it belongs to. The object id is a unique identifier for a record, so it can be used safely because it cannot be changed at least it makes no sense to change it. On the lower end of the script, you can see a set of fields for inserting data. When the Submit button is clicked, the data in the fields will be added to the table. Let's take a closer look at the source code of the file. At the beginning of the script, a connection to the database is established. After that the script checks whether $number_of_fields is defined. If it is defined, a new record has to be added to the table. Whenever the Submit button is clicked, $number_of_fields will be defined. If somebody clicks on a link to delete a record, $number_of_fields won't be defined, so it is a good choice to find out what has to be done. The INSERT operation is simple. A SQL statement is compiled, which is sent to PostgreSQL. You will see in a minute why the algorithm works. The next thing to do is to find out which data has to be displayed onscreen. Therefore a query is performed that retrieves all records from the table. The object id is selected as well because it is needed to identify a record. In the next step the header of the tables is created. This is done with the help of a simple loop. After displaying the head of the table, the data is added to it. The most interesting part of this component is the generation of the link for deleting records. The object id of the line and the name of the table where the record can be found are added to the link. This way no Submit button is used for calling the delete function. In the next step the table for inserting the data is added to the scenario. It consists of a dynamic number of columns, which is generated on-the-fly as well. The most important thing is that the number of the column is used as the name of the field. If your script knows how many columns your table has, it is an easy task to guess the names of the fields in the form. Of course, there are several other possibilities for extracting the names of the fields in the form, but this is one of the easiest ones. A set of hidden fields is defined. The advantage of a hidden field is that you can use it inside a form for storing data. It is not displayed by the browser but can be used to pass data on to the next script. In this scenario the number of fields as well as the name of the table the application is all about are stored in hidden fields. You have seen earlier in this section that the script checks whether $number_of_fields exists. With the help of a hidden field, $number_of_fields is passed to the script the form calls when the button is clicked. At the end of the script, the data is displayed. When the user clicks on the link, action.php is called. This file does nothing but delete the desired record and redirect the user to manage.php. Let's take a look at the code: <?php # connecting to the database $dbh = pg_connect("dbname=phpbook user=hs host=localhost"); if (!$dbh) { die ("cannot connect to database<br>\n"); } # managing delete statements if ($act == 'delete') { mydelete($dbh, $tab, $oid); } # deleting a record function mydelete($dbh, $tab, $oid) { $sql = "DELETE FROM $tab WHERE oid=$oid"; $stat = @pg_exec($dbh, $sql) or die ("cannot delete record $oid"); echo '<head> <meta http-equiv="refresh" content="0; URL=manage.php"> </head> <body> Record has been deleted - you will be redirected '; } ?> As you can see, the code is easy because it does nothing but connect to the database, delete a record, and redirect the user. |
EAN: N/A
Pages: 201
- The Second Wave ERP Market: An Australian Viewpoint
- Enterprise Application Integration: New Solutions for a Solved Problem or a Challenging Research Field?
- Context Management of ERP Processes in Virtual Communities
- Intrinsic and Contextual Data Quality: The Effect of Media and Personal Involvement
- Healthcare Information: From Administrative to Practice Databases
- Structures, Processes and Relational Mechanisms for IT Governance
- Integration Strategies and Tactics for Information Technology Governance
- Technical Issues Related to IT Governance Tactics: Product Metrics, Measurements and Process Control
- Managing IT Functions
- The Evolution of IT Governance at NB Power