16.2 Using Geometric Data Types
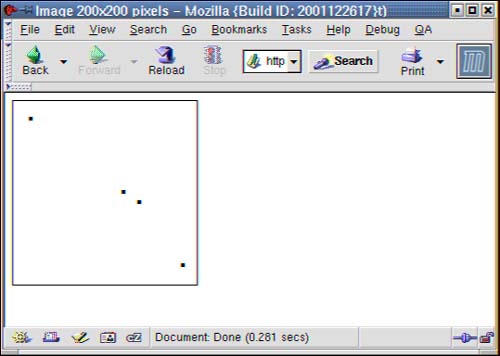
| PostgreSQL providesa set of data types you can use for storing geometric information efficiently. These data types are included in PostgreSQL's core distribution and are widely used and admired by many people. In addition to the data types themselves, PostgreSQL provides an index structure based on R-trees, which are optimized for performing spatial searching. PHP has a simple interface for generating graphics. To generate database-driven indexes, you can combine PostgreSQL and PHP. In this section you will see how to implement the "glue" between PHP and PostgreSQL. The goal of the next example is to implement an application that extracts points from a database and displays them in an image. To store the points in the database, you can create a table: phpbook=# CREATE TABLE coord (comment text, data point); CREATE Then you can insert some values into the table: phpbook=# INSERT INTO coord VALUES ('no comment', '20,20'); INSERT 19873 1 phpbook=# INSERT INTO coord VALUES ('no comment', '120,99'); INSERT 19874 1 phpbook=# INSERT INTO coord VALUES ('no comment', '137,110'); INSERT 19875 1 phpbook=# INSERT INTO coord VALUES ('no comment', '184,178'); INSERT 19876 1 In this example four records have been added to the table. Now that some data is in the database, you can start working on a script that generates the dynamic image: <?php include("objects/point.php"); header ("Content-type: image/png"); $im = @ImageCreate (200, 200) or die ("Cannot Generate Image"); $white = ImageColorAllocate ($im, 255, 255, 255); $black = ImageColorAllocate ($im, 0, 0, 0); ImageFill($im, 0, 0, $white); # connecting to the database $dbh = pg_connect("dbname=phpbook user=postgres"); if (!$dbh) { exit ("an error has occurred<br>"); } # drawing border $points = array(0,0, 0,199, 199,199, 199,0); ImagePolygon($im, $points, 4, $black); # selecting points $sql = "SELECT comment, data FROM coord"; $result = pg_exec($dbh, $sql); $rows = pg_numrows($result); # processing result for ($i = 0; $i < $rows; $i++) { $data = pg_fetch_array ($result, $i); $mypoint = new point($data["data"]); $mypoint->draw($im, $black, 3); } ImagePng ($im); ?> First a library is included. This library will be discussed after you have gone through the main file of the script. Then an image is generated and two colors are allocated. The background is painted white, and after that the connection to the database is established. To see where the image starts and where it ends, a rectangle is drawn that marks the borders of the image. In the next step all records are retrieved from the table called coord. All records in the table are processed using a simple loop. In the loop a constructor is called. After the object has been created, a method called draw is called. This method adds the point to the image. Finally the image is sent to the browser. In the next listing you can take a look at the library you will need to run the script you have just seen: <?php # working with points class point { var $x1; var $y1; # constructor function point($string) { $string = ereg_replace("\(*\)*", "", $string); $tmp = explode(",", $string); $this->x1 = $tmp[0]; $this->y1 = $tmp[1]; } # drawing a point function draw($image, $color, $size) { imagefilledrectangle ($image, $this->x1 - $size/2, $this->y1 - $size/2, $this->x1 + $size/2, $this->y1 + $size/2, $color); } } ?> The class called point contains two variables. $x1 contains the x coordinate of the point. $y1 contains the y coordinate of the point. Let's take a closer look at the constructor. One parameter has to be passed to the function. This parameter contains the data returned by PostgreSQL. In the next step the data is transformed and the two coordinates of the point are extracted from the input string. Finally the two values are assigned to $this. In addition to the constructor, a function for drawing a point has been implemented. Because a point is too small, a filled rectangle is drawn. The coordinates of the rectangle are computed based on the data retrieved from the database by the constructor. Figure 16.11 shows what comes out when running the script. Figure 16.11. Dynamic points.
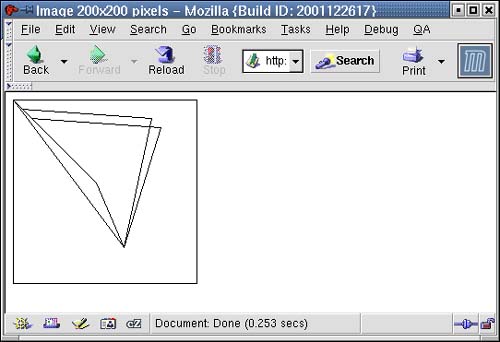
Points are the easiest data structure provided by PostgreSQL and therefore the PHP class you have to implement is easy as well. A more complex yet important data structure is polygons. Polygons consist of a variable number of points, so the constructor as well as the drawing functions are more complex. Before taking a look at the code, you have to create a table and insert some data into it: phpbook=# CREATE TABLE mypolygon (data polygon); CREATE In the next step you can add some data to the table: phpbook=# INSERT INTO mypolygon VALUES ('10,10, 150,20, 120,160'::polygon); INSERT 19902 1 phpbook=# INSERT INTO mypolygon VALUES ('20,20, 160,30, 120,160, 90,90'); INSERT 19903 1 Two records have been added to the table. Let's query the table to see how the data is returned by PostgreSQL: phpbook=# SELECT * FROM mypolygon; data -------------------------------------- ((10,10),(150,20),(120,160)) ((20,20),(160,30),(120,160),(90,90)) (2 rows) The target of the next piece of code is to transform the data returned by the database and make something useful out of it. The next listing contains a class called polygon used for processing polygons: <?php # working with polygons class polygon { var $x; var $y; var $number; # constructor function polygon($string) { $string = ereg_replace("\(*\)*", "", $string); $tmp = explode(",", $string); $this->number = count($tmp); for ($i = 0; $i < $this->number; $i = $i + 2) { $this->x[$i/2] = $tmp[$i]; $this->y[$i/2] = $tmp[$i + 1]; } } # drawing a polygon function draw($image, $color) { for ($i = 0; $i < $this->number - 1; $i++) { imageline($image, $this->x[$i], $this->y[$i], $this->x[$i + 1], $this->y[$i + 1], $color); } imageline($image, $this->x[$this->number - 1], $this->y[$this->number - 1], $this->x[0], $this->y[0], $color); } } ?> $x will be used to store a list of x coordinates and $y will contain the list of y coordinates extracted from the points defining the polygon. $number will contain the number of points a polygon consists of. After defining the variables belonging to the polygon, the constructor has been implemented. With the help of regular expressions, the data returned by PostgreSQL is modified and can easily be transformed into an array of values. In the next step the values in the array are counted and the various coordinates are added to $this->x and $this->y. In addition to the constructor, a function for drawing the polygon has been implemented. The function goes through all points of the polygon and adds lines to the image being generated. Now that you have seen how to process polygons, you can take a look at the main file of the application: <?php include("objects/polygon.php"); header ("Content-type: image/png"); $im = @ImageCreate (200, 200) or die ("Cannot Generate Image"); $white = ImageColorAllocate ($im, 255, 255, 255); $black = ImageColorAllocate ($im, 0, 0, 0); ImageFill($im, 0, 0, $white); # connecting to the database $dbh = pg_connect("dbname=phpbook user=postgres"); if (!$dbh) { exit ("an error has occurred<br>"); } # drawing border $points = array(0,0, 0,199, 199,199, 199,0); ImagePolygon($im, $points, 4, $black); # selecting points $sql = "SELECT data FROM mypolygon"; $result = pg_exec($dbh, $sql); $rows = pg_numrows($result); # processing result for ($i = 0; $i < $rows; $i++) { $data = pg_fetch_array ($result, $i); $mypoly = new polygon($data["data"]); $mypoly->draw($im, $black); } ImagePng ($im); ?> First the library for processing polygons is included. In the next step an image is created, colors are allocated, the background of the image is painted white, and a connection to the database is established. After drawing the borders and retrieving all records from the database, the polygons are displayed using a loop. Inside the loop the constructor is called for every record returned by PostgreSQL. After the constructor, the draw function is called, which adds the polygon to the scenery. If you execute the script, you will see the result as shown in Figure 16.12. Figure 16.12. Dynamic polygons.
Classes can be implemented for every geometric data type provided by PostgreSQL. As you have seen in this section, implementing a class for working with geometric data types is truly simple and can be done with just a few lines of code. The major part of the code consists of basic things such as creating images, allocating colors, or connecting to the database. The code that is used for doing the interaction with the database is brief and easy to understand. This should encourage you to work with PHP and PostgreSQL's geometric data types extensively. |
EAN: N/A
Pages: 201