ActiveMQ Resource Adapter Configuration
When the need arises to deploy JMS resources, those resources can be deployed using either the Geronimo deployer or the Geronimo Web console. For more information on the Geronimo deployer, see Chapter 6. The deployer functionality (as it relates to deploying JMS resources) is discussed here. For demonstration purposes, the examples provided follow the default ActiveMQ resource adapter plan as a base.
The ActiveMQ plan has a dependency on the ActiveMQ message broker plan and can only be successfully deployed if that plan is already deployed. Only once the ActiveMQ broker is deployed can the ActiveMQ plan be deployed. So, let’s walk through the independent deployment of the ActiveMQ resource adapter and some JMS resources that use it.
Because the deployment plan is the only requirement for a RAR file, understanding it is critical to understanding the configuration and deployment of JMS resources for the message broker. The following configuration tells Geronimo to make the JMS resources available via the resource adapter. Listing 16-3 shows the deployment plan.
Listing 16-3: The ActiveMQ Resource Adapter Deployment Plan
<?xml version="1.0" encoding="UTF-8"?> <connector xmlns="http://geronimo.apache.org/xml/ns/j2ee/connector-1.1"> <dep:environment xmlns:dep="http://geronimo.apache.org/xml/ns/deployment-1.1"> <dep:moduleId> <dep:groupId>geronimo</dep:groupId> <dep:artifactId>activemq</dep:artifactId> <dep:version>1.1</dep:version> <dep:type>car</dep:type> </dep:moduleId> <dep:dependencies> <dep:dependency> <dep:groupId>geronimo</dep:groupId> <dep:artifactId>activemq-broker</dep:artifactId> <dep:type>car</dep:type> </dep:dependency> </dep:dependencies> <dep:hidden-classes/> <dep:non-overridable-classes/> </dep:environment> <resourceadapter> <resourceadapter-instance> <resourceadapter-name>ActiveMQ RA</resourceadapter-name> <config-property-setting name="ServerUrl">tcp://localhost:61616</config- property-setting> <config-property-setting name="UserName">geronimo</config-property-setting> <config-property-setting name="Password">geronimo</config-property-setting> <workmanager> <gbean-link>DefaultWorkManager</gbean-link> </workmanager> </resourceadapter-instance> <outbound-resourceadapter> <connection-definition> <connectionfactory interface>javax.jms.ConnectionFactory</connectionfactory-interface> <connectiondefinition-instance> <name>DefaultActiveMQConnectionFactory</name> <implemented-interface>javax.jms.QueueConnectionFactory</implemented- interface> <implemented-interface>javax.jms.TopicConnectionFactory</implemented- interface> <connectionmanager> <xa-transaction> <transaction-caching/> </xa-transaction> <single-pool> <max-size>10</max-size> <blocking-timeout-milliseconds>5000</blocking-timeout-milliseconds> <match-one/> </single-pool> </connectionmanager> </connectiondefinition-instance> </connection-definition> </outbound-resourceadapter> </resourceadapter> <adminobject> <adminobject-interface>javax.jms.Queue</adminobject-interface> <adminobject-class>org.codehaus.activemq.message.ActiveMQQueue</adminobject- class> <adminobject-instance> <message-destination-name>MDBTransferBeanOutQueue</message-destination-name> <config-property-setting name="PhysicalName">MDBTransferBeanOutQueue</config- property-setting> </adminobject-instance> </adminobject> <adminobject> <adminobject-interface>javax.jms.Queue</adminobject-interface> <adminobject-class>org.codehaus.activemq.message.ActiveMQQueue</adminobject- class> <adminobject-instance> <message-destination-name>SendReceiveQueue</message-destination-name> <config-property-setting name="PhysicalName">SendReceiveQueue</config- property-setting> </adminobject-instance> </adminobject> </connector>
The contents of Listing 16-3 are fairly complex, but walking through it one element at a time makes it easier to understand. Tables 16-3 and 16-4 contain descriptions of the allowed contents of a resource adapter deployment plan. Table 16-3 contains a description of the actual contents in the plan displayed in Listing 16-3.
| Item | Description |
|---|---|
| environment | An encapsulating root element for the module plan file. |
| connector | The root element of the deployment descriptor for the resource adapter. This element includes general information and also includes information specific to the implementation of the resource adapter library as specified through the element resourceadapter. |
| moduleId | The unique identifier for the descriptor. |
| dependencies | Holds all the dependency information. |
| hidden-classes | A list of classes that will never be loaded from parent class loaders of this module. The classes are specified in zero or more child filter elements, where each filter element specifies a fully qualified class name or prefix. Essentially, any class that starts with one of the prefixes listed here will be treated as hidden. |
| non-overridable-classes | A list of classes that will only be loaded from parent class loaders of this module (never from the module’s own class loader). Just as with the hidden-classes element, the classes are specified in zero or more child filter elements where each filter element specifies a fully qualified class name or prefix. Essentially, any class that starts with one of the prefixes listed here will be treated as hidden. |
| resourceadapter | A container element holding the resourceadapter-instance and outbound-resourceadapter elements. |
| workmanager | A container element holding one of gbean-link, target-name, or a group of elements including domain, server, application, module, type, and name. The work manager handles work on behalf of the resource adapter in a parallel-processing manner. |
| resourceadapter-instance | A container element to hold the necessary information about the resource adapter and its configuration. |
| resourceadapter-name | A simple name for the resource adapter. |
| outbound-resourceadapter | Specifies information about an outbound resource adapter, including fully qualified names of classes and interfaces required as part of the connector architecture-specified contracts for connection management, level of transaction support provided, one or more authentication mechanisms supported, and additional required security permissions. |
| connection-definition | A container element holding information about a connection that implements a particular interface. |
| connectionfactoryinterface | The fully qualified package path to the implemented interface. |
| connectiondefinitioninstance | Additional interfaces implemented by the connection factory, used by the application. |
| implemented-interface | The actual interface that the implementation covers. |
| connectionmanager | The configuration of the connection manager. |
| container-managed-security | A wrapper element containing information to customize the container-managed security. |
| no-transaction | An empty marker element indicating that the resource adapter does not participate in transactions. |
| local-transaction | An element indicating that the resource adapter can participate in local transactions only. |
| xa-transaction | An element indicating that the resource adapter can participate in distributed transactions. |
| transaction-caching | An element that allows resources to be shared during the duration of the transaction. This is dependent upon whether the resource has been marked as shareable. |
| thread-caching | An element that allows the sharing of a single connection across transactions. |
| transaction-log | An element that allows a local JDBC resource to be able to participate in XA transactions |
| no-pool | Indicates that no connection pool should be used (that is, each request will cause a new connection to be established). |
| single-pool | Indicates that a single connection pool should be used. |
| match-one | This element indicates that the first connection acquired from the pool should be tested for validity against the pooling criteria. |
| match-all | This element indicates that all connection acquired from the pool should be tested for validity against the pooling criteria. |
| select-one-assume-match | This element indicates that no connections acquired from the pool should be tested. |
| partitioned-pool | Indicates that a partitioned connection pool should be used. Partitioned connection pools are segregated into many single pools, using one of the following marker subelements: partition-by-subject or partition-by-connection requestinfo. |
| partition-by-subject | An element to indicate that one partition per subject should be used. |
| partition-by-connectionrequestinfo | An element indicating that one partition per set of connection request information should be used. |
| max-size | The maximum number of connection in a single pool or a partitioned pool. Once this size is reached, requests will begin to block until a connection becomes available. The default is 10. |
| min-size | The minimum number of connection in a single pool or a partitioned pool. The default is zero. |
| blocking-timeoutmilliseconds | This element indicates the timeout period when waiting for a connection to be returned from a pool when all connections in a pool are in use and the pool has already reached its max-size. The default is 5000 milliseconds. |
| idle-timeout-minutes | The amount of time a connection is allowed to go unused before it is automatically closed. The default is 15 minutes. |
| adminobject | Specifies information about an administered object. Administered objects are specific to a messaging style or message provider. This contains information on the Java type of the interface implemented by an administered object, its Java class name, and its configuration properties. |
| adminobject-interface | The interface implemented by the adminobject-class element. |
| adminobject-class | The implementation class of the adminobject-interface element. |
| adminobject-instance | A container element holding the configuration information for this adminobject element. |
| message-destination-name | A unique name for the adminobject to be used for the JNDI ENC. |
| config-property-setting | Contains an arbitrary name/value pair for configuration of the adminobject. |
| gbean | An element for describing GBeans within the resource adapter. |
| Item | Description |
|---|---|
| geronimo/activemq/1.1/car | This is the unique ID that is generated by flattening the contents of the moduleId element. This string doesn’t reside in ra.xml, but is used to uniquely identify it throughout Geronimo. |
| <dependencies> | The necessary dependencies for the ActiveMQ resource adapter configuration. |
| ActiveMQ RA | A simple string name for the resource adapter. |
| DefaultWorkManager | This is a reference to the DefaultWorkManager GBean, which is located in the j2ee-server deployment plan. |
| javax.jms.ConnectionFactory | The fully qualified package name of the interface used by the connection factory. |
| DefaultActiveMQ ConnectionFactory | This item is responsible for creating both queue connections and topic connections, hence the reference to the implemented interfaces javax.jms.QueueConnectionFactory and javax.jms.TopicConnectionFactory. |
| <connectionmanager> | The connection manager is responsible for handling the JMS connections. The elements contained herein tell the connection manager to participate in distributed transactions, to share connections among components, and to maintain a single connection pool whose maximum size is 10 connections with a blocking timeout of 5000 milliseconds to wait for any connection to become available. |
| MDBTransferBeanOutQueue | This is an adminobject for a JMS queue named MDBTransfer BeanOutQueue that exposes the javax.jms.Queue via the org.codehaus.activemq.message.ActiveMQQueue class. |
| SendReceiveQueue | This is an adminobject for a JMS queue named SendReceiveQueue that also exposes the javax.jms.Queue via the org.codehaus.activemq.message.ActiveMQQueue class. |
This list covers the geronimo-connector-1.1 schema, but not the connector-1.5 schema, so it’s not 100 percent exhaustive. Again, the ActiveMQ resource adapter configuration serves the RAR file and is utilized by the Geronimo deployer upon deployment. Now that the allowed content of a resource adapter deployment plan has been discussed, the content of the instance in Listing 16-3 should be explored, as shown in Table 16-4.
Tables 16-3 and 16-4 document not only the allowed content of the Geronimo resource adapter plan (Table 16-3), but also the actual content of the plan (see Table 16-4). The allowed content of the plan actually is the configuration for the resource adapter. The next step is the deployment of these resources to the Geronimo server.
Deploying JMS Resources
When the Geronimo server starts up, the ActiveMQ message broker is started. In addition, some administered objects and a couple of JMS queues are deployed as well. These queues are dependent upon the ActiveMQ broker and are deployed using the Geronimo deployer as demonstrated here. But these queues are present in the ActiveMQ resource adapter plan. As noted earlier in this chapter, the plan files are not distributed with the Geronimo binaries. They are only available in the Geronimo source code.
There are two ways to deploy JMS resources:
-
Via the command line
-
Via the Geronimo Web console
Deploying Via the Command Line
Using the Geronimo deployer to deploy JMS resources via the command line can be accomplished through the use of the deployment plan for the ActiveMQ resource adapter.
Listing 16-4 shows the addition to the plan.
Listing 16-4: Adding a New JMS Topic to the Plan
<adminobject> <adminobject-interface>javax.jms.Topic</adminobject-interface> <adminobject-class> org.codehaus.activemq.message.ActiveMQTopic </adminobject-class> <adminobject-instance> <message-destination-name>ProGeronimoTopic</message-destination-name> <config-property-setting name="PhysicalName"> ProGeronimoTopic </config-property-setting> </adminobject-instance> </adminobject>
This chunk of XML simply tells the ActiveMQ resource adapter to set up a JMS topic whose name is ProGeronimoTopic. To deploy this plan, the following command will be used:
$ ./bin/deploy.sh --user system --password manager deploy /path/to/plan.xml repository/geronimo/activemq-rar/1.1/activemq-rar-1.1.rar Using GERONIMO_BASE: /Users/bsnyder/geronimo-1.1 Using GERONIMO_HOME: /Users/bsnyder/geronimo-1.1 Using GERONIMO_TMPDIR: /Users/bsnyder/geronimo-1.1/var/temp Using JRE_HOME: /System/Library/Frameworks/JavaVM.framework/Versions/1.4/Home Deployed geronimo/activemq/1.1/car
Notice that this command includes not only the plan that was changed but also the ActiveMQ resource adapter archive. The reason for this is that the plan is a JCA resource adapter deployment descriptor. JMS resources are deployed using a resource adapter because that is the contract for communication between a J2EE server and a message broker. Upon executing the previous command, the following log messages will appear in the var/log/geronimo.log file:
19:20:11,617 DEBUG [GBeanInstanceState] GBeanInstanceState for: geronimo.server:J2EEApplication=null,J2EEServer=geronimo,JCAResource=org/apache/ger onimo/SystemJMS,j2eeType=JCAAdminObject,name=ProGeronimoTopic State changed from stopped to starting 19:20:11,640 DEBUG [GBeanInstanceState] GBeanInstanceState for: geronimo.server:J2EEApplication=null,J2EEServer=geronimo,JCAResource=org/apache/ger onimo/SystemJMS,j2eeType=JCAAdminObject,name=ProGeronimoTopic State changed from starting to running
These messages indicate changes of state in the topic named ProGeronimoTopic that was added to the plan. The result is the deployment of the new JMS topic.
Another manner in which to verify that this resource is truly deployed is to verify it in the Geronimo Console. Figure 16-6 shows the console while viewing the JMS service.

Figure 16-6: Verifying that the ProGeronimoTopic is deployed
Creating JMS Resource Groups in the Geronimo Console
The Geronimo console contains a concept known as JMS Resource Groups that are simply a grouping of JMS resources for deployment. A big benefit to working with JMS Resource Groups via the Web console is that it’s easier than working with a deployment plan and a RAR file directly. As shown in Figure 16-6, JMS Resources are listed in the Web console in groups. Adding additional resources is a relatively simply task, which is demonstrated next.
Configure Server Connection
To create a new JMS Resource, click the link to add resources for ActiveMQ. Simply fill in the requested information in the form, as shown in Figure 16-7.
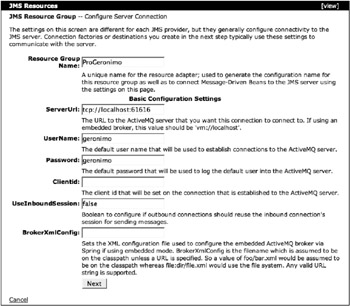
Figure 16-7: Creating JMS Resources for ActiveMQ
Table 16-5 describes the available options within the initial JMS Resource creation screen from Figure 16-7.
| Item | Description |
|---|---|
| Resource Group Name | A unique name to identify the resource group in the Web console and to applications that intend to use the resource group. |
| ServerURL | The URL on which the ActiveMQ message broker has been made available. |
| UserName | The default username for accessing ActiveMQ within Geronimo is simply geronimo. |
| Password | The default password for accessing ActiveMQ within Geronimo is simply geronimo. |
| Clientid | A unique ID for identification of clients connecting to ActiveMQ. This is not required, so it is left blank. |
| UseEmbededBroker | A Boolean value indicating the start of a new ActiveMQ instance. This is usually set to false because there is already an ActiveMQ instance running. |
| UseInboundSession | This Boolean value determines whether a single connection should be shared for the inbound and outbound communications with the resource adapter. |
| BrokerXmlConfig | The configuration file to use for the message broker configuration. If a full URL is not provided, it is assumed the file lives on the classpath. |
Click the Next button and the screen in Figure 16-8 appears, presenting the option of creating either a connection factory or a destination.

Figure 16-8: Create either a connection factory or a destination
Selecting the Connection Factory Type
Upon clicking the button to create a connection factory, the screen in Figure 16-9 is displayed, requesting information for the connection factory.
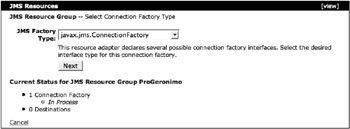
Figure 16-9: Determine the type of connection factory to create
This screen offers the ability to choose the type of connection factory to create. Available choices include the following:
-
javax.jmx.ConnectionFactory - Used to create a connection with the ActiveMQ message broker.
-
javax.jms.QueueConnectionFactory - Used to create a point-to-point QueueConnection with the ActiveMQ message broker.
-
javax.jms.TopicConnectionFactory - Used to create a publish/subscribe TopicConnection with the ActiveMQ message broker.
Simply choose a connection factory type, and click the Next button.
Configure Connection Factory
It’s now time to configure the connection factory. Figure 16-10 shows the screen that should be displayed now. Table 16-6 describes the fields.
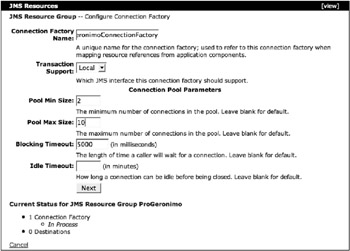
Figure 16-10: Fill in the necessary metadata for the connection factory
| Item | Description |
|---|---|
| Connection Factory Name | A unique name to identify the connection factory in the Web console and to applications that intend to use the resource group. |
| Transaction Support | Choose the type of transactions in which this connection factory should participate. |
| Pool Min Size | The minimum size for the connection pool. The default is zero. |
| Pool Max Size | The maximum size for the connection pool. Once the pool reaches this size, requests for connections will begin to block using the Blocking Timeout waiting for available connections. The default is 10. |
| Blocking Timeout | The duration of time for which requests will be blocked waiting for available connections. The default is 5000 milliseconds. |
| Idle Timeout | The amount of time a connection is allowed to go unused before it is automatically closed. The default is 15 minutes. |
Simply fill in the form, and click the Next button to see the Current Progress screen.
Current Progress
The Current Progress screen is now displayed, as shown in Figure 16-11.

Figure 16-11: The connection factory has been created
This screen demonstrates that the connection factory named ProGeronimoConnectionFactory has been created, but there are no destinations available yet. The next step is to click the Add Destination button to create one.
Select Destination Type
The Select Destination Type screen provides the ability to choose the type of destination to create, as shown in Figure 16-12.
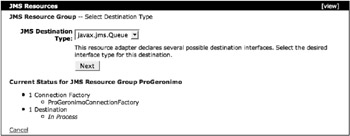
Figure 16-12: Adding a JMS queue
The two destination types available include the following:
-
javax.jms.Queue - Provides point-to-point-style messaging that provides messaging in a one-to-one or many-to-one paradigm.
-
javax.jms.Topic - Provides publish/subscribe-style messaging that provides messaging in a many-to-many paradigm.
Once the destination type has been selected, it must be configured.
Configure Destination
Adding a destination is very simple as shown by Figure 16-13. Table 16-7 shows the options on this screen.
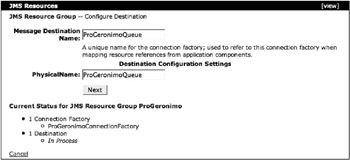
Figure 16-13: Naming the queue
| Item | Description |
|---|---|
| Message Destination Name | A unique name to identify this destination in the Web console and to applications that intend to use the destination. |
| Physical Name | This name can be used to map this destination to a different destination in the message broker. This use case is fairly rare, and providing the same name as the Message Destination Name is very common. |
Click the Next button to proceed to the progress screen again to see what has been added to the ProGeronimo JMS Resource Group.
Current Progress Again
So far, a connection factory and a destination have been added to the ProGeronimo JMS Resource Group, as shown in Figure 16-14.
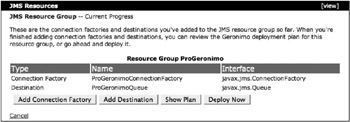
Figure 16-14: The JMS queue has been created
To see the XML plan that is created by this whole process, click the Show Plan button.
Show Deployment Plan
The Deployment Plan text area shows the XML plan resulting from the process of creating the ProGeronimo JMS Resource Group, as shown in Figure 16-15.
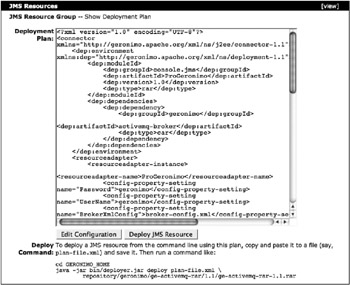
Figure 16-15: Viewing the plan
As Figure 16-15 indicates, this XML plan can be copied, saved to a file, and deployed using the command-line deployer. But why go to that trouble when there is a button right there named Deploy JMS Resource? One answer is that there may be a reason to check this XML plan into a version-control system for tracking and further development. Another reason might be that there may be a policy to deploy from the command line within an IT department across a farm of servers. The point is that the user is given a choice. However, if the Deploy JMS Resource button is clicked, the JMS Resource is deployed, and the Available JMS Resources screen appears, showing something new.
Available JMS Resources
The listing of available JMS Resources now has a new resource named ProGeronimo, as shown in Figure 16-16.
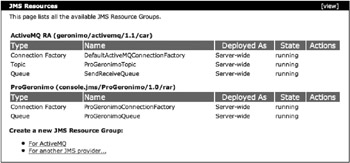
Figure 16-16: The ProGeronimo JMS Resource Group deployed
This resource contains the ProGeronimoConnectionFactory and the ProGeronimoQueue, which are both available for use now.
EAN: 2147483647
Pages: 148