Configuring SONETSDH Interfaces
Configuring SONET/SDH InterfacesSynchronous Digital Hierarchy (SDH) is a CCITT standard for a hierarchy of optical transmission rates. Synchronous Optical Network (SONET) is an American standard that is largely equivalent to SDH. Both are widely used methods for very high speed transmission of voice and data signals across the numerous worldwide fiber- optic networks. Configuring SONET/SDH Physical Interface PropertiesTo configure SONET/SDH physical interface properties, include the sonet-options statement: [edit interfaces so- fpc / pic / port ] sonet-options { aggregate as x ; aps { advertise-interval milliseconds ; authentication-key key ; force; hold-time milliseconds ; lockout; neighbor address ; paired-group group-name ; protect-circuit group-name ; request; revert-time seconds ; working-circuit group-name ; } bytes { e1-quiet value ; f1 value ; f2 value ; s1 value ; z3 value ; z4 value ; } fcs (32 16); loopback (local remote); path-trace trace-string ; (payload-scrambler no-payload-scrambler); rfc-2615; (z0-increment no-z0-increment); } To configure values in SONET header bytes, include the bytes statement. You can configure the following SONET header bytes:
On SONET OC-48 interfaces that you configure for channelized (multiplexed) mode (by including the no-concatenate statement at the [edit chassis fpc slot-number pic pic-number ] hierarchy level), the bytes e1-quiet and bytes f1 options have no effect. The bytes f2 , bytes z3 , bytes z4 , and path-trace options work correctly on channel 0 and work in the transmit direction only on channels 1, 2, and 3. Table 6.7 lists the JUNOS software framing bytes. Table 6.7. SONET/SDH Framing Bytes for Specific Speeds
The use of J0 for framing has been deprecated. For DS-3 channels on a Channelized OC-12 interface, the bytes e1-quiet, bytes f1, bytes f2, bytes z3 , and bytes z4 statements have no effect. The bytes s1 statement is supported only for channel 0; it is ignored if configured on channels 1 through 11. The bytes s1 value configured on channel 0 applies to all channels on the interface. When configured in SDH framing mode, SONET/SDH interfaces on a Juniper Networks router might not interoperate with some older versions of ADMs or regenerators that require an incrementing STM ID. To resolve this incompatibility , you can explicitly configure an incrementing STM ID rather than a static one in the SDH overhead by including the z0-increment statement. You should include this statement only for SDH mode; do not use it for SONET mode. [edit interfaces so- fpc / pic / port sonet-options] z0-increment; By default, SONET interfaces use a 16-bit frame checksum. You can configure a 32-bit checksum, which provides more reliable packet verification. However, some older equipment may not support 32-bit checksums. To configure a 32-bit checksum, include the fcs 32-statement: [edit interfaces so- fpc / pic / port sonet-options] fcs 32; To configure loopback capability on a SONET interface, include the loopback statement. Packets can be looped on either the local or the remote router. [edit interfaces so- fpc / pic / port sonet-options] loopback (local remote); The SONET path trace identifier is a text string that identifies the circuit. To configure a path trace identifier, include the path-trace statement. If the string contains spaces, enclose it in quotation marks. The common convention is to use the circuit identifier as the path trace identifier. If you do not configure an identifier, the JUNOS software uses the system and interface names . The local system's path trace identifier is displayed when you issue a show interfaces command on the remote system. For DS-3 channels on a Channelized OC-12 interface, you can configure a unique path trace for each of the 12 channels. Each path trace can be up to 16 bytes. [edit interfaces so- fpc / pic / port sonet-options] path-trace trace-string ; SONET HDLC payload scrambling, which is enabled by default, provides better link stability. Both sides of a connection must either use or not use scrambling. To disable HDLC payload scrambling , include the no-payload-scrambler statement: [edit interfaces so- fpc / pic / port sonet-options] no-payload-scrambler; RFC 2615 requires certain C2 header byte and frame checksum (FCS) settings that vary from the default values configured in accordance with RFC 1619. The newer values are optimized for stronger error detection, especially when combined with payload scrambling at higher bit rate links. Table 6.8 shows the older (RFC 1619) and newer (RFC 2615) values, together with the Juniper Networks default values. Table 6.8. SONET Default Settings
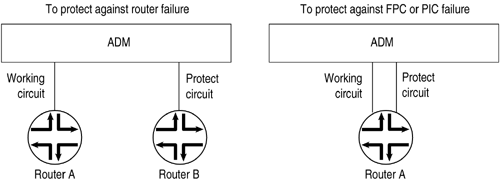
To enable support for the RFC 2615 features, include the rfc-2615 statement: [edit interfaces so- fpc / pic / port sonet-options] rfc-2615; Configuring APSAutomatic Protection Switching (APS) is used by SONET add/drop multiplexers (ADMs) to protect against circuit failures. The JUNOS implementation of APS allows you to protect against circuit failures between an ADM and one or more routers and between multiple interfaces in the same router. When a circuit or router fails, a backup immediately takes over. The JUNOS software supports APS 1+1 switching, bidirectional only, and either revertive or nonrevertive mode. The JUNOS software does not transmit identical data on the working and protect circuits, as the APS specification requires for 1+1 switching, but this causes no operational impact. With APS, you configure two circuits, a working circuit and a protect circuit. Normally, traffic is carried on the working circuit (that is, the working circuit is the active circuit), and the protect circuit is disabled. If the working circuit fails or degrades, or if the working router fails, the ADM and the protect router switch the traffic to the protect circuit, and the protect circuit becomes the active circuit. To configure APS, you configure a working and a protect circuit, as shown in Figure 6.3. To protect against a router failure, you connect two routers to the ADM, configuring one of them as the working router and the second as the protect router. To protect against a PIC or an FPC failure, you connect one router to the ADM through both the working and protect circuits, configuring one of the PICs or FPCs as the working circuit and the second as the protect circuit. Figure 6.3. APS Configuration Topologies To set up a basic APS configuration, configure one interface to be the working circuit and a second to be the protect circuit. If you are using APS to protect against router failure, configure one interface on each router. If you are using APS to protect against FPC failure, configure two interfaces on the router, one on each FPC. For each working “protect circuit pair, configure the following:
The working and protect configurations on the routers must match the circuit configurations on the ADM; that is, the working router must be connected to the ADM's working circuit, and the protect router must be connected to the protect circuit. To set up a basic APS configuration, include the following statements:
When there are multiple reasons to switch between the working and protect circuits, a priority scheme is used to decide which circuit to use. The routers and the ADM might automatically switch traffic between the working and protect circuits because of circuit and router failures. You can also choose to switch traffic manually between the working and protect circuits. There are three priority levels of manual configuration, listed here in order from lowest to highest priority:
To perform a manual switch, include the request statement. This statement is honored only if there are no higher-priority reasons to switch. [edit interfaces so- fpc / pic / port sonet-options aps] request (protect working); When the working circuit is operating in nonrevertive mode, use the request working statement to switch the circuit manually to being the working circuit or to override the revert timer. To perform a forced switch, include the force statement. This statement is honored only if there are no higher-priority reasons to switch. This configuration can be overridden by a signal failure on the protect circuit, thus causing a switch to the working circuit. [edit interfaces so- fpc / pic / port sonet-options aps] force (protect working); To configure a lockout of protection, forcing the use of the working circuit and locking out the protect circuit regardless of anything else, include the lockout statement: [edit interfaces so- fpc / pic / port sonet-options aps] lockout; By default, APS is nonrevertive, which means that if the protect circuit becomes active, traffic is not switched back to the working circuit unless the protect circuit fails or you manually configure a switch to the working circuit. In revertive mode, traffic is automatically switched back to the working circuit. You should configure the ADM and routers consistently with regard to revertive or nonrevertive mode. To configure revertive mode, include the revert-time statement, specifying the amount of time to wait after the working circuit has again become functional before making the working circuit active again: [edit interfaces so- fpc / pic / port sonet-options aps] revert-time seconds ; If you are using nonrevertive APS, you can use the request working statement to switch the circuit manually to being the working circuit or to override the revert timer (configured with the revert-time statement). The protect and working routers periodically send packets to their neighbors to advertise that they are operational. By default, these advertisement packets are sent every 1,000 milliseconds. A router considers its neighbor to be operational for a period, called the hold time , that is, by default, three times the advertisement interval. If the protect router does not receive an advertisement packet from the working router within the hold time configured on the protect router, the protect router assumes that the working router has failed and becomes active. APS is symmetric; either side of a circuit can time out the other side (for example, when detecting a crash of the other). Under normal circumstances, the failure of the protect router does not cause any changes because the traffic is already moving on the working router. However, if you had configured request protect and the protect router failed, the working router would enable its interface. To modify the advertisement interval, include the advertise-interval statement: [edit interfaces so- fpc / pic / port sonet-options aps] advertise-interval milliseconds ;
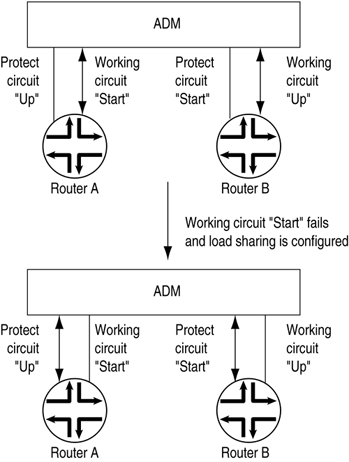
To modify the hold time, include the hold-time statement: [edit interfaces so- fpc / pic / port sonet-options aps] hold-time milliseconds ; When two routers are connected to a single ADM, they can back up each other on two different pairs of circuits. This arrangement provides load balancing between the routers if one of the working circuits fails. Figure 6.4 illustrates load sharing between circuits on two routers. Router A has a working circuit "Start" and a protect circuit "Up," and Router B has a working circuit "Up" and a protect circuit "Start." Under normal circumstances, Router A carries the "Start" circuit traffic, and Router B carries the "Up" circuit traffic. If the working circuit "Start" were to fail, Router B would end up carrying all the traffic for both the "Start" and "Up" circuits. To balance the load between the circuits, you pair the two circuits. In this case, you pair the "Start" and "Up" circuits. Then, if the working circuit "Start" fails, the two routers automatically switch the "Up" traffic from the working to the protect circuit so that each router is still carrying only one circuit's worth of traffic. That is, the working circuit on Router A would be "Up," and the working circuit on Router B would be "Start." Figure 6.4. APS Load Sharing between Circuit Pairs To configure load sharing between two working “protect circuit pairs, include the paired-circuit statement when configuring one of the circuits on one of the routers. In this statement, the group-name is the name of the group you assigned to one of the circuits with the working-circuit and protect-circuit statements. The software automatically configures the remainder of the load-sharing setup based on the group name. [edit interfaces so- fpc / pic / port sonet-options aps] paired-group group-name ; Configuring the Media MTU
The default media MTU size used on a physical interface depends on the encapsulation being used on that interface. To modify the default media MTU size for a physical interface, include the mtu statement: [edit interfaces interface-name ] mtu bytes ; If you change the size of the media MTU, you must ensure that the size is equal to or greater than the sum of the protocol MTU and the encapsulation overhead. You configure the protocol MTU by including the mtu statement at the [edit interfaces interface-name unit logical-unit-number family family ] hierarchy level. Configuring the Clock SourceFor interfaces such as SONET that can use different clock sources, you can configure the source of the transmit clock on each interface. The source can be internal (also called line timing or normal) or external (also called loop timing ). The default source is internal, which means that each interface uses the router's internal Stratum 3 clock. For DS-3 channels on a Channelized OC-12 interface, the clocking statement is supported only for channel 0; it is ignored if included in the configuration of channels 1 through 11. The clock source configured for channel 0 applies to all channels on the Channelized OC-12 interface. The individual DS-3 channels use a gapped 45-MHz clock as the transmit clock. To configure loop timing on an interface, include the clocking external statement: [edit interfaces interface-name ] clocking external; To explicitly configure line timing on an interface, include the clocking internal statement: [edit interfaces interface-name ] clocking internal; Configuring Receive and Transmit Leaky Bucket PropertiesCongestion control is particularly difficult in high-speed networks with high volumes of traffic. When congestion occurs in such a network, it is usually too late to react . You can avoid congestion by regulating the flow of packets into your network. Smoother flows prevent bursts of packets from arriving at (or being transmitted from) the same interface and causing congestion. For all interface types except ATM, Fast Ethernet, and Gigabit Ethernet, you can configure leaky bucket properties, which allow you to limit the amount of traffic received on and transmitted by a particular interface. You effectively specify what percentage of the interface's total capacity can be used to receive or transmit packets. You might want to set leaky bucket properties to limit the traffic flow from a link that is known to transmit high volumes of traffic. The leaky bucket is used at the host “network interface to allow packets into the network at a constant rate. Packets might be generated in a bursty manner, but after they pass through the leaky bucket, they enter the network evenly spaced . In some cases, you might want to allow short bursts of packets to enter the network without smoothing them out. By controlling the number of packets that can accumulate in the bucket, a threshold property can control burstiness. The maximum number of packets entering the network in t time units is threshold + rate * t. By default, leaky buckets are disabled, and the interface can receive and transmit packets at the maximum line rate. For each DS-3 channel on a Channelized OC-12 interface, you can configure unique receive and transmit buckets. To configure leaky bucket properties, include one or both of the receive-bucket and transmit-bucket statements: [edit interfaces interface-name ] receive-bucket { overflow (tag discard); rate percentage ; threshold number ; } transmit-buckets { overflow (discard); rate percentage ; threshold number ; } In the rate statement, specify the percentage of the interface line rate that is available to receive or transmit packets. The percentage can be a value from 0 (none of the interface line rate is available) to 100 (the maximum interface line rate is available). For example, when you set the line rate to 33, the interface receives or transmits at one-third of the maximum line rate. In the threshold statement, specify the bucket threshold, which controls the burstiness of the leaky bucket mechanism. The larger the value, the more bursty the traffic, which means that over a very short amount of time the interface can receive or transmit close to line rate, but the average over a longer time is at the configured bucket rate. The threshold can be a value from 0 through 16,777,215 bytes. For ease of entry, you can enter number either as a complete decimal number or as a decimal number followed by the abbreviation k (1,000) or m (1,000,000). For example, the entry threshold 2m corresponds to a threshold of 2,000,000 bytes. In the overflow statement, specify how to handle packets that exceed the threshold:
Damping Interface TransitionsBy default, when an interface changes from being up to being down, or from down to up, this transition is advertised immediately to the router software and hardware. In some situations, for example, when an interface is connected to an ADM or WDM, or to protect against SONET framer holes, you might want to damp interface transitions, thereby not advertising the interface's transition until a certain period of time has transpired. When you have damped interface transitions and the interface goes from up to down, the interface is not advertised to the rest of the system as being down until it has remained down for the hold-time period. Similarly, when an interface goes from down to up, it is not advertised as being up until it has remained up for the hold-time period. To damp interface transitions, include the hold-time statement. The time can be a value from 0 through 65,534 milliseconds. The time value that you specify is rounded up to the nearest whole second. The default value is 0, which means that interface transitions are not damped. [edit interfaces interface-name ] hold-time up milliseconds down milliseconds ; Configuring Interface EncapsulationPoint-to-Point Protocol (PPP) encapsulation is the default encapsulation type for physical interfaces. You need not configure encapsulation for any physical interfaces that support PPP encapsulation.
For SONET/SDH interfaces, the physical interface encapsulation can be one of the following:
To configure the encapsulation on a physical interface, include the encapsulation statement: [edit interfaces interface-name ] encapsulation (cisco-hdlc cisco-hdlc-ccc cisco-hdlc- tcc frame-relay frame-relay-ccc frame-relay-tcc ppp ppp-ccc ppp-tcc); For Frame Relay encapsulation, you also can configure the encapsulation type that is used inside the Frame Relay packet itself by including the following encapsulation statement, specifying the frame-relay-ccc option: [edit interfaces interface-name unit logical-unit-number ] encapsulation frame-relay-ccc; Configuring Aggregated SONET/SDH InterfacesThe JUNOS software enables link aggregation of SONET/SDH interfaces; this is similar to Ethernet link aggregation, but is not defined in a public standard. You configure an aggregated SONET/SDH virtual link by specifying the link number as a physical device and then associating a set of physical interfaces that have the same speed. By default, no aggregated SONET/SDH interfaces are created. To define the number of aggregated SONET/SDH interfaces, include the device-count statement. The maximum number of aggregated interfaces is 16, and the assigned number can range from 0 through 15. [edit chassis aggregated-devices sonet] device-count number ; To configure aggregated SONET/SDH interfaces, assign a number for the aggregated SONET/SDH interface as x at the [ edit interfaces ] hierarchy level: [edit interfaces] as x { ... } You also need to specify the constituent physical interfaces by including the aggregate statement at the [edit interfaces interface-name sonet-options] hierarchy level. You can optionally specify other physical properties that apply specifically to the aggregated SONET interfaces. To remove the configuration statements related to as x and set the aggregated SONET/SDH interface to down state, delete the interface from the configuration. However, the aggregated SONET/SDH interface is not deleted until you delete the chassis aggregated-devices sonet device-count configuration statement. To associate a physical interface with an aggregated SONET link, include the aggregate statement: [edit interfaces interface-name sonet-options] aggregate as x ; x is the interface instance number and can range from 0 through 15, for a total of 16 aggregated interfaces. You should not mix SONET and SDH mode on the same aggregated interface. The interface instance you specify must match the one you configured as as x at the [edit interfaces] hierarchy level. When you configure the aggregate statement, the only other statement allowed under the sonet-options hierarchy is loopback . You can combine like interfaces only, so each physical interface in the aggregate must be the same speed. You can set the required link speed for all interfaces included in the bundle. All interfaces that make up a bundle must be the same speed. If you include in the aggregated SONET interface an individual link that has a speed different from the speed you specify in the link-speed parameter, an error message is logged. To set the required link speed, include the link-speed statement: [edit interfaces interface-name aggregated-sonet-options] link-speed speed ; speed can be one of the following values:
On aggregated SONET interfaces, you can set the minimum number of links that must be up for the bundle as a whole to be labeled up by including the minimum-links statement. By default, the minimum number is 1. number can be a value from 1 through 8. [edit interfaces interface-name aggregated-sonet-options] minimum-links number ;
To set up firewall filters or sampling on aggregated SONET interfaces, you must configure the as x interface with these properties. The filters function in the same manner as on other interfaces. To configure a filter, include the filter statement: [edit interfaces] asx { unit 0 { family inet { address address { destination address ; } filter { input input-filter-name; output output-filter-name; } } } } |
EAN: 2147483647
Pages: 185