Constraints
3 4
Constraints enforce data integrity automatically. Constraints define rules that determine the data values that are allowed in a column. They allow you to restrict the values that can be entered into a column so that invalid values are not accepted. For example, you could restrict the values of an integer type column to only 1 through 100 by using a constraint. Then any values outside that range could not be inserted into that column. (You would use a CHECK constraint to create this restriction, as shown later.) A constraint on only one column is called a column constraint; it restricts only that column's values. A constraint that affects two or more columns is called a table constraint; it ensures that the combination of values for the columns in the constraint meets the constraint requirements. The five types of constraints are NOT NULL, UNIQUE, PRIMARY KEY, FOREIGN KEY, and CHECK.
Creating and Modifying Constraints by Using T-SQL
In this section, you'll learn about the use of each type of constraint and how to implement the constraints by using T-SQL. In the following section, you'll learn how to implement the constraints by using Enterprise Manager.
NOT NULL
The NOT NULL constraint is fairly simple—in fact, we've already seen it used in the examples in this chapter and in previous chapters. The NOT NULL constraint is placed on a column to simply prevent null values from being inserted into that column (as opposed to the NULL constraint, which allows null values). Using T-SQL, you can specify NOT NULL either at the time of table creation or later, when you are modifying a column. (See Chapter 10 for more details on modifying database tables.) You should use NOT NULL instead of NULL whenever possible because operations that deal with null values, such as comparisons, require more processing overhead. As mentioned earlier in this chapter, it is better to use a default, when possible, than to allow null values.
UNIQUE
The UNIQUE constraint ensures that a column or a set of columns will not allow duplicate values—in other words, the uniqueness of the values in the column or set is enforced. To enforce this uniqueness, SQL Server by default creates a unique nonclustered index on the column or columns in the UNIQUE constraint. You can, however, specify whether the index should be clustered or nonclustered. Remember that a table can have only one clustered index.
NOTE
You'll see the terms "clustered index" and "nonclustered index" used frequently in this chapter. Don't despair if you're unsure of what these terms mean—Chapter 17 describes these types of indexes in detail.
A UNIQUE constraint can be used on any column that is not part of a PRIMARY KEY constraint (covered in the next section), which also enforces unique values. A UNIQUE constraint can be used on columns that allow null values, whereas PRIMARY KEY constraints cannot. Null values are ignored by UNIQUE constraints. A column with a UNIQUE constraint can be referenced by a FOREIGN KEY constraint (described in the section "FOREIGN KEY" later in this chapter). And multiple UNIQUE constraints are allowed on a table, as long as the total number of indexes for that table does not exceed 249 nonclustered and 1 clustered.
To create a UNIQUE constraint on a table by using T-SQL, use the CREATE TABLE or ALTER TABLE command. For example, the following statement creates the customer table with a UNIQUE constraint on the SSN column as a clustered index:
CREATE TABLE customer ( first_name char(20) NOT NULL, mid_init char(1) NULL, last_name char(20) NOT NULL, SSN char(11) NOT NULL UNIQUE CLUSTERED, cust_phone char(10) NULL ) GO
The preceding CREATE statement used a column constraint. The following example again creates the customer table, this time with an added UNIQUE table constraint, named UQ_full_name, on the first_name, mid_init, and last_name columns:
CREATE TABLE customer ( first_name char(20) NOT NULL, mid_init char(1) NULL, last_name char(20) NOT NULL, SSN char(11) NOT NULL UNIQUE CLUSTERED, cust_phone char(10) NULL, CONSTRAINT UQ_full_name UNIQUE NONCLUSTERED (first_name, mid_init, last_name) ) GO
A UNIQUE table constraint (a constraint on more than one column) ensures that the combination of values in the columns is unique. In this case, no two customer names that consist of exactly the same first name, last name, and middle initial can be entered into the database. One or two of these columns can be the same, but not all three. Notice that here the UNIQUE table constraint is a nonclustered index because we already have a unique clustered index on SSN.
To add a UNIQUE constraint to an existing table, use the ALTER TABLE command. If you try to modify an existing column or columns by adding a UNIQUE constraint, all existing rows in the table must contain unique or null values in the column or columns, or you will get an error message and the UNIQUE constraint will not be added. Let's assume we have created the customer table with no constraints at all. Here are the two commands to add both the column and table constraints:
ALTER TABLE customer ADD CONSTRAINT UQ_ssn UNIQUE CLUSTERED (SSN) GO ALTER TABLE customer ADD CONSTRAINT UQ_full_name UNIQUE NONCLUSTERED (first_name, mid_init, last_name) GO
Again, you can add constraints to a table only if the existing data already meets the constraint requirements.
To change an existing UNIQUE constraint on a column or table by using T-SQL, you must first delete the constraint and then re-create it. As you should for defaults, you should use descriptive names for your constraints so that you can find them and drop them easily, without having to determine what names SQL Server assigned to them. As we'll see in the section "Creating and Modifying Constraints by Using Enterprise Manager," when you change a constraint by using Enterprise Manager, SQL Server will automatically delete the old constraint and re-create it when you save the change.
PRIMARY KEY
A PRIMARY KEY constraint is used to specify the primary key of a table, which is a column or set of columns that uniquely identifies a row. Because it identifies the row, a primary key column can never be NULL. This is the difference between a PRIMARY KEY constraint and a UNIQUE constraint, which allows null values. When you define a PRIMARY KEY constraint on a set of columns, the constraint indicates that the combination of those column values must be unique for each row, which is similar to a UNIQUE constraint on a set of columns. And, like the UNIQUE constraint, the PRIMARY KEY constraint does not allow duplicate values. When a PRIMARY KEY is assigned to a column or a set of columns, a unique index is automatically created on the primary key column or columns. You can also specify either a clustered or nonclustered index for a primary key; a clustered index is the default when none is specified, as long as the table does not already have a clustered index.
A table can have only one PRIMARY KEY constraint. An IDENTITY column makes a good candidate for a primary key, as does any other column or set of columns that is unique for each row. For example, in our sample customer table, we could have created the SSN column as the primary key instead of creating a UNIQUE constraint on it. The PRIMARY KEY constraint would not allow null values and would enforce unique values in the SSN column, and a clustered index would automatically be created on the primary key column. The following T-SQL command shows one way to specify the SSN column as the primary key when you are defining a table. This method allows SQL Server to assign a name to the PRIMARY KEY constraint, which is not the preferred method because you might want to delete the key by name later.
CREATE TABLE customer ( first_name char(20) NOT NULL, mid_init char(1) NULL, last_name char(20) NOT NULL, SSN char(11) PRIMARY KEY, cust_phone char(10) NULL ) GO
As an alternative, you can assign a name to the constraint by adding the CONSTRAINT keyword. To assign the name PK_SSN to our PRIMARY KEY constraint, use the following command:
CREATE TABLE customer ( first_name char(20) NOT NULL, mid_init char(1) NULL, last_name char(20) NOT NULL, SSN char(11) CONSTRAINT PK_SSN PRIMARY KEY, cust_phone char(10) NULL ) GO
You can also specify the PRIMARY KEY constraint after all the table columns have been defined. The column name must be enclosed in parentheses and specified after the CONSTRAINT clause when this syntax is used, as shown here:
CREATE TABLE customer ( first_name char(20) NOT NULL, mid_init char(1) NULL, last_name char(20) NOT NULL, SSN char(11), cust_phone char(10) NULL, CONSTRAINT PK_SSN PRIMARY KEY (SSN) ) GO
To add a PRIMARY KEY constraint to a table that does not have a PRIMARY KEY constraint, use the ALTER TABLE command. The following command adds a PRIMARY KEY constraint to the customer table:
ALTER TABLE customer ADD CONSTRAINT PK_SSN PRIMARY KEY CLUSTERED (SSN) GO
Here we have included the optional keyword CLUSTERED just to clarify that a clustered index will be created on the primary key column, although this is the default.
To drop a PRIMARY KEY constraint, use the ALTER TABLE command with the DROP CONSTRAINT clause. Here we drop the constraint on the SSN column:
ALTER TABLE customer DROP CONSTRAINT PK_SSN GO
Notice that only the constraint name is necessary for the DROP CONSTRAINT clause. To change an existing PRIMARY KEY constraint on a table by using T-SQL commands, you must first drop the existing constraint and then alter the table to add the new constraint. You do this by using the ALTER TABLE…DROP CONSTRAINT and ALTER TABLE…ADD CONSTRAINT statements.
FOREIGN KEY
A FOREIGN KEY constraint defines a foreign key, which identifies a relationship between two tables. The foreign key column or columns in one table reference a candidate key—one or more columns—in another table. When a row is inserted into the table with the FOREIGN KEY constraint, the values to be inserted into the column or columns defined as the foreign key are checked against the values in the candidate key of the referenced table. If no row in the referenced table matches the values in the foreign key, the new row cannot be inserted. But if the foreign key values to be inserted into the table do exist in the candidate key of the other table, the new row will be inserted. If the value to be inserted into the table with the FOREIGN KEY constraint is NULL, it is also allowed.
FOREIGN KEY constraints are also checked when you want to update a row in either the referenced table or the foreign key table. You cannot update a candidate key value nor a foreign key value if doing so will violate the constraint. There is an exception to this rule when you update the referenced table: you can update the table by using the ON UPDATE CASCADE option of the T-SQL CREATE TABLE statement. This option is described in the section "Creating and Modifying Constraints by Using Enterprise Manager" later in this chapter.
Additionally, FOREIGN KEY constraints are checked when you want to delete a row from the referenced table. You cannot delete a row from a referenced table if the value in the foreign key column is referenced by a row in the foreign key table (the table that holds the FOREIGN KEY constraint). In other words, for each row in the foreign key table, a corresponding row in the referenced table must exist, and that row cannot be deleted while it is still referenced. There is also an exception to this rule: you can delete a row from the referenced table by using the ON DELETE CASCADE option of the T-SQL CREATE TABLE statement. This option is also described in the section "Creating and Modifying Constraints by Using Enterprise Manager."
A foreign key can reference only columns that have a PRIMARY KEY or UNIQUE constraint in the referenced table. If you try to create a foreign key that references a column that is not part of one of these constraints, SQL Server will return an error message. Also, the data type and size of the foreign key column or columns must match that of the referenced column or columns.
To get a better understanding of foreign keys, let's look at some examples. First we'll create a table named items that has a PRIMARY KEY constraint on the item_id column, as shown here:
CREATE TABLE items ( item_name char(15) NOT NULL, item_id smallint NOT NULL IDENTITY(1,1), price smallmoney NULL, item_desc varchar(30) NOT NULL DEFAULT 'none', CONSTRAINT PK_item_id PRIMARY KEY (item_id) ) GO
Next we'll create a table named inventory with a FOREIGN KEY constraint named FK_item_id that references the item_id column in the items table, as shown here:
CREATE TABLE inventory ( store_id tinyint NOT NULL, item_id smallint NOT NULL, item_quantity tinyint NOT NULL, CONSTRAINT FK_item_id FOREIGN KEY (item_id) REFERENCES items(item_id) ) GO
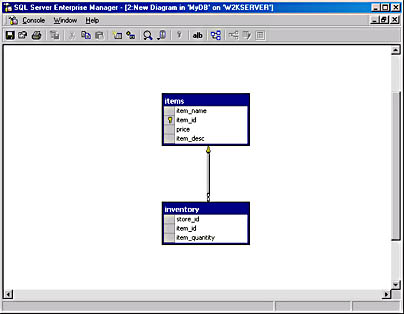
To see how these two tables are related, we create a database diagram, as shown in Figure 16-10. (Instructions for creating a database diagram can be found in Chapter 15.) In this example, items is the referenced table, with a candidate key of item_id. This is the only candidate key possible because it is the primary key in the table and the table has no UNIQUE constraints. Remember, only primary key columns and columns with UNIQUE constraints are valid candidate keys. The inventory table has a FOREIGN KEY constraint defined on its item_id column, creating a foreign key relationship between these two tables. The related columns are both of the data type smallint. Defining a FOREIGN KEY constraint in the inventory table on the item_id column ensures that no item_id value can be inserted into the table if that value does not already exist as an item_id value in the items table. In other words, if an item does not exist in the items table, it cannot exist in the inventory table. Also, a row cannot be deleted from the items table if it is referenced by a row in the inventory table. In other words, if an item exists in the items table and the inventory table, that item cannot be deleted from the items table while it exists in the inventory table. As you might realize by now, foreign keys are used to help keep a consistent database. In our example, for instance, you do not want information about an item to be allowed in tables when there is no record of that item in the items table, which is intended to hold a record for every item available.
To modify a FOREIGN KEY constraint by using T-SQL commands, you must first delete the old constraint and then create a new one by using the ALTER TABLE command. This method is similar to the one used to modify a PRIMARY KEY constraint. Here are the commands to first drop the original constraint on the inventory table and to then add the new constraint:
ALTER TABLE inventory DROP CONSTRAINT FK_item_id GO ALTER TABLE inventory ADD CONSTRAINT FK_item_id FOREIGN KEY (item_id) REFERENCES items(item_id) GO
When you add a FOREIGN KEY constraint to an existing table column, SQL Server checks the existing rows in the table to ensure that the foreign key column values, except null values, have matching values in the PRIMARY KEY or UNIQUE constraint column of the referenced table. To create a FOREIGN KEY constraint without allowing SQL Server to validate existing values, you can use the WITH NOCHECK option of ALTER TABLE, as shown here:
ALTER TABLE inventory WITH NOCHECK ADD CONSTRAINT FK_item_id FOREIGN KEY (item_id) REFERENCES items(item_id) GO
The WITH NOCHECK option prevents SQL Server from checking the existing rows in the table so that the constraint will be added to the table regardless of what the existing values are. After the constraint is added, SQL Server enforces foreign key integrity for future inserted rows.
CAUTION
Be careful when using the WITH NOCHECK option if you plan to perform updates later on the existing data. An update will fail if attempted on a row containing a value in the foreign key column that does not comply with the constraint.
You can also enable or disable the use of a FOREIGN KEY constraint. If you want to insert a row that does not comply with an existing constraint, you can temporarily disable the constraint, insert the row, and then re-enable the constraint. The NOCHECK keyword indicates that the constraint should be ignored (disabled), and the CHECK keyword indicates that the constraint should be enabled. The following commands disable and re-enable a FOREIGN KEY constraint by using the NOCHECK and CHECK keywords:
ALTER TABLE inventory NOCHECK CONSTRAINT FK_item_id --Disables the constraint GO --INSERT statement goes here GO ALTER TABLE inventory CHECK CONSTRAINT FK_item_id --Re-enables the constraint GO
CAUTION
You should not insert a row of data that does not comply with the FOREIGN KEY constraint unless absolutely necessary. If you do so, future table updates might fail.
CHECK
The CHECK constraint is used to restrict the values allowed in a column to specific values. The values to be inserted or updated in a column are validated if they return TRUE from the specified Boolean search condition in the constraint. For example, if we wanted to restrict the possible range of values that will be allowed in the price column of the items table to $0.01 through $500.00, we would use the following statement:
CREATE TABLE items ( item_name char(15) NOT NULL, item_id smallint NOT NULL IDENTITY(1,1), price smallmoney NULL, item_desc varchar(30) NOT NULL DEFAULT 'none', CONSTRAINT PK_item_id PRIMARY KEY (item_id), CONSTRAINT CK_price CHECK (price >= .01 AND price <= 500.00) ) GO
Notice that we allow NULLs in the price column and that we also have a CHECK constraint on the column. Because SQL Server can distinguish a null value from any other type of value, NULLs are allowed in the price column despite the CHECK constraint. Also, notice that we gave this constraint the name CK_price. As we've seen, assigning a constraint name makes it easier to later drop and re-create the constraint by name, using T-SQL. For instance, to change the range of values to $1.00 through $1000.00, use the following statement:
ALTER TABLE items DROP CONSTRAINT CK_price GO ALTER TABLE items ADD CONSTRAINT CK_price CHECK (price >= 1.00 AND price <= 1000.00) GO
The second ALTER TABLE command is the same one you would use if you added this constraint for the first time to an existing items table. When you are adding a CHECK constraint to an existing table, the same rules apply as when you add a FOREIGN KEY constraint. The existing rows will be checked against the constraint. If they do not all return TRUE, the constraint will not be added to the table, and SQL Server will return an error message stating that the ALTER TABLE statement had a conflict because of the CHECK constraint. If you must, use WITH NOCHECK to specify that existing rows should not be validated but that future updates and rows added later should be validated.
CAUTION
Using WITH NOCHECK is not recommended because a later update might fail on a row that does not comply with the constraint.
Here is an example of using WITH NOCHECK when the CK_price constraint is added:
ALTER TABLE items WITH NOCHECK ADD CONSTRAINT CK_price CHECK (price >= 1.00 AND price <= 1000.00) GO
You can also enable and disable a CHECK constraint as you can a FOREIGN KEY constraint, using the CHECK and NOCHECK keywords with ALTER TABLE. You might want to use this technique to insert one price that is out of the specified range but is still valid. The following example disables and then re-enables the CK_price CHECK constraint:
ALTER TABLE items NOCHECK CONSTRAINT CK_price --Disables constraint GO --INSERT statement goes here GO ALTER TABLE items CHECK CONSTRAINT CK_price --Re-enables constraint GO
NOTE
CHECK and FOREIGN KEY are the only types of constraints that can be disabled and enabled in this manner.
Creating and Modifying Constraints by Using Enterprise Manager
In this section, you'll learn how to create, modify, and delete constraints by using the Enterprise Manager Design Table window and, in the case of FOREIGN KEY constraints, a database diagram. (Instructions for creating a database diagram can be found in Chapter 15.) The Design Table window appears when you create or edit a table by using Enterprise Manager. To create a table, expand the Server and Database folders in the left pane of Enterprise Manager, right-click Tables, and then choose New Table from the shortcut menu. To display the Design Table window for an existing table, first click Tables, right-click the table name in the right pane, and then choose Design Table from the shortcut menu.
Allow Nulls
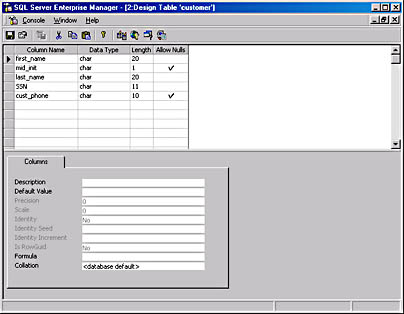
To specify whether null values should be allowed in a column, simply select or clear the appropriate cell under the Allow Nulls heading in the Design Table window. You can set this option either when you create the table or when you modify it. (For rules on allowing null values, see Chapter 10.) Figure 16-11 shows the Design Table window for the customer table we created in the section "Creating and Modifying Constraints by Using T-SQL" earlier in this chapter. As you can see, the mid_init and cust_phone columns allow null values, but the other three columns do not.
UNIQUE
To create or modify a UNIQUE constraint by using Enterprise Manager, follow these steps:
- In the Design Table window, click the Table And Index Properties button on the Design Table toolbar (the button to the right of the Save button), and then click the Indexes/Keys tab in the Properties window that appears. Figure 16-12 shows the Indexes/Keys tab of the Properties window for the customer table. This tab will show any UNIQUE constraints because they are actually unique indexes.
This table was created by using the following statement, which includes a UNIQUE constraint as a clustered index on the SSN column. (SQL Server automatically named the index UQ_customer_398D8EEE; you can see why it is helpful to specify your own constraint and index names.)
CREATE TABLE customer ( first_name char(20) NOT NULL, mid_init char(1) NULL, last_name char(20) NOT NULL, SSN char(11) NOT NULL UNIQUE CLUSTERED, cust_phone char(10) NULL ) GO
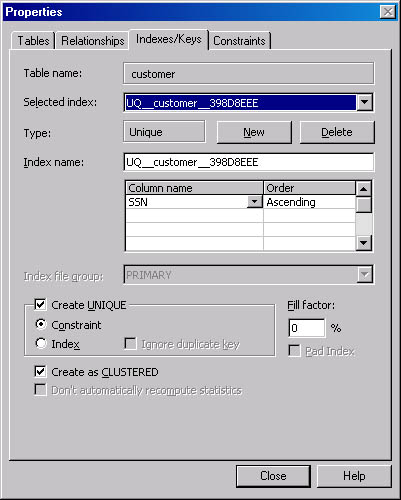
Figure 16-12. The Indexes/Keys tab of the Properties window for the customer table.
- To create a new UNIQUE constraint, begin by clicking the New button on the Indexes/Keys tab of the Properties window. Select the names of the columns that you want to be part of the constraint, type the name of the new constraint, and then select the Create UNIQUE check box. Select the Create As CLUSTERED check box if you want this to be the clustered index on the table, and specify a fill factor if you want. If you do not want SQL Server to automatically recompute this index's statistics periodically, select the check box next to that option as well.
- You can use the Properties window to modify a UNIQUE constraint—for example, you can change the constraint name, specify the columns to which the constraint is attached, set the clustered index option, and choose the fill factor for the index. (Fill factor is described in detail in Chapter 17.) Make any changes you want to this constraint. When you are done, click Close and then click the Save button in the Design Table window to save your changes.
PRIMARY KEY
You can specify a PRIMARY KEY constraint on one column or on multiple columns. These columns should uniquely identify each row in the table. To specify a PRIMARY KEY, follow these steps:
- In the Design Table window, select a column by clicking in one of the cells in its row. (You can select multiple columns by holding down the Ctrl key and clicking the gray boxes to the left of the column names.)
- Right-click one of the selected columns and choose Set Primary Key from the shortcut menu. A small key will appear to the left of the columns you set as the primary key. Figure 16-13 shows the Design Table window for the customer table after the SSN column was set as the primary key. The UNIQUE constraint was also removed from the SSN column by deleting the unique index because it is not necessary to have both a UNIQUE constraint and a PRIMARY KEY constraint on the same column.
Figure 16-13. Setting a PRIMARY KEY constraint in the Design Table window.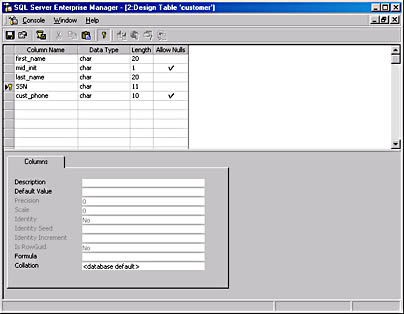
- If you want to change the PRIMARY KEY constraint to another column, simply set the new column as the primary key. You are not required to explicitly remove the original primary key first—SQL Server drops and re-creates the PRIMARY KEY index for you. You can also modify the PRIMARY KEY index in the Properties window. Again, your changes will take effect when you save your work by clicking the Save button on the toolbar.
NOTE
If you have modified the PRIMARY KEY constraint on a table that has existing data, the re-creation of the index might take some time. If your table contains a lot of data and you specified a major change in the index, such as changing the columns or the cluster status, you should perform this kind of change during periods of off-peak use of the database, if possible.
FOREIGN KEY
To create or modify a FOREIGN KEY constraint by using Enterprise Manager, you can use the Design Table window, or you can create a database diagram of the tables to be involved in the foreign key relationship. It is always best to create the foreign key relationships at table creation time (or at least before any data is inserted into the tables). You'll see why in the following example. First you'll learn how to use the Design Table window to create a FOREIGN KEY constraint. We will build a foreign key relationship between two tables described earlier in this chapter, items and inventory. We will re-create the items table with a PRIMARY KEY constraint (which we used before) but without the IDENTITY property on the item_id column, because we will be working through an example where this column is updated, and you cannot update an IDENTITY column without doing some extra work. We will also re-create the inventory table without the FOREIGN KEY constraint so that we can add it later. Here are the CREATE TABLE statements used for both tables:
CREATE TABLE items ( item_name char(15) NOT NULL, item_id smallint NOT NULL, price smallmoney NULL, item_desc varchar(30) NOT NULL DEFAULT 'none', CONSTRAINT PK_item_id PRIMARY KEY (item_id) ) GO CREATE TABLE inventory ( store_id tinyint NOT NULL, item_id smallint NOT NULL, item_quantity tinyint NOT NULL ) GO
To add a FOREIGN KEY constraint on the inventory table, follow these steps:
- Right-click the inventory table name in the right pane of Enterprise Manager and choose Design Table. Right-click in an open space in this window and choose Relationships from the shortcut menu. The Properties window will appear with the Relationships tab open, as shown in Figure 16-14.

Figure 16-14. The Relationships tab of the Properties window for the inventory table.
- Click New. Default data will appear in the window, as shown in Figure 16-15.
- We select the primary key table to be items (instead of customer), and we select the item_id column for the foreign key relationship between the items and inventory tables. To do this, just click in one of the empty rows below the table names, and the possible column choices will appear in a drop-down menu. Once you have selected the appropriate tables for the relationship, the name in the Relationship Name box changes, as shown in Figure 16-16.

Figure 16-15. The Relationships tab with default entries after clicking New.
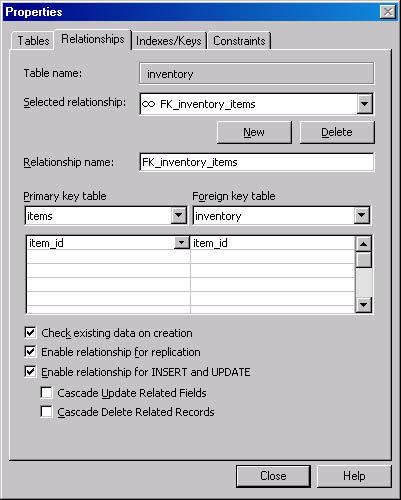
Figure 16-16. The Relationships tab showing a foreign key relationship between the items and inventory tables.
- Several check boxes appear at the bottom of this window. Sample selections are shown in Figure 16-17. Select the Check Existing Data On Creation option if you want SQL Server to check existing data against the foreign key relationship. If the data does not comply, the constraint creation will fail. Clear this check box only if you have no data yet, you know that the existing data is already compliant with the constraint, or you do not want existing data to comply for a particular reason. This could cause problems if you try to update or delete one of those existing rows later, though.
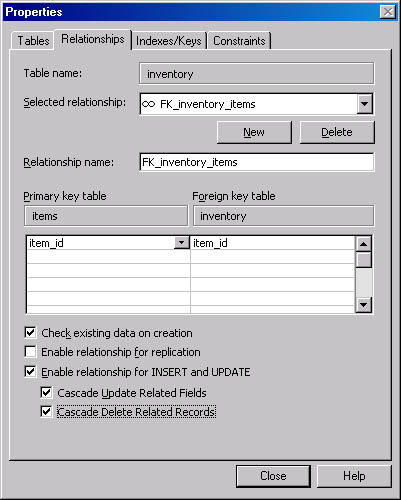
Figure 16-17. The Relationships tab showing check box options selected.
- The next check box is Enable Relationship For Replication. Do not select this if you are not using replication. Even if you are using replication, you still do not need to select this check box because the data will already be checked against the constraint in the original tables, so it should not have to be checked again upon replication. If you do enable the relationship for replication, and if the replication schedules of the two tables in the relationship are not well synchronized, you will receive errors during replication that indicate a row could not be replicated because it violated the foreign key constraint.
- The next check box is Enable Relationship For INSERT And UPDATE. Selecting this check box means that the FOREIGN KEY constraint will be checked when you perform inserts and updates, as well as deletes. If this is your intent, select this check box. The two check boxes below will become available. They are Cascade Update Related Fields and Cascade Delete Related Records. ("Record" refers to a row of data.)
- Selecting Cascade Update Related Fields means that if you update the referenced column of the referenced table (such as by updating an item_id value in the items table), that update will be cascaded to the foreign key table. (In this case, that same item_id value will be updated if it exists in the inventory table.) Only the column value will be updated; the rest of the information in the row in the foreign key table will remain the same. Selecting this option also allows the update of the referenced column to occur. If you do not select this option, you will not be allowed to update a referenced column if it exists in the table with the foreign key. You will get an error message from SQL Server similar to the following: "UPDATE statement conflicted with COLUMN REFERENCE constraint 'FK_inventory_items'. The conflict occurred in database 'MyDB', table 'inventory', column 'item_id'. The statement has been terminated."
- Selecting Cascade Delete Related Records means that a delete from the referenced table will be cascaded to the foreign key table. For example, if a row in the items tables is deleted and a row in the inventory table has the same item_id value as the deleted row, that row will be deleted from the inventory table as well. This keeps your information consistent. If you do not select this option, you will not be allowed to delete a row from the referenced table if it is referenced by a row in the foreign key table. You will get an error message from SQL Server similar to the following: "DELETE statement conflicted with COLUMN REFERENCE constraint 'FK_inventory_items'. The conflict occurred in database 'MyDB', table 'inventory', column 'item_id'. The statement has been terminated."
- When you have finished selecting your options, click Close and then click the Save button in the Design Table window to save your changes. Another window will appear stating that the listed tables will be saved to your database, and it lists the two tables in the foreign key relationship. Click Yes to finish. Then you can close the Design Table window by clicking the Close button in the top right corner of that window (not of the Enterprise Manager window, or you will close Enterprise Manager).
There is another method you can use to create or modify a FOREIGN KEY constraint: the database diagram method. To learn how to create and modify a FOREIGN KEY constraint by using a database diagram, we will develop a diagram using the same two tables we used in the previous example, items and inventory. First we'll look at a database diagram of these tables without a foreign key relationship, and then we'll add a foreign key. The initial database diagram is shown in Figure 16-18.

As you can see in Figure 16-18, the item_id column in the items table is a primary key column. This is the only candidate for a foreign key reference because there are no UNIQUE constraints on the items table. To create a foreign key relationship between the item_id column in the inventory table and the item_id column in the items table, follow these steps:
- Click in the far left side of the row (in the gray box) for the item_id column in the items table, and hold down the mouse button while you drag the cursor to the inventory table. (You'll see a dotted line following the cursor.) Release the mouse button when you are pointing to the item_id column's row in the inventory table. The Create Relationship dialog box will appear, as shown in Figure 16-19. This is similar to the Properties window from the Design Table window, as shown previously. The item_id column will appear in each table's column in the dialog box, indicating that the foreign key relationship will be between the two item_id columns.
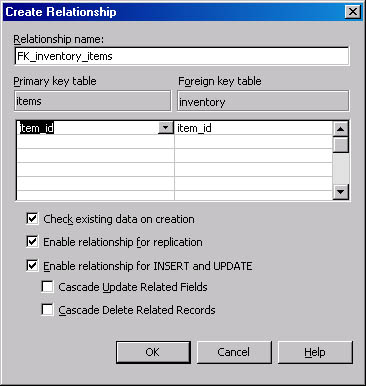
Figure 16-19. The Create Relationship dialog box showing the proposed foreign key relationship.
- You can change the relationship name if you want. Select or clear the check boxes at the bottom of the dialog box to choose the options you want. These options were described earlier in this section.
- Click OK when you're finished to create the relationship in the diagram, as shown in Figure 16-20. (It is not saved yet.) A line with a key on the end runs from the foreign key table to the referenced table.
- Click the Save button to save your changes. You will be asked to name the database diagram and then to confirm the changes to the involved tables. Click Yes to finish.
Figure 16-20. Database diagram showing the foreign key relationship.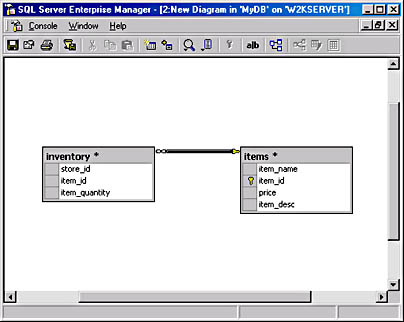
To modify a FOREIGN KEY constraint, you can use the two methods described in this section, in a similar manner. In the Design Table window, simply open the Relationships tab again, make your changes, and save your work. In the database diagram, right-click the foreign key line in the diagram and choose Properties to make changes to the constraint, or choose Delete Relationship From Database to completely delete the constraint. You can then create a new one if you want.
CHECK
To create a CHECK constraint by using the Design Table window, open the Design Table window for the table you want to work with, and follow these steps:
- Right-click in the Design Table window and choose Properties from the shortcut menu to display the Properties window. Click the Check Constraints tab, shown in Figure 16-21, and click New for the items table.
- Next type the expression you want to use for validating data that is inserted or updated. In our example, we'll add a CHECK constraint on the price column of the items table so that values only from $1.00 through $1000.00 can be inserted into the table, as shown in Figure 16-22.
- Notice the three check boxes at the bottom. Selecting Check Existing Data On Creation means that the existing data in the table will be checked against the CHECK constraint and that if it does not comply, the constraint will not be created. Selecting Enable Constraint For Replication means that the constraint will be checked when the data is replicated. The data should have been checked before it got into the original table, so selecting this option means the data is unnecessarily checked again when it is replicated. Selecting Enable Constraint For INSERT And UPDATE simply means that the CHECK constraint will be enabled. If you do not select this check box, the constraint will be created, but it will not be enabled and thus will have no effect.
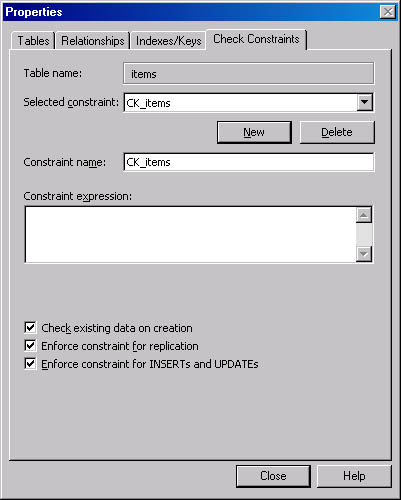
Figure 16-21. The Check Constraints tab of the Properties window.

Figure 16-22. Adding a CHECK constraint on the price column of the items table.
- Click Close and then click the Save button to save the new constraint.
To modify a CHECK constraint, use the Constraint tab to modify the name, the expression, and the check box options. In Figure 16-23, the CHECK constraint on the price column has been changed from a range of $1.00 through $1000.00 to a range of $1.00 through $99.00.
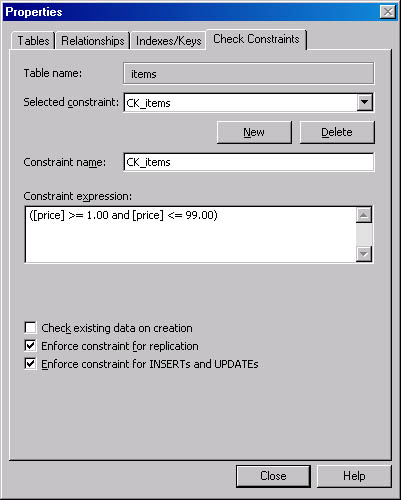
Figure 16-23. Modifying the CHECK constraint.
Notice that the Check Existing Data On Creation option is now cleared because the constraint was already created. If you want to verify the existing data against the modified range, select this check box. If the check fails for the existing data, you will get an error message and the constraint will not be modified.
You can also use the Check Constraints tab to delete a CHECK constraint by selecting the name of the constraint you want in the Selected Constraint list box and clicking Delete.
EAN: N/A
Pages: 264