Defaults
3 4
First let's talk about the reason you might want to use defaults for certain table columns by looking at what happens if you don't use a default. If a row is inserted into a table containing columns without default values and the data values for one or more nullable columns are not specifically entered, those nullable columns will be given the value NULL. But if a column was defined as NOT NULL and you do not supply a value for that column when inserting a row, an error message will be returned, informing you that NULL cannot be inserted into the column. This is when defaults come in handy. Defaults can be used to specify a value to be inserted in place of NULL so that you do not receive an error message. You should use defaults on your columns instead of allowing null values because operations on nullable columns require more processing overhead than those on non-nullable columns.
Microsoft SQL Server 2000 enables you to define a default for each column in a table. You cannot define a default for columns that have a timestamp data type or the IDENTITY or ROWGUIDCOL property, as those columns must have unique values. These column types are not compatible with a default because if a default is used more than once for a column, that column will no longer have unique values. You can assign only one value as the default, and it will be used automatically every time it's needed. And here is an important note about defaults: the value specified as the default definition for a column must be compatible with the data type for that column.
A default definition can be created and modified in several ways. In this section, we'll look at how to define a default value at table creation and how to modify a column to add or change a default, first by using T-SQL and then by using Enterprise Manager. Remember, in Chapter 15 we talked about adding a column with a default value to a table and how this affects the existing rows in the table. You will see a less detailed example of that here. We will also examine the available options and the effects of adding a default to an existing column in a table.
Defining and Modifying Defaults by Using T-SQL
You can define a default on a column by using one of three T-SQL statements: CREATE TABLE, ALTER TABLE, or CREATE DEFAULT. CREATE DEFAULT, which is available in SQL Server 2000 for backward compatibility, creates a Default object. When you use this method, SQL Server stores the object apart from the table, so you must bind the object to a column or columns by using the system stored procedure sp_bindefault. If you drop the table, the DEFAULT definition will be automatically unbound from the table, but the Default object will still exist. If you use the CREATE TABLE or ALTER TABLE method, however, SQL Server will store the DEFAULT definition with the table, and if the table is dropped, the default itself is automatically dropped as well, without your having to perform any extra steps. For this reason, it is generally recommended that you do not use CREATE DEFAULT. Using a Default object might be beneficial, however, when the same default will be used for multiple columns.
You should use SQL Server Query Analyzer to run your T-SQL statements because the output will appear in a GUI. This is easier to read than if you run the statements in a command prompt window.
CREATE TABLE with DEFAULT
Creating a default on a column by using the CREATE TABLE command is the preferred, standard technique. The following statement creates a table in MyDB that has defaults defined for both columnA, a char type column, and columnB, an int type column:
USE MyDB CREATE TABLE MyTable ( columnA char(15) NULL DEFAULT 'n/a', columnB int NULL DEFAULT 0 ) GO
The default value n/a for columnA is compatible with the char data type of that column, and the default value 0 for columnB is compatible with the int data type. If no value is specified for one or both of these columns when a row is inserted into the table, the default value will be used. Therefore, the only way one of these columns can contain a NULL is if NULL is explicitly inserted. Null values are allowed because both columns are nullable. If the columns were defined as NOT NULL, you could not explicitly insert the value NULL.
ALTER TABLE with DEFAULT
To change a DEFAULT definition on a column or add one to a column, you can use the ALTER TABLE command. If a default has already been defined and you want to change it by using this command, you must first drop the existing default by name and then add the new one. (If you use Enterprise Manager, you will not have to perform this step; therefore, you will find that using Enterprise Manager is the easier method. After you have altered a table by using Enterprise Manager, you can, at any time, generate the scripts to re-create the table as well.)
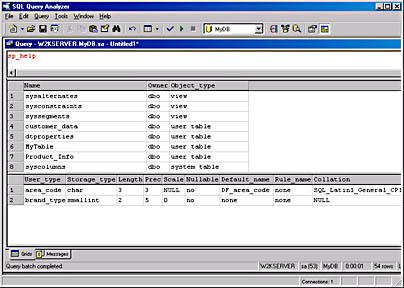
Let's assume you do want to change an existing default. If you created the default by using the CREATE TABLE command or by using Enterprise Manager, which is described later in this chapter, but did not name the default yourself, SQL Server automatically named the default for you. To find out what name the default was assigned by SQL Server so that you can drop the default by using T-SQL, you can run the sp_help stored procedure with the name of the table in which the default exists, such as
USE MyDB GO sp_help MyTable GO
The names of all the default constraints on MyTable appear at the end of the output under the column heading constraint_name, as shown in Figure 16-1.

Suppose we want to change the default value for columnA from n/a to not applicable. Remember that we must first drop the existing default and then add the new one. To drop this default, use the following command:
ALTER TABLE MyTable DROP CONSTRAINT DF_MyTable_columnA_1920BF5CGO
Now we can add a new default, this time naming it ourselves, by using the following command:
ALTER TABLE MyTable ADD CONSTRAINT DF_MyTable_columnA DEFAULT 'not applicable' FOR columnA GO
When you change an existing default on a column, all existing rows will keep their original values for that column, even if a value is NULL. Only newly inserted rows will use the new default value.
Again, as we saw in Chapter 15, you can also add an entirely new column to an existing table and assign it a default value by using the ALTER TABLE command, as shown here:
ALTER TABLE MyTable ADD columnC tinyint NOT NULL DEFAULT 13 GO
Now the MyTable sample table has another column, columnC, which has a default value of 13. Because columnC is a new column and is defined as NOT NULL, any existing data rows in the table will be assigned the default value 13 in the new column.
If the new column allowed NULLs, all existing rows would, by default, get NULL for the value in the new column. If we wanted the default value inserted for each existing row instead of NULL, we would use the WITH VALUES option of DEFAULT, as shown here:
ALTER TABLE MyTable ADD columnC tinyint NULL DEFAULT 13 WITH VALUES GO
WITH VALUES will force all existing rows in MyTable to receive the value 13, instead of the value NULL, for the new column.
Now that you know how to create a DEFAULT definition that is stored with a table, let's look at using CREATE DEFAULT. This method creates a Default object that is stored apart from the table.
CREATE DEFAULT and sp_bindefault
You can also add a default to an existing column or change a default on a column by first creating a Default object, using the T-SQL CREATE DEFAULT command. If you create a Default object, you can later bind it to a column or to a user-defined data type by using the system stored procedure sp_bindefault. As mentioned, this method still exists in SQL Server 2000 for backward compatibility only; it is not the preferred method. It might be useful, however, if you will be using the same default for columns in more than one table.
Let's look at an example that uses CREATE DEFAULT to create a Default object that is named DF_not_applicable and has a value of n/a. The default will be created in the MyDB database and will then be bound to columnA of MyTable (assuming no defaults exist for the table). The syntax for CREATE DEFAULT is shown here:
CREATE DEFAULT default_name AS constant_expression
The syntax for sp_bindefault is shown here:
sp_bindefault '<I>default_name', table.column | user_defined_datatype [, futureonly]
The parameter default_name is the name of the Default object. Table.column specifies the column to which you want to assign the default.
The following T-SQL statements create our sample Default object and bind it to columnA of MyTable:
USE MyDB GO CREATE DEFAULT DF_not_applicable AS 'n/a' GO sp_bindefault 'DF_not_applicable', 'MyTable.columnA' GO
If a default already exists on columnA, SQL Server will return an error message informing you that you cannot bind a default to a column that already has a default. Remove that default first and then bind the new default to the column. (The process of using DROP DEFAULT to remove a Default object is described later in this section.)
You can also create a Default object and bind it directly to a user-defined data type. Any column that is assigned that particular data type will inherit the default property automatically. You can use the option futureonly with sp_bindefault when you are binding the Default object to a user-defined data type. This option prevents existing columns of that user-defined data type from inheriting the new default; thus, only newly created columns of the user-defined data type will inherit the bound default. If futureonly is not specified, SQL Server will bind the default to all existing and newly created columns of that user-defined data type.
For example, let's create a user-defined data type named area_code and a Default object that is named DF_area_code and has the value 786; we'll then bind this default to the user-defined data type. (Creating user-defined data types was described in Chapter 10.) Because this is a new user-defined data type and therefore no columns of this type yet exist, the futureonly option is not required. We'll include it anyway so that we can see the syntax, which simply will have no effect. The statements look like this:
sp_addtype 'area_code', 'char(3)', 'NOT NULL' GO CREATE DEFAULT DF_area_code AS 786 GO sp_bindefault 'DF_area_code', 'area_code', 'futureonly' GO
To view the data type and see the default assigned to it, use the system stored procedure sp_help, as shown in Figure 16-2.
sp_unbindefault
To unbind a Default object from a column or a user-defined data type, use sp_unbindefault followed by the table name and column name or by the user-defined data type name. For example, to unbind DF_not_applicable, the Default object that we previously bound to columnA of MyTable, use the following statement:
sp_unbindefault 'MyTable.columnA' GO
To unbind the default we bound to the user-defined data type area_code, use this statement:
sp_unbindefault 'area_code' GO
When you do this, all columns that had been assigned the user-defined data type area_code no longer have the default property.
You can bind a Default object to more than one column by using separate sp_bindefault statements. Also, if you unbind a default from a column, you can bind it back again, as long as you do not delete the Default object itself. To delete a Default object, use the DROP DEFAULT statement, as shown here:
DROP DEFAULT DF_area_code GO
Once a Default object has been dropped, it cannot be retrieved. You must use CREATE DEFAULT to re-create the object if you want to use it again.
Defining and Modifying Defaults by Using Enterprise Manager
As you saw in Chapter 15, using enterprise manager is probably the easiest way to create, view, and modify your database tables. When you create or modify a table or column by using Enterprise Manager, SQL Server automatically takes care of executing the appropriate t-sql commands to perform the work for you. (For step-by-step instructions on how to create a table by using Enterprise Manager, see Chapter 10.) In this section, we'll look at the specifics of using Enterprise Manager to assign a default definition to a column, modify a default on a column, and create a Default object. This is the preferred method. Let's start with examples of assigning and modifying default definitions.
Assigning and Modifying Default Definitions
Suppose we have a table named Product_Info in the MyDB database. The table structure is shown in Figure 16-3. (Refer to Chapter 10 for instructions on using Enterprise Manager to create this table.)
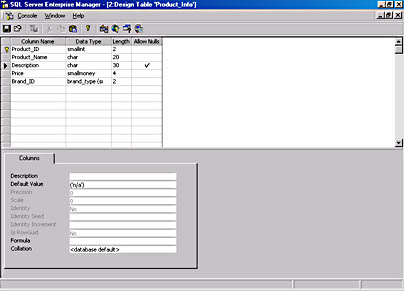
To define a default, simply click the name of the column to which you want to assign the default, and type the default value next to Default Value on the Columns tab at the bottom of the window. In Figure 16-3, a default value of 'n/a' has been assigned to the Description column; this might be a placeholder value indicating that a description is not yet known for a product. Also, the default value is enclosed in parentheses—Enterprise Manager adds these for you automatically when you save the table.
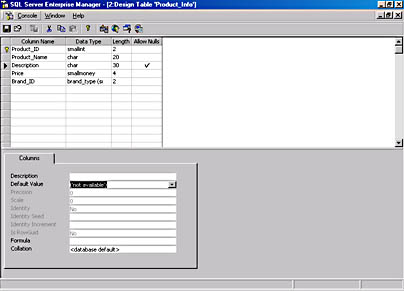
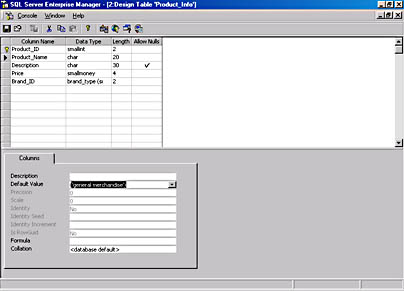
Changing a default value is just as simple. Replace the original default value with the new default value, and save your work by clicking the Save button. Figure 16-4 shows the Description default changed to 'not available'; Figure 16-5 shows a default of 'general merchandise' added to Product_Name.
NOTE
If you enter a character string for the default value, you must enclose it in single quotation marks or you'll get an error message from SQL Server when you try to save the change.
As with T-SQL, when you create or change a default on an existing column using Enterprise Manager, the existing rows in the table are not affected—only newly inserted rows will use the new default. If you add a new column to the table and assign it a default value, any existing rows of data will get the default value for that new column only if NULLs are not allowed. If NULLs are allowed, existing rows will be assigned the value NULL in the new column. To allow NULLs for a new column and also force the default value to be inserted into all existing rows, use the technique described in the section "ALTER TABLE with DEFAULT" earlier in this chapter.
Creating and Managing Default Objects
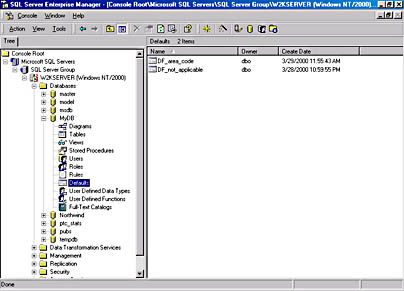
You can also create a Default object and view existing Default objects by using Enterprise Manager. To view any existing Default objects, open Enterprise Manager, expand the server and the database that you want to use, and click Defaults. All existing Default objects will appear in the right pane, as shown in Figure 16-6. Notice that the DF_not_applicable and DF_area_code defaults we created earlier in this chapter by using the CREATE DEFAULT statement are visible.
To create a new Default object and bind the default to a column or user-defined data type by using Enterprise Manager, follow these steps:
- Expand the server and the database, right-click Defaults, and choose New Default from the shortcut menu to display the Default Properties window, as shown in Figure 16-7. We'll name the Default object DF_none and assign it a value of 'none'. Click OK when you have finished.
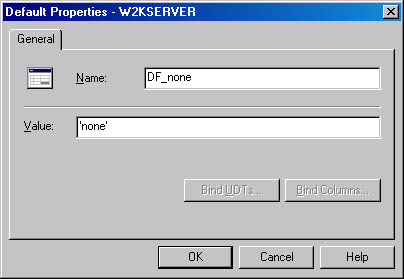
Figure 16-7. The Default Properties window.
- To bind your default to a user-defined data type or to a column, right-click the name of the default (in this case, DF_none) in the right-hand pane of Enterprise Manager and choose Properties from the shortcut menu. The Default Properties window will appear again, but now the Bind UDTs (user-defined types) and Bind Columns buttons are available.
Click Bind UDTs to display the Bind Default To User-Defined Data Types dialog box, as shown in Figure 16-8. This dialog box displays all the user-defined data types. From this list, you can select the user-defined data type to which you want to bind the default. In Figure 16-8, we see the area_code and brand_type data types. If you have defined more data types, they will appear in your list as well. When you have finished, click Apply and then click OK to return to the Default Properties window. We will choose to not bind our default to a user-defined data type; we will bind it to a column instead, as shown in the next step.
- To bind the default to a column, click Bind Columns to display the Bind Default To Columns dialog box. Now select the column to which you want to bind the default. First select the table name in the Table drop-down list. Then, in the Unbound Columns list, select the column name to which you want to bind the default. Then click Add. (Figure 16-9 shows this dialog box after the phone column from the customer_data table was added to the Bound Columns list.)
- Click OK to return to the Default Properties window, and click OK again to close the Default Properties window.
Figure 16-8. The Bind Default To User-Defined Data Types dialog box.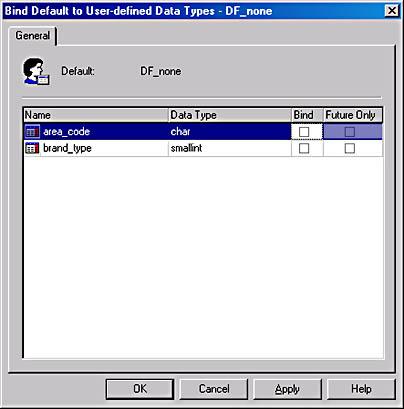
Figure 16-9. The Bind Default To Columns dialog box.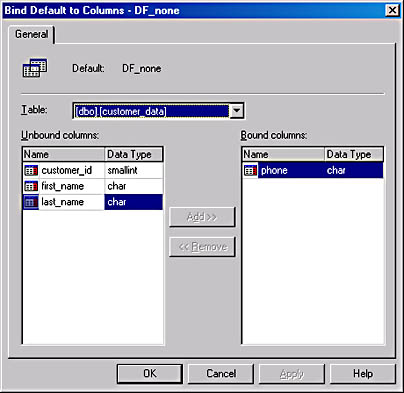
To unbind a Default object from a user-defined type, from the Default Properties window, open the Bind Default To User-Defined Data Types dialog box as described previously, and simply clear the Bind check box. To unbind a Default object from a column, open the Bind Default To Columns dialog box, select the column name, and then click Remove.
To delete a Default object, you must first unbind the default from all other objects (as was just described). SQL Server will return an error message if you try to delete a default that is bound to one or more objects. To delete a Default object, click Defaults in the left pane of Enterprise Manager, right-click the Default object name, choose Delete from the shortcut menu, and then click Drop All in the Drop Objects dialog box that appears.
EAN: N/A
Pages: 264